Digital Display 7 Segment Explained: Structure, Working & Applications
Digital display 7 segment — what exactly is it?
Digital display 7 segment technology is probably one of the first electronic display systems I ever learned about — and honestly, it still feels iconic. Whenever I see one glowing red on an old calculator or on a microwave timer, I get that familiar tech nostalgia.
Digital display 7 segment modules are one of the simplest and most widely used numeric display systems. You’ve seen them everywhere — clocks, elevators, digital meters, weighing scales, petrol pumps, and even in basic engineering lab projects.
I still remember the first time I wired a digital display 7 segment module on a breadboard. One wrong connection and all the segments flickered like a disco light. But when it finally displayed the number “5”, it felt like magic — simple magic, but still magic.
1. Understanding the Structure of a Seven Segment Display
When I say “digital display 7 segment,” I literally mean it:
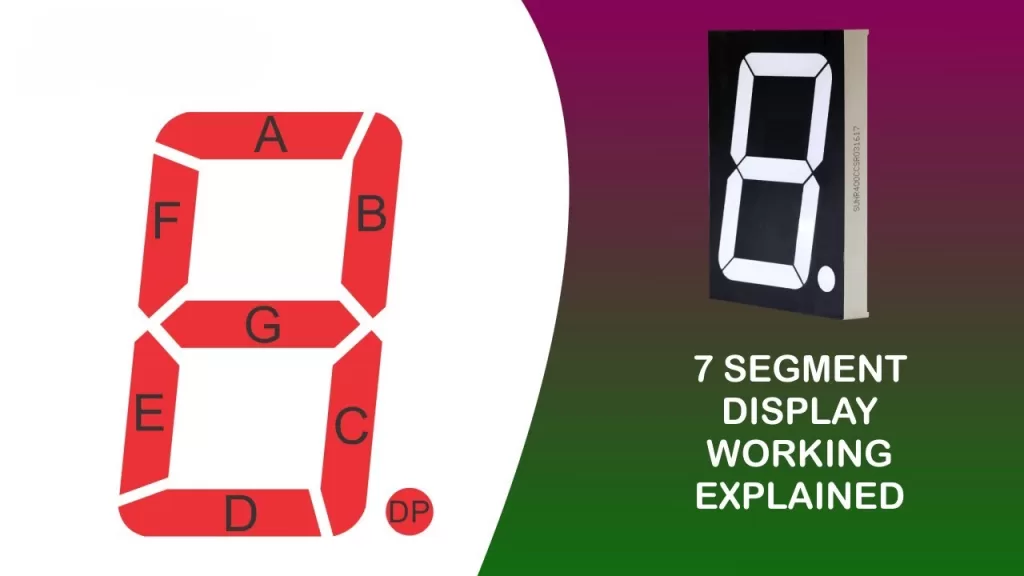
There are seven LED segments arranged in a figure-8 pattern.
These segments are labeled:
a, b, c, d, e, f, g
Each segment lights up independently to form numbers from 0 to 9.
If you light up all segments except one, the display changes.
It’s like playing with light-based Lego bricks.
🔹 Two Common Types
There are two popular versions, and I’ve worked with both:
1. Common Anode (CA)
All LED anodes are tied together.
You apply LOW to light a segment.
2. Common Cathode (CC)
All LED cathodes are tied together.
You apply HIGH to light a segment.
Most beginners prefer Common Cathode because turning ON a segment feels intuitive.
2. How a Digital Display 7 Segment Actually Works
The way a digital display 7 segment works reminds me of toggling small switches.
Each segment is basically an LED.
When electricity flows through a particular segment, it glows.
When it doesn’t, the segment stays dark.
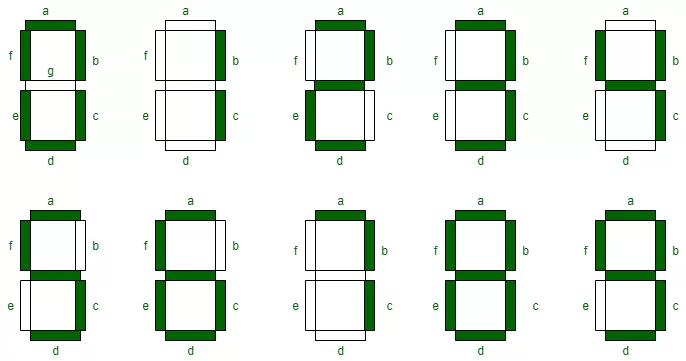
Let me give you a quick example:
To display the number 2, segments a, b, g, e, d turn ON.
For 8, all seven segments glow.
You control these segments using:
- Switches
- Microcontrollers like Arduino or PIC
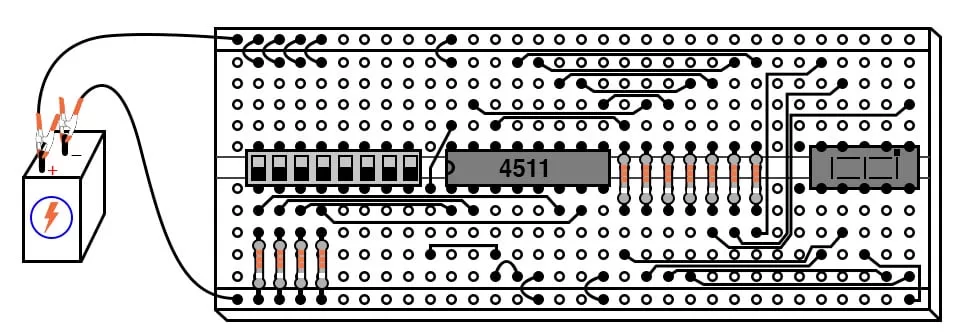
- Decoders like 7447 or 4511
If you’re working with a microcontroller, you simply send HIGH/LOW signals to each pin.
I still remember writing my first Arduino program to display a sequence.
Watching 0→1→2→3 in glowing red LEDs felt like building my own tiny time machine.
3. Pin Configuration — The Part Most Beginners Fear
A digital display 7 segment module usually comes with 10 pins, and trust me, remembering them the first time feels like memorizing a new phone number.
A typical pin layout has:
- 7 segment pins (a to g)
- 1 or 2 common pins (CA/CC)
The tricky part is that pin numbers differ between brands.
I’ve often ended up checking the datasheet twice after wiring something wrong.
🔸 Single Digit Display
One unit showing numbers 0–9.
Perfect for counters and basic lab circuits.
🔸 Multi-Digit Display
Two, three, or four-digit units used in clocks or timers.
However, they use multiplexing — lighting each digit really fast so your eyes see them all at once.
🔸 Hexadecimal Display
Displays A–F in addition to 0–9
Super useful in digital electronics courses.
5. Real-Life Applications (Where You’ve Already Seen Them)
Here’s where digital display 7 segment systems quietly do their job every day:
✔ Digital clocks
Every time you check the time on a digital wall clock, that’s a 7-segment display glowing.
✔ Calculators
The old-school ones still rely on seven glowing segments to give answers.
✔ Ovens & microwaves
Temperature, timer, countdown — all seven segment magic.
✔ Elevators
The floor number display? Yep — seven segment again.
✔ Fuel pumps
Lit-up digits showing litres and price.
✔ Weighing scales
Most simple electronic scales use the same display style.
Once you notice them, you can’t “un-see” them.
6. Advantages I Personally Love
- Super simple to understand — a great starting point for learners.
- Very reliable — these displays work for years.
- Low power consumption — LED-based designs are efficient.
- Cheap — costs less than a sandwich.
- Visible even in bright light — dependable in outdoor conditions.
If you’re teaching someone basic electronics, digital display 7 segment modules are perfect.
7. Limitations — Yes, Even Simple Things Have Flaws
Even though I love their simplicity, digital display 7 segment systems aren’t perfect.
- They only display numbers, not letters (except a few like A, b, C, d, E, F).
- Not suitable for showing long text or animations.
- Multi-digit displays need multiplexing — a bit tricky for beginners.
- Doesn’t look as modern as LCD or OLED panels.
Think of them like the classic Nokia phone — robust and reliable, but not fancy.
8. My Personal Experience: Why I Still Use Them
Even with fancy RGB displays around, I still use digital display 7 segment units in my projects. They remind me of the basics — the foundation of digital electronics.
Whenever someone new joins my lab or workshop, the first thing I make them build is a counter using a seven segment display.
Why?
Because once you understand how one LED lights up, you understand the logic behind all displays.
It’s a great confidence booster too.
If you can make a “7” glow on your first attempt?
You’re officially an electronics student now.
9. Final Thoughts
If you’re starting your electronics journey, the digital display 7 segment module is honestly one of the best places to begin. It’s simple enough for a beginner, powerful enough for real-world devices, and nostalgic enough to make you appreciate how far technology has come.
These displays may look old-school, but they taught many of us — including me — the fundamentals of digital circuits, LED driving, logic patterns, and microcontroller programming.
want to learn more?, kaashiv infotech offers, cloud computing course, networking course and more visit their website www.kaashivinfotech.com