Screenshots are more than just images of your screen; they are records, assistance, and fast saves. Whether you’re a learner taking capture of lecture slide, a developer finding error in debugging, or a normal person just sharing a funny meme, knowing how to take screenshot on Windows 11 could really save your time.
And yes – you don’t need to install any extra apps. Windows 11 already has a number of builtin tools.
🔑 Key Highlights
- 📸 Learn how to take screenshot on Windows 11 using built-in tools.
- ⌨️ Master shortcut keys like PrtSc, Win + Shift + S, and Alt + PrtSc.
- 🖼️ Discover how to take cropped screenshots for precision.
- 🛠️ Explore Snipping Tool and Xbox Game Bar for advanced use cases.
- 💡 Best practices from developers & professionals to stay productive.
1. The Fastest Way: Windows 11 Screenshot Shortcut Keys
If you’re in a hurry, keyboard shortcuts are your best friend. They’re instant and don’t require opening an app.
Here are the most useful ones:
- PrtSc (Print Screen) → Captures the whole screen and copies it to the clipboard. You can paste it directly into Paint, Word, or Slack.

- Alt + PrtSc → Captures only the active window. Great when you don’t want background clutter.

- Win + PrtSc → Captures the full screen and automatically saves it in
Pictures > Screenshots.

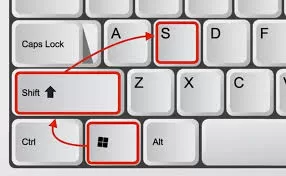
- Win + Shift + S → Opens the Snip & Sketch overlay where you can crop, free-form snip, or capture part of the screen.
👉 If you only remember one, Win + Shift + S is the hero shortcut.
2. How to Take a Cropped Screenshot on Windows 11
Sometimes you don’t need the whole screen. Maybe just a graph from Excel, or a bug in your code editor.
Here’s how:
- Press Win + Shift + S.
- Select Rectangular Snip (or Free-form).

- Drag over the area you want.
- The screenshot is copied to the clipboard and pops up as a notification. Click it to edit or annotate.
💡 Pro Tip (Developer Insight): Developers often use cropped screenshots when reporting bugs in Jira or GitHub issues. Cropping avoids exposing unrelated data and keeps the report professional.
3. Using Snipping Tool (The Upgraded Classic)
Windows 11 finally merged Snip & Sketch and Snipping Tool into a single app.
Why use it?
- Delay capture (3 or 10 seconds).
- Draw or annotate before saving.
- Save directly to PNG, JPG, or GIF.
It’s perfect when you need more control than shortcuts give.
4. Taking Screenshots While Gaming 🎮
Gamers often need to capture achievements or bugs. Windows 11 has the Xbox Game Bar for this.
- Press Win + G to open Game Bar.
- Click the camera icon or press Win + Alt + PrtSc.
- Screenshots are saved automatically in
Videos > Captures.
Fun fact: According to Microsoft’s 2023 usage report, over 20% of Game Bar users capture more screenshots than gameplay videos.
5. Best Practices for Professionals
Screenshots are not just pictures—they’re communication tools.
- ✅ Always crop before sharing → Keeps focus and hides sensitive info.
- ✅ Use annotations → Arrows, highlights, and notes make screenshots more useful.
- ✅ Save in PNG for clarity → Especially important for charts, code, or UI designs.
- ✅ Organize folders → Keep work-related screenshots separate from personal ones.
📊 Real-world example: Tech support teams often annotate screenshots with arrows and circles. This reduces back-and-forth emails and can cut troubleshooting time by up to 40%.
6. Alternatives: Third-Party Screenshot Tools
If built-in tools feel limiting, third-party apps give you superpowers:
- ShareX (free, open-source) → Automation, GIF capture, direct uploads.
- Lightshot → Simple editing and cloud sharing.
- Greenshot → Lightweight and great for workflow automation.
These are widely used by developers and designers who need more than Windows offers.
7. FAQs on How to take screenshot in Windows 11
Q. How do I take a screenshot directly to a file in Windows 11?
Use Win + PrtSc. The screenshot saves automatically in the Pictures > Screenshots folder.
Q. What’s the windows 11 screenshot shortcut for cropped screenshots?
Win + Shift + S → lets you select part of the screen.
Q. Can I record my screen instead of screenshots?
Yes, use the Xbox Game Bar (Win + G) or third-party apps like OBS Studio.
Final Thoughts
Learning how to take screenshot on Windows 11 is like learning to ride a bike—you’ll wonder how you ever lived without it. From quick shortcuts to advanced Snipping Tool tricks, the right method depends on what you’re doing—debugging code, teaching, gaming, or just sharing memes.
Remember:
- Use shortcuts for speed.
- Use Snipping Tool for precision.
- Use third-party tools for power.
Now the next time someone asks “hey, how do you screenshot on Windows 11?”—you’ll not only know the answer, you’ll know the best practice behind it.
📚 Related Reads
- How to Take Screenshot in Windows 10: 4 Simple Ways – Compare how Windows 10 screenshot methods evolved into Windows 11.
- 5 Best Screenshot Apps for Android – Top Android apps for quick and reliable screenshots.
- 7 Easy Ways to Take a Screenshot on a Mac – Simple step-by-step guide for macOS users.
- How to Take a Screenshot via a Python Script in Linux – Automate screenshots on Linux using Python.
- How to Change Default Screenshot Location on Mac – Organize and manage your Mac screenshots better.
- 11 Best Screen Capture Software and Screenshot Tools – A roundup of powerful tools beyond the default snipping tool.
- Microsoft Official: Take screenshots on Windows 11