7 Simple Ways to Create Data Validation Rules in Excel

Excel data validation is one of those features I wish someone had told me about much earlier. If you work with spreadsheets even a little, knowing excel data validation can save you from messy data, wrong entries, and those tiny mistakes that eventually become big headaches.
And since you’re here, I’m guessing you want the fastest, most practical way to understand how to create data validation rules in Excel—without jargon and without boring theory.
So let’s jump right in.
Within the next few minutes, you’ll know exactly how I use this feature to avoid chaos in my daily work.

What Is Excel Data Validation?
I’ll be honest: before I learned about excel data validation, my sheets were a complete jungle. People typed whatever they wanted—numbers where text should be, dates in strange formats, sometimes even emojis (I’m not kidding).
excel data validation lets you control what users can type in a cell.
Nothing fancy. Just clean, predictable, error-free data.
Here’s what you can control:
- Only numbers (within a range)
- Only names from a list
- Only specific dates
- Only text of specific length
- Only unique values
- Custom rules with formulas
It’s like putting guardrails on your spreadsheet so nobody flies off the cliff .

1. How to Create Simple List-Based Excel Data Validation
Sometimes, I want people to select from only a few choices.
For example: Product Type = Mobile, Laptop, Tablet.
Here’s what I do:
- Select the cell(s).
- Go to Data → Data Validation.
- Choose List.
- Type values like this:
Mobile, Laptop, Tablet - Hit OK.
Where I use this:
Team attendance sheets, status updates, category filtering.

2. Number Validation Rules
Have you ever had someone enter “Ten” instead of “10”?
I have. More times than I want to admit.
With excel data validation, I set rules like:
- Only numbers between 1 and 100
- Only whole numbers
- Only decimal values
- Only positive numbers
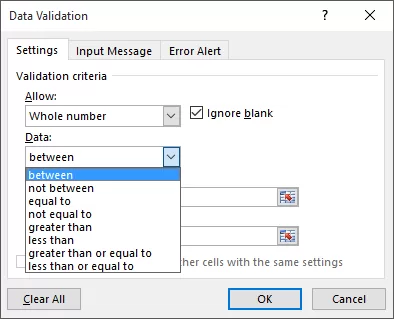
Steps:
- Select the data area.
- Data → Data Validation → Whole Number or Decimal.
- Add min and max limits.
- Press OK.
I use this for budgeting sheets, quantity inputs, and scoring tools.

3. Date Validation Rules -Great for Schedules & Forms 📅
When I create project trackers, people often enter dates outside the plan range.
That’s where excel data validation saves the day.
You can restrict:
- Only future dates
- Only past dates
- Only dates within a project timeline
Example:
- Allow only dates from
1-Jan-2024to31-Dec-2024.
This keeps your timelines consistent.
4. Text Length Validation (Useful for IDs, Phone Numbers, Codes)
Ever seen phone numbers typed as 7 digits, 14 digits, and sometimes even “hello”?
I have.
Text length rules solve that.
Steps:
- Data → Data Validation.
- Choose Text Length.
- Choose “equal to” → type 10 (for phone numbers).
Now users can’t type more or less. It’s a gentle nudge toward accuracy

5. Custom Formula-Based Excel Data Validation 🧠
This is where things get interesting.
You can write formulas to create your own rules.
Examples:
- Only allow text starting with “KA_”
- Only allow unique values
- Only allow numbers greater than another cell
One of my favorite rules:
=COUNTIF($A$1:$A$100, A1)=1
This ensures all entries are unique.
If someone tries to repeat a value, Excel politely says, “Nope.”
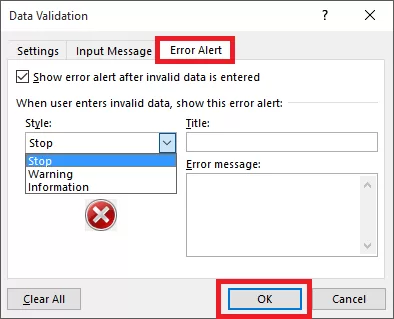
6. Create Input Messages & Error Alerts
Most people skip this part, but it makes your sheet feel thoughtful and user-friendly.
Input messages tell users what to enter.
Example:
“Enter quantity between 1 and 50.”
Error alerts show messages when they enter something invalid.
I like adding friendly messages like:
❌ “Oops! This value doesn’t fit the rule. Try again ”
It makes the process smoother and less intimidating.
7. Using Excel Data Validation With Tables -Dynamic & Clean
If you work with growing data, this is a lifesaver.
When you turn your data into a table (Ctrl + T), your dropdown ranges adjust automatically.
So when you add new items to your product list, your dropdown updates instantly.
This is one of the reasons I don’t build dashboards without tables anymore.
Real-Life Example: How Excel Data Validation Saved Me From a Huge Mistake
A few months back, I was creating a price list for a client.
One of my teammates accidentally entered “20000” instead of “2000”.
If I had sent that file, the client would’ve fainted—and my boss would’ve roasted me like a peanut .
After that day, I put excel data validation rules on every number column.
No more wrong zeros.
No more panic attacks.
Just clean, reliable data.
Best Practices I Learned Over Time
Here’s what I follow now:
- Keep rules simple.
- Add clear messages.
- Use tables for dynamic lists.
- Protect your sheet after applying rules.
- Document rules in a small note nearby.
These tiny habits changed my productivity more than I expected.
Frequently Asked Questions
❓ Can you apply multiple validation rules at once?
Not directly.
But you can use a custom formula to combine several rules.
❓ Can you copy/paste cells with validation?
Yes!
But be careful—pasting regular data may remove validation rules.
❓ Does validation work on shared Excel files?
Yes, but testing before sharing is always a good idea.
Final Thoughts: Excel Data Validation Is Your Best Friend
If you want cleaner sheets, fewer mistakes, and smoother teamwork, you need to use excel data validation. It’s simple, powerful, and honestly—once you get used to it, you’ll wonder how you ever survived without it.
Use it for:
- Forms
- Dashboards
- Reports
- Team sheets
- Data entry
- Anything that needs accuracy
And remember—every minute you spend setting validation rules saves you ten minutes of fixing errors later.
want to learn more?, kaashiv infotech offers, excel course , Data Analytics ,Excel for Beginners, and more visit their website www.kaashivinfotech.com