visual studio tutorial - Snippets in Visual Studio - microsoft studio - microsoft visual
Snippets
Intoduction
- Since Visual Studio 2005 can you make Intellisense Code Snippets. This allow you to generate some code just by typing one keyword and press two times the tab key.
Using the code
- The XML code you need for make an Intellisense Code Snippet stands below:
<?xml version="1.0" encoding="utf-8"?>

<CodeSnippets xmlns="http://schemas.microsoft.com/VisualStudio/CodeSnippet">
  <CodeSnippet Format="1.0.0"> <!-- format attribute is required -->

    <Header> <!-- 1 -->
      <Title></Title>
      <Author></Author>
      <Shortcut></Shortcut>
      <Description></Description>
      <Keywords>
        <Keyword>abc<Keyword>
        <Keyword>def<Keyword>
      </keywords>
    </Header>

    <Snippet> <!-- 2 -->

      <Imports> <!-- 2.1 -->
        <Import>
          <Namespace>System</Namespace>
        </Import>
      </Imports>

      <Declarations> <!-- 2.2 -->
        <Literal Editable="true/false"> <!-- 2.2.1 -->
          <ID>example</ID>
          <Type>System.String</Type>
          <ToolTip>A tip you can show</ToolTip>
          <Default>default value</Default>
          <Function></Function> <!-- 2.2.2 -->
        </Literal>

        <Object> <!-- 2.2.1 -->
          <ID>example</ID>
          <Type>System.String</Type>
          <ToolTip>A tip you can show</ToolTip>
          <Default>default value</Default>
          <Function></Function> <!-- 2.2.2 -->
        </Object>
      </Declarations>

      <References> <!-- 2.3 -->
        <Reference>
          <Assembly>System.Data.dll</Assembly>
        </Reference>
      </References>

      <Code Language=""> <!-- 2.4 -->
        <![CDATA[
            <!-- your code here if you use literals use dollar chars  -->
        ]]>
      </Code>

    </Snippet>

  </CodeSnippet>
</CodeSnippets>
click below button to copy the code. By Visual studio tutorial team
- In the snippet tag, you have two required tags named Header and Snippet. You can find more information in next headings. The number near the name are correspondents with the numbers in the code above.
There can be zero or more CodeSnippet elements added into the CodeSnippets element.
1. Header
- In the Header-tag, you can place some specific information about the snippet and what he does. The important tags you can use inside this tag are:
| Element | Description |
|---|---|
| Title | The title of the snippet. This attribute is required. |
| Author | The author of the snippet. |
| Shortcut | Is the shortcut, you can use for generating the code. Note that this can only contain letters and numbers and must begin with a letter. Note: Remember also to give the snippet a good and unique name and shortcut. Otherwise, it will give problems when you import the snippet into Visual Studio. |
| Description | Gives more information about the snippet if you need that. |
| HelpUrl | A url for a help page on the internet. |
| Keywords | Groups one or more keyword elements. |
| SnippetTypes | Groups SnippetType elements. This element contain a text value and must be one of the following values. Snippet types are merged with a forward slash.
|
2. Snippet
In the snippet tag, you can use three different tags. This can be:
- Imports
- Declarations
- Code (required)
- References
These are explained below.
2.1 Imports
- Imports contain the needed namespaces you need for the code. Use the import-tag inside this tag and here you can place the needed namespaces each with the Namespace-tag.
2.2 Declarations
- Declarations can be used for declaring some literals or objects into your code in the Code-tag. The children are literals and objects.
2.2.1 Literals and objects
- Literals and objects define the literals and objects of the code snippet that you can edit. Functionality are literals and objects are the same, but it has an additional type constraint.
The Literal and object-tag can contain next children:
- ID: The ID of the literal (required)
- Type: The type of that object including namespace and class (required by objects)
- ToolTip: Gives a tip
- Default: A default value of that object (required)
- Functions
In the snippets, there are some predefined literals. They are listed below:
2.2.2 Functions
- Functions in the Literal- or Object-tag means that you can use a function for generating code depending on another element. There are three functions that I know:
| Function | Description | Language |
|---|---|---|
| GenerateSwitchCases (EnumerationLiteral) |
for the members of the enumeration specified by the EnumerationLiteral parameter. to an enumeration literal or an enumeration type. |
Visual C# and Visual J#1 |
| ClassName() | Returns the name of the class that contains the inserted snippet. | Visual C# and Visual J#1 |
| SimpleTypeName (TypeName) |
Reduces the TypeName parameter to its simplest form in the context in which the snippet was invoked. |
Visual C# |
Attributes for the Literal and Object Elements
- The Literal and Object tags can have some optional attributes.
| Attribute | Description | Type |
|---|---|---|
| Editable | Specifies whether or not you can edit the literal after the code snippet is inserted. The default value of this attribute is true. |
Boolean |
2.3 References
Groups reference elements that contains information about assembly references for the code snippet. This can contain next elements:
- Assembly: Contains the name of the assembly by the code snippet (required)
- Url: Contains a website that gives more information about the assembly
2.4 Code
- Code is the code you will generate between . Place the ID of your literal between dollar chars and Visual Studio will ask you for change these default value if the declarations are filled in. Here, you've an example for C# and VB for the shortcut propfull.
<!-- ... Other code ... -->
<Declarations>
  <Literal>
    <Id>variablename</Id>
    <Default>_myproperty</Default>
  </Literal>

  <Literal>
    <Id>propertytype</Id>
    <Default>int</Default>
  </Literal>

  <Literal>
    <Id>propertyname</Id>
    <Default>myproperty</Default>
  </Literal>
</Declarations>

<Code Language="CSharp">
  <![CDATA[
    private $propertyvalue$ $variablename$;

    public $propertyvalue$ $propertyname$
    {
        get { return $variablename$; }
        set { $Variablename$ = Value; }
    }
  ]]>
</Code>

<!-- ... Other code ... -->

<Declarations>
  <Literal>
    <Id>variablename</Id>
    <Default>_myproperty</Default>
  </Literal>

  <Literal>
    <Id>propertytype</Id>
    <Default>int</Default>
  </Literal>

  <Literal>
    <Id>propertyname</Id>
    <Default>myproperty</Default>
  </Literal>
</Declarations>

<Code Language="VB">
  <![CDATA[
    Private $variablename$ As $propertyvalue$

    Public Property $propertyname$ As $propertyvalue$
        Get
            Return $variablename$
        End Get

        Set (ByVal value As $propertyvalue$)
            $variablename$ = value
        End Set
    End Property
  ]]>
</Code>

<!-- ... Other code ... -->
click below button to copy the code. By Visual studio tutorial team
In the required Language attribute, you can define your language where you are making the snippet. You can find the languages you can use in the next table.
| Language | Keyword | Available in next versions |
|---|---|---|
| Visual C# | CSharp | 2005, 2010, 2012 and later |
| Visual Basic | VB | 2005, 2010, 2012 and later |
| XML | XML | 2005, 2010, 2012 and later |
| Visual J# | VJSharp | 2005, 2012 and later |
| C++ | CPP | 2012 and later |
| JavaScript | JavaScript | 2012 and later |
| JScript | JScript | 2012 and later |
| SQL | SQL | 2012 and later |
| HTML | HTML | 2012 and later |
| CSS | CSS | 2012 and later |
| XAML | XAML | 2012 and later |
Other optional attributes are:
| Attribute | Description |
|---|---|
| Delimiter | Specifies the delimiter used to describe literals and objects in the code. By default, the delimiter is $ |
| Kind | Specifies the kind of code that the snippet contains and, therefore, the location at which a code snippet must be inserted for the code snippet to compile. |
The valid values for the kind variable are:
| Value | Description |
|---|---|
| method body | Specifies that the code snippet is a method body, and therefore, must be inserted inside a method declaration. |
| method decl | Specifies that the code snippet is a method, and therefore, must be inserted inside a class or module. |
| type decl | Specifies that the code snippet is a type, and therefore, must be inserted inside a class, module, or namespace. |
| file | Specifies that the snippet is a full code file. These code snippets can be inserted alone into a code file, or inside a namespace. |
| any | Specifies that the snippet can be inserted anywhere. This tag is used for code snippets that are context-independent, such as comments. |
Import Snippet into Visual Studio
- Save the XML code and give it the extension .snippet.
- You can add the new made snippet into Visual Studio by pressing Control + K, Control + B or go to "Tools" → "Code Snippets Manager...". This open next window:
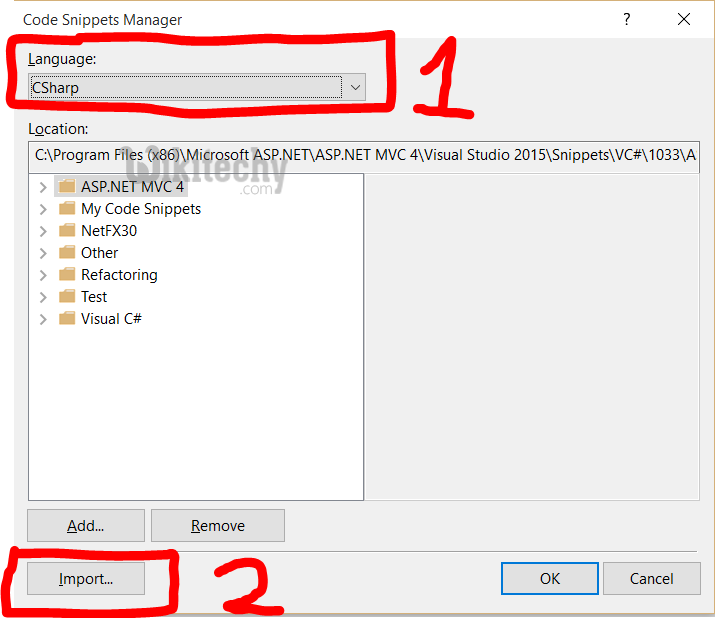
Learn Visual Studio - Visual Studio tutorial - Code snippets Manager - Visual Studio examples - Visual Studio programs
- Choose the language into the combo box for which language you've made the snippet. click on "Import..." and choose the file you've made.

Learn Visual Studio - Visual Studio tutorial - import code snippet - Visual Studio examples - Visual Studio programs
Click on "Finish". If the file name already has been used, Visual Studio go ask to override the existing file. You've three options:
- Overwrite: Overwrites the file. You can use this option if you will edit an old snippet.
- Rename: Goes to rename the file to an unique name.
- Skip: Cancels the import. Renames the file to a unique name.
You could also add a new location with all the snippets you've made by clicking on the "Add..." button on the first window and select the folder in the "select folder window". The advantage is now when a new valid snippet is added in that folder, you can use this directly in Visual Studio.
Note: Test after importing your snippet for errors, so you don't have any problems when you use the snippet. You can always remove or overwrite the snippet if there is an error.