
How to Enable Android 11’s Native Screen Recording in Android 10 without Root
Introduction
- If your device is running Android 10, you almost certainly don’t get to download and install a third-party app to record your phone’s screen anymore. Google’s Android 11 Developer Preview comes with an in-built screen recorder. Apparently, Android 10 has this feature too. During this guide, you’ll find out how to enable Android 11’s Native Screen Recording in Android 10 without root.
- Note: This feature is currently experimental and has bugs in Android 10. If you own a Pixel device, you’ll install Android 11 Dev Preview, wherein the feature works fully.
- When the primary beta version of Android Q was released last year, it had been discovered that it had a hidden screen recording feature. The feature, at that point, could easily be enabled using the ‘settings_screenrecord_long_press‘ feature flag in Android 10’s Developer Options. Online publishers like GadgetHacks, alongside many others also covered a tutorial on the way to enable it.
- However, it had been later removed within the following beta updates and never made it to the stable Android 10 update either. It clearly indicated that Google had planned on including this feature within the next major Android version, that’s Android 11 (R). because it seems to be true, Google just pushed the primary developer preview of Android 11 and it comes with the screen recording feature built right into the system.
Android 11 Screen Recording Feature in Android 10
- Redditor u/Xenofastiq found that the built-in screen recording feature started working again on his Pixel 2 unit running Android 10 software with January 2020 security update. But unlike before, this couldn’t be enabled using the flag within the device’s developer option. Another Redditor u/Hung_L shared an ADB shell command that would easily the feature.
- So, you’ll now enable Android 11’s screen recording feature in Android 10 using ADB and without rooting your device. we’ve already tested the tactic on our Pixel 3 XL and may confirm that it works and enables the feature flawlessly. It should probably also work on other Android 10 devices too, just like the Pixel 4 and Essential PH-1.
- Before you proceed with the instructions, confirm that you simply have installed and found out ADB on your PC and enabled USB debugging on your Android 10 device.
Important Note: The very fact that the feature still remains hidden, means it’s not fully ready for a mean user, and contain bugs. If you’re really curious about trying it out, then sure, just plow ahead and follow the instructions. It’s not like it’s getting to do any harm.
Table Of Content
Instructions to Enable Android 11’s Native Screen Recorder in Android 10
The only requirement to enable Android 11’s native screen recording is that your phone should be running the Android 10-based January 2020 security update or later.
- First, connect your Android 10 device to the PC using the USB cable.
- Confirm that USB debugging is enabled on the device.
- On your Windows PC, attend the folder where ADB is installed (e.g. C:\platform-tools). Then while holding the SHIFT key, right-click on any empty space inside the folder and choose the ‘Open PowerShell window here’ option.

- If you’re using macOS/Linux, launch the Terminal and alter its directory to the folder where ADB is installed (e.g. /Documents/platform-tools):
5. Now, enter the subsequent command to make sure that your device is being properly detected by the PC over ADB:
Windows Powershell:
[pastacode lang=”bash” manual=”.%5Cadb%20devices” message=”” highlight=”” provider=”manual”/]macOS/Linux:
[pastacode lang=”bash” manual=”.%2Fadb%20devices” message=”” highlight=”” provider=”manual”/]6. The command should return a tool ID.
7. Finally, enter the subsequent ADB command to enable Android 11’s native screen recording feature in Android 10:
Windows Powershell:
[pastacode lang=”bash” manual=”.%5Cadb%20shell%20settings%20put%20global%20settings_screenrecord_long_press%20true” message=”” highlight=”” provider=”manual”/] macOS/Linux:
- The ADB shell command mentioned above basically activates the hidden flag within the device settings. an equivalent flag that was discovered within the early Android Q beta.
- Once enabled, the feature will stay even through reboots, unless you factory reset your device or flash the stock firmware thereon.
How to Record Screen in Android 10
- Now that you simply have enabled the feature on your Android 10 device, you’ll start using it to record your phone’s screen.
- The option has been hidden right your device’s Power Menu. So, just long-press the power button until the menu appear. You ought to see the facility, Reboot, Screenshot, and Emergency options. Simply long-press on the ‘Screenshot’ button until a replacement window pops up.
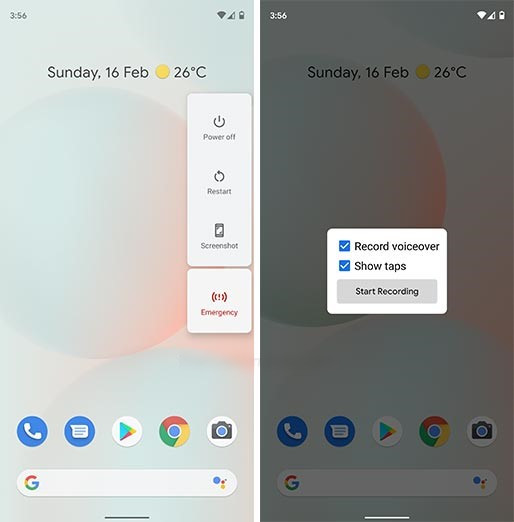
- The Android 10 screen recorder offers two options –
(1) To record voice using the device’s microphone, and
(2) show taps when recording the screen.
- Now press the ‘Start Recording button’. As soon as you press it, you ought to see a precautionary warning on the screen about how you’ll expose sensitive information during the recording process. If you are feeling comfortable and sure, just tap the ‘Start Now’ button to finally start recording your device’s screen.
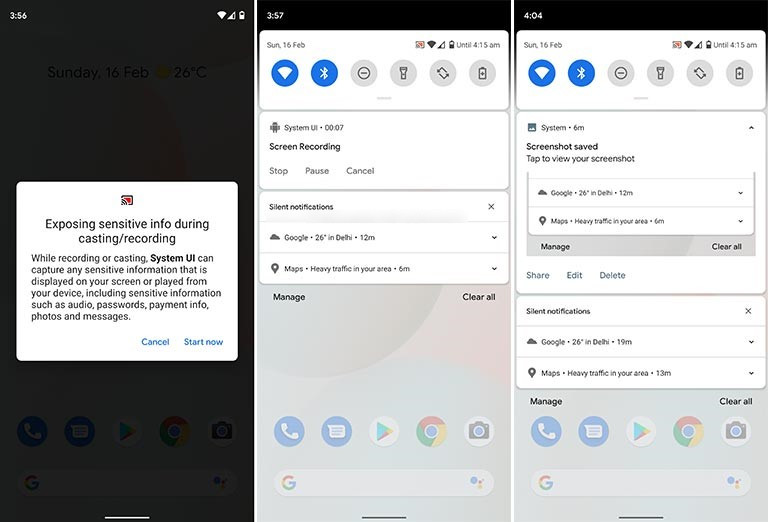
- Pull down the notification tray and tap on ‘Stop’ after recording. The system will process the recorded screen video. you’ll then share it using the ‘Share’ button.
There’s a known bug!
- Like we mentioned earlier, the feature isn’t fully able to make its thanks to the settings. In our period of testing, we acknowledged that only the highest half our device’s screen was recorded. We aren’t alone, several other users have reported an equivalent on Reddit. While there have been others who didn’t face this issue. So, be prepared and good luck!
- The feature is unquestionably very useful in several scenarios. It took Google quite a while to understand and accommodate it.


