Flask Mail Extension
- It provides the simple interface for the developer and the email server to send the email through the web application.
- There are several extensions to the flask like Mail, WTF, SQLite, SQLAlchemy, etc. which facilitates the developer to provide some basic facilities to the user.
| S. No | Parameters & Description |
|---|---|
| 1 | MAIL_SERVER - Name/IP address of email server. The Default is localhost |
| 2 | MAIL_PORT - Port number of server used. Default Port Number 25. |
| 3 | MAIL_USE_TLS - Enable/disable Transport Security Layer description. The Default Value is False. |
| 4 | MAIL_USE_SSL - Enable/disable Secure Sockets Layer encryption. The Default Value is False. |
| 5 | MAIL_DEBUG - Debug support to the mail application. Default Value is None. |
| 6 | MAIL_USERNAME - User name of sender. Default Value is None. |
| 7 | MAIL_PASSWORD - It represents the password of the server emailid. Default Value is none. |
| 8 | MAIL_DEFAULT_SENDER - Sets default sender id for multiple emails. The Default value is none. |
| 9 | MAIL_MAX_EMAILS - Sets maximum mails to be sent. The Default Value is None. |
| 10 | MAIL_SUPPRESS_SEND - Sending the mail is suppressed if app.testing set to true |
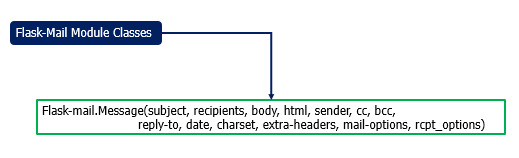
Flask-Mail Module Classes
Mail Extension
Message class
- The Message class binds the email message into the one simple Message class instance so that the important methods like attach() can be called on this instance.
Syntax
Flask-mail.Message(subject, recipients, body, html, sender, cc, bcc, reply-to, date, charset, extra-headers, mail-options, rcpt_options)
- There are the following methods that can be called on the Message class object.
- attach(filename, content_type, data, disposition): This method is used to send the attachments with the message. It accepts the name of the file, MIME type of file, raw file data, and the content disposition.
- add_recipient(): It is used to add the recipient to the message.
Mail Class
- It is used to send the email. This class is instantiated by passing the application object to the Mail class constructor.
Syntax
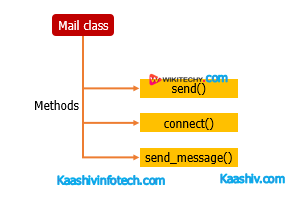
Mail Class
Flask-mail.Mail(app=None)
- The Mail class contains the following methods.
- send(): It sends the message object content to the recipient.
- connect(): It is used to open the connection with mail host.
- send_message(): It is used to send the message object.
Process of sending email using flask web application
- Step 1: import the required module like flask-mail, flask using from-import statement.
from flask import *
from flask-mail import * - Step 2: Configure the Flask Mail.
app.config['MAIL_SERVER']='smtp.gmail.com'
app.config['MAIL_PORT']=465
app.config['MAIL_USERNAME'] = 'admin@gmail.com'
app.config['MAIL_PASSWORD'] = '******'
app.config['MAIL_USE_TLS'] = False
app.config['MAIL_USE_SSL'] = True
- Step 3: Instantiate the Mail class.
mail = Mail(app)
- Step 4: Instantiate the Message class with the desired attributes in the function mapped by some URL rule.
@app.route('/')
def index():
    msg = Message('subject', sender = 'admin@gmail.com', recipients=['username@gmail.com'])
    msg.body = 'hi, this is the mail sent by using the flask web application'
    return "Mail Sent, Please check the mail id"
Read Also
Sample Code
- The following example contains a python script where we send the email to the given email id.
Mailer.py
from flask import *
from flask-mail import *

app = Flask(__name__)

#Flask mail configuration
app.config['MAIL_SERVER']='smtp.gmail.com'
app.config['MAIL_PORT']=465
app.config['MAIL_USERNAME'] = 'admin@gmail.com'
app.config['MAIL_PASSWORD'] = '******'
app.config['MAIL_USE_TLS'] = False
app.config['MAIL_USE_SSL'] = True

#instantiate the Mail class
mail = Mail(app)

#configure the Message class object and send the mail from a URL
@app.route('/')
def index():
    msg = Message('subject', sender = 'admin@gmail.com', recipients=['username@gmail.com'])
    msg.body = 'hi, this is the mail sent by using the flask web application'
    return "Mail Sent, Please check the mail id"

if __name__ == '__main__':
   app.run(debug = True)
Email verification in flask using OTP
- In the Web applications, Email is confirmed using the one time password created randomly by the program. In this model, we will make a python script that accepts the client's email id as the input from the user and send an email containing the automatically produced (4-digit) one time password.
- For the confirmation of the email-id, the user is needed to enter the otp sent to the referenced email id. In the event that the OTP entered by the user is matched with the randomly created OTP, at that point the email-id is successfully verified, and the success message is shown to the user in any case the confirmation is failed, and the failure message is appeared to the used.
Mailer.py
from flask import *
from flask_mail import *
from random import *

app = Flask(__name__)
mail = Mail(app)

app.config["MAIL_SERVER"]='smtp.gmail.com'
app.config["MAIL_PORT"] = 465
app.config["MAIL_USERNAME"] = 'username@gmail.com'
app.config['MAIL_PASSWORD'] = '*************'
app.config['MAIL_USE_TLS'] = False
app.config['MAIL_USE_SSL'] = True

mail = Mail(app)
otp = randint(000000,999999)

@app.route('/')
def index():
    return render_template("index.html")

@app.route('/verify',methods = ["POST"])
def verify():
email = request.form["email"]
    msg = Message('OTP',sender = 'username@gmail.com', recipients = [email])
    msg.body = str(otp)
    mail.send(msg)
    return render_template('verify.html')

@app.route('/validate',methods=["POST"])
def validate():
    user_otp = request.form['otp']
    if otp == int(user_otp):
        return "<h3>Email verified successfully</h3>"
    return "<h3>failure</h3>"

if __name__ == '__main__':
    app.run(debug = True)
index.html
<!DOCTYPE html>
<html>
<head>
    <title>index</title>
</head>
<body>
<form action = "http://localhost:5000/verify" method = "POST">
Email: <input type="email" name="email">
<input type = "submit" value="Submit">
</form>
</body>
</html>
verify.html
<!DOCTYPE html>
<html>
<head>
    <title>OTP Verification</title>
</head>

<body>

<form action = "/validate" method="post">

<h4> One-time password has been sent to the email id. Please check the email for the verification.</h4>

Enter OTP: <input type="text" name="otp">

<input type="submit" value="Submit">

</form>
</body>
</html>
Output
- The user to enter the email_id and password. The script Mailer.py will send an email containing the one-time password to the email id entered by the user.
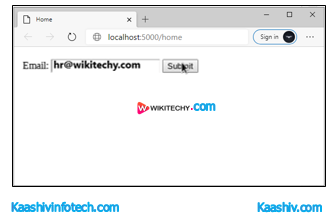
Mail Extension Home
- Now, the user is prompted to enter the OTP sent to the specified email.
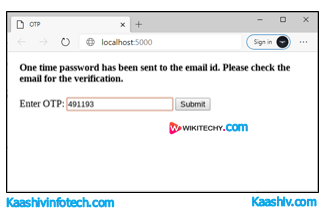
Mail-OTP
- The validate() function matches the OTP entered by the user with the one which was randomly generated and mailed to the user's email id. In this case, OTP is matched; therefore the user will get the success message as display in the following image.
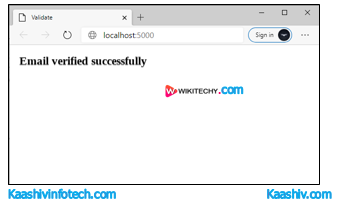
Validate
Bulk Emails
In this case we need to send bulk of emails or multiple emails in a single connection. In that case, we can make use of the python with the statement which closes the connection object automatically once all the emails are sent.
Sample Code
from flask import *
from flask_mail import *

app = Flask(__name__)

app.config["MAIL_SERVER"]='smtp.gmail.com'
app.config["MAIL_PORT"] = 465
app.config["MAIL_USERNAME"] = 'admin@gmail.com'
app.config['MAIL_PASSWORD'] = '******'
app.config['MAIL_USE_TLS'] = False
app.config['MAIL_USE_SSL'] = True

users = [{'name':'john','email':'john@gmail.com'},{'name':'wikitechy','email':'wikitechy@wikitechy.com'},{'name':'divya','email':'divya@gmail.com'}]

mail = Mail(app)

@app.route("/")
def index():
    with mail.connect() as con:
        for user in users:
            message = "hello %s" %user['name']
            msgs = Message(recipients=[user['email']],body = message, subject = 'hello', sender = 'divya@gmail.com')
            con.send(msgs)
    return "Sent"
if __name__ == "__main__":
    app.run(debug = True)
Adding attachments with the mail
Flask enables us to send the attachment with the mail. For this case, we need to open the resource using the open_resource() method of Flask class.
Syntax
with app.open_resource("image.png") as fp:
    msg.attach("image.png", "image/png", fp.read())
mailer_attach.py
from flask import *
from flask_mail import *

app = Flask(__name__)

app.config["MAIL_SERVER"]='smtp.gmail.com'
app.config["MAIL_PORT"] = 465
app.config["MAIL_USERNAME"] = 'admin@gmail.com'
app.config['MAIL_PASSWORD'] = '********'
app.config['MAIL_USE_TLS'] = False
app.config['MAIL_USE_SSL'] = True

mail = Mail(app)

@app.route("/")
def index():
    msg = Message(subject = "hello", body = "hello", sender = "admin@gmail.com", recipients = ["wikitechy@wikitechy.com"])
    with app.open_resource("/home/wikitechy/Desktop/galexy.jpg") as fp:
        msg.attach("galexy.jpg","image/png",fp.read())
        mail.send(msg)
    return "sent"

if __name__ == "__main__":
    app.run(debug = True)
If you want to learn about Python Course , you can refer the following links Python Training in Chennai , Machine Learning Training in Chennai , Data Science Training in Chennai , Artificial Intelligence Training in Chennai