Selenium Tutorial - Selenium Automation Testing - Selenium Webdriver Tutorial
Now lets see how to create our first project in apache netbeans and learn how to test an webapplication using selenium and java.
- Download & Install JDK to Automate Selenium WebDriver
- Steps To Install Apache NetBeans
- Steps To Install Selenium WebDriver
- Steps To Create A Project In Apache NetBeans
- Test Scenarios
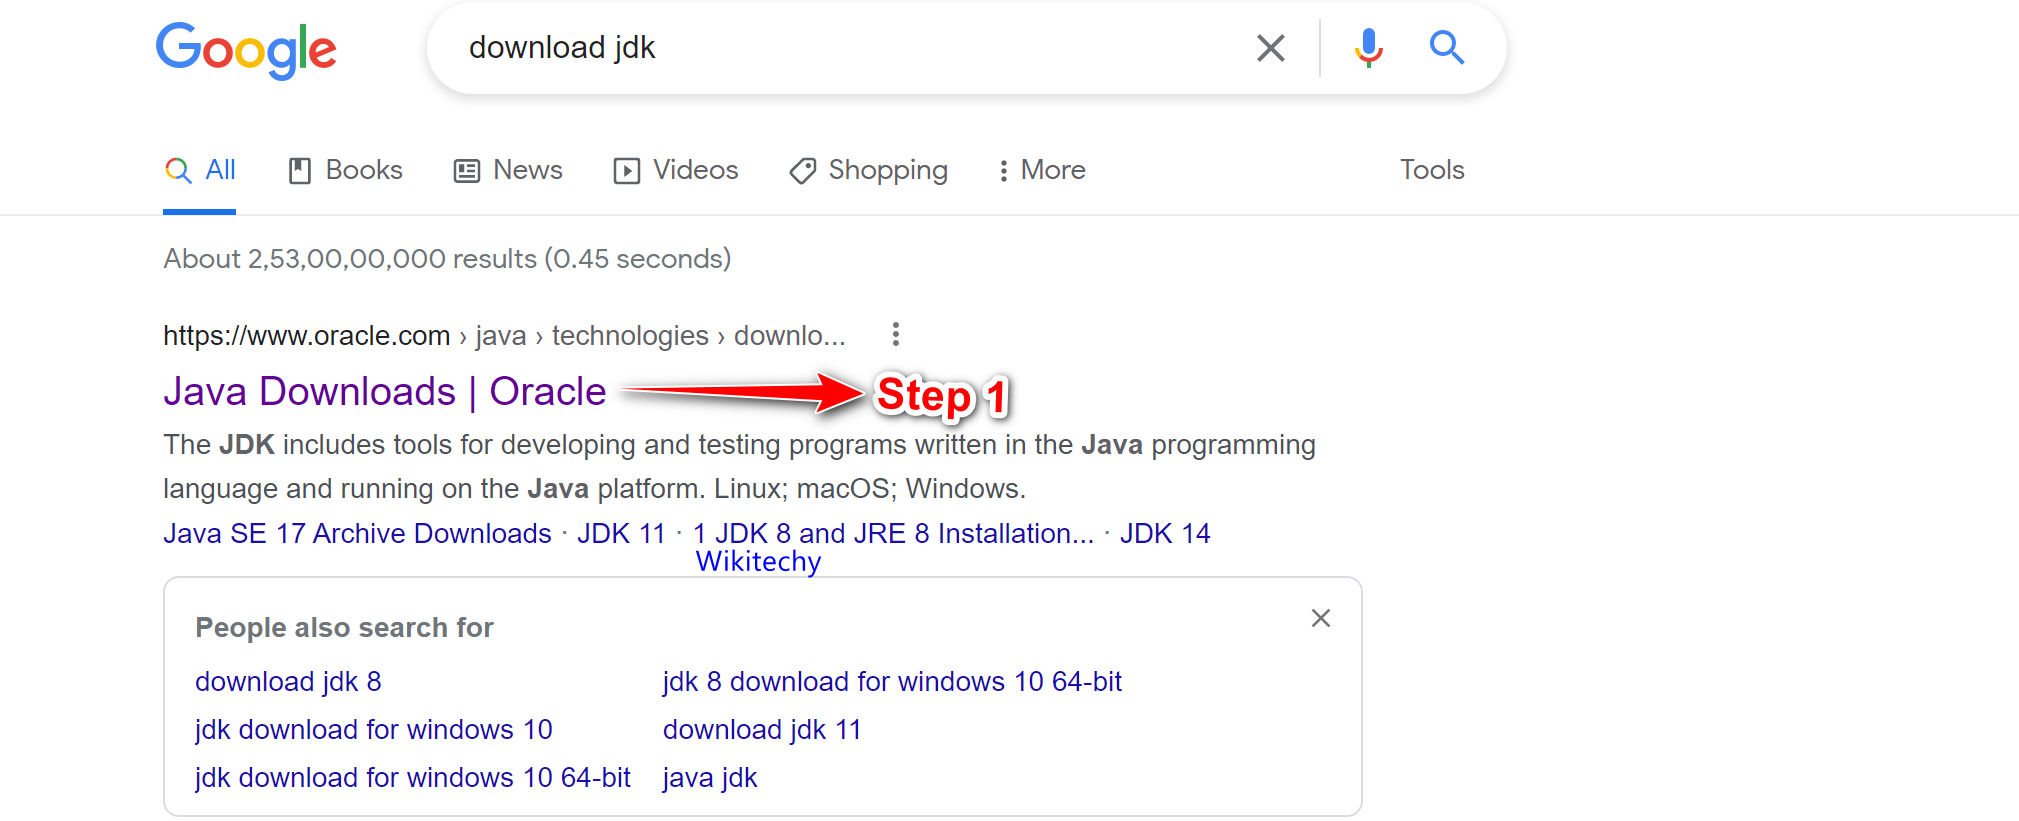
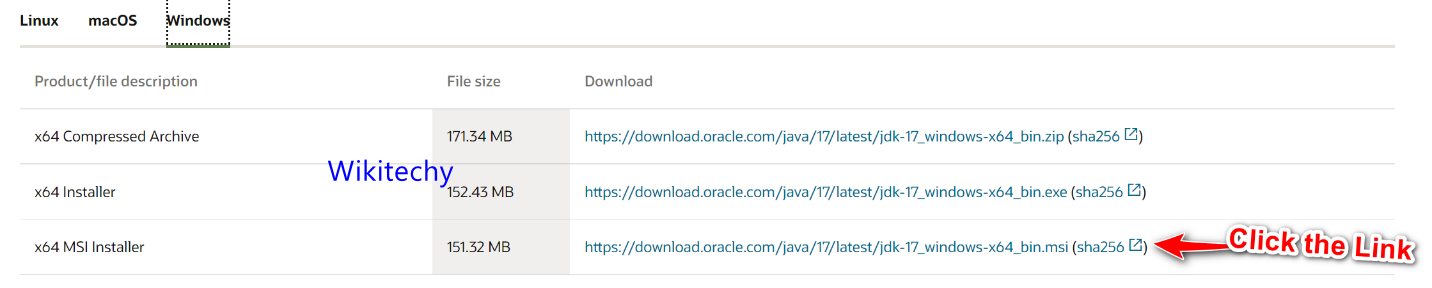
How to Download & Install JDK to Automate Selenium WebDriver Test Scripts
- Install Java on your computer
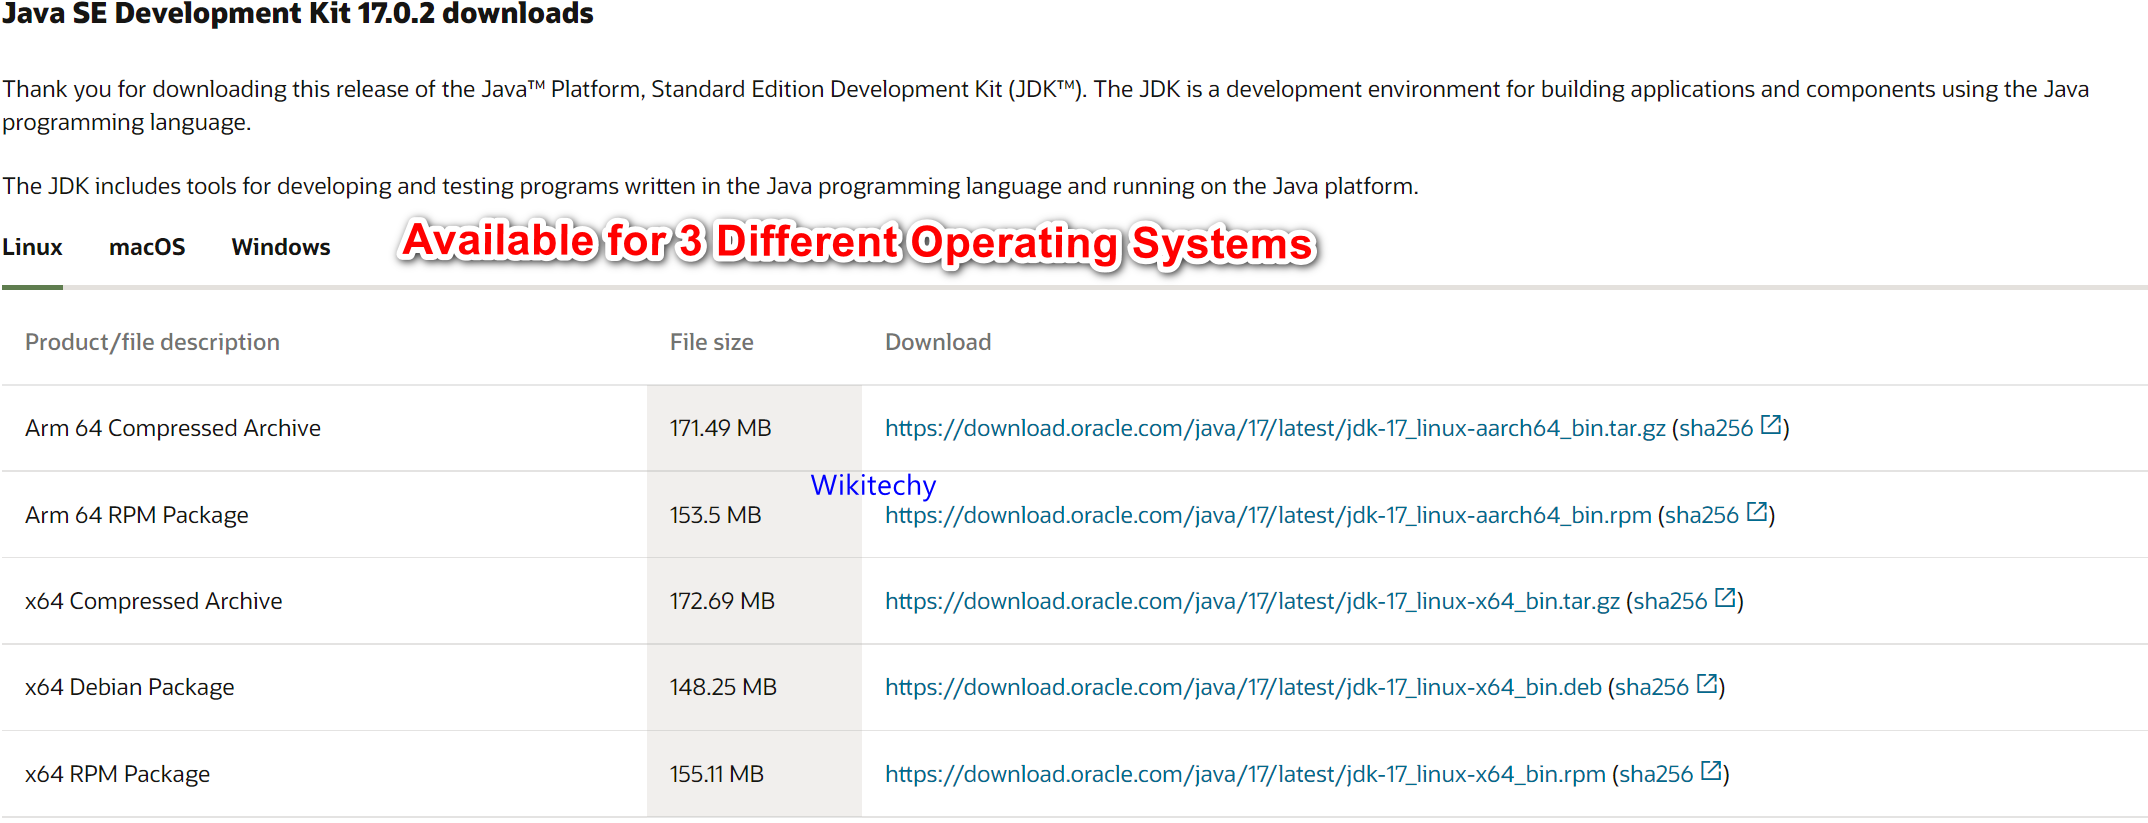
This JDK version comes bundled with Java Runtime Environment (JRE), so you do not need to download and install the JRE separately.

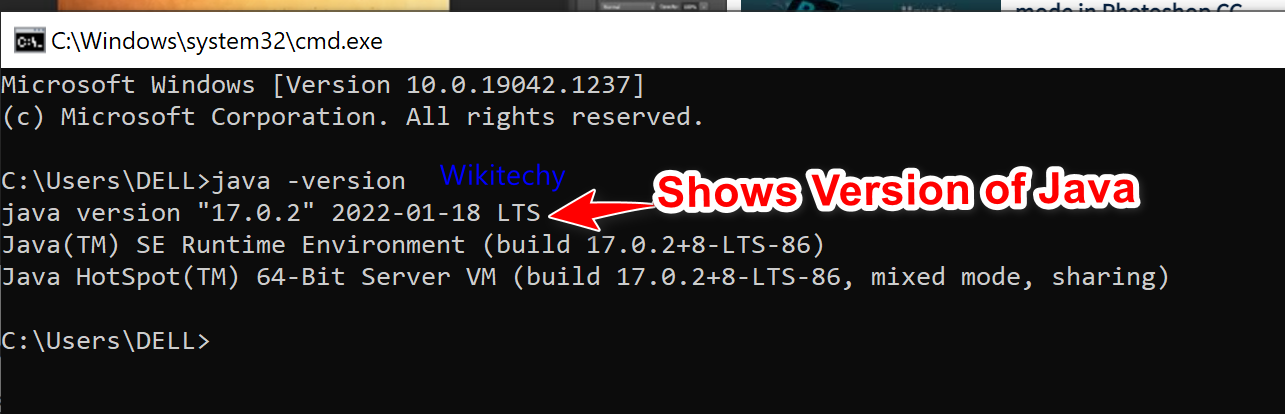
Once installation is complete, open command prompt and type “java”. If you see the following screen you are good to move to the next step
Steps to Create a First Project in Apache NetBeans
- We have Installed JDK and set its path variable and verified the installation of java. For Writing Selenium and java code in an IDE let’s download Apache NetBeans. Follow the Instruction for Installation
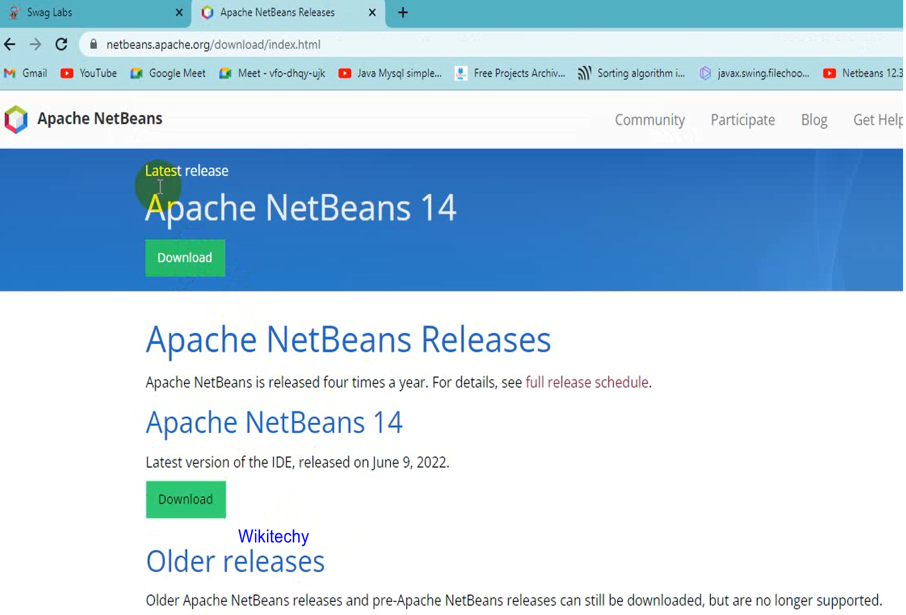
Steps to Install Apache NetBeans
- Click Download Button in this link https://netbeans.apache.org/
- Click this link and download the apache netbeans
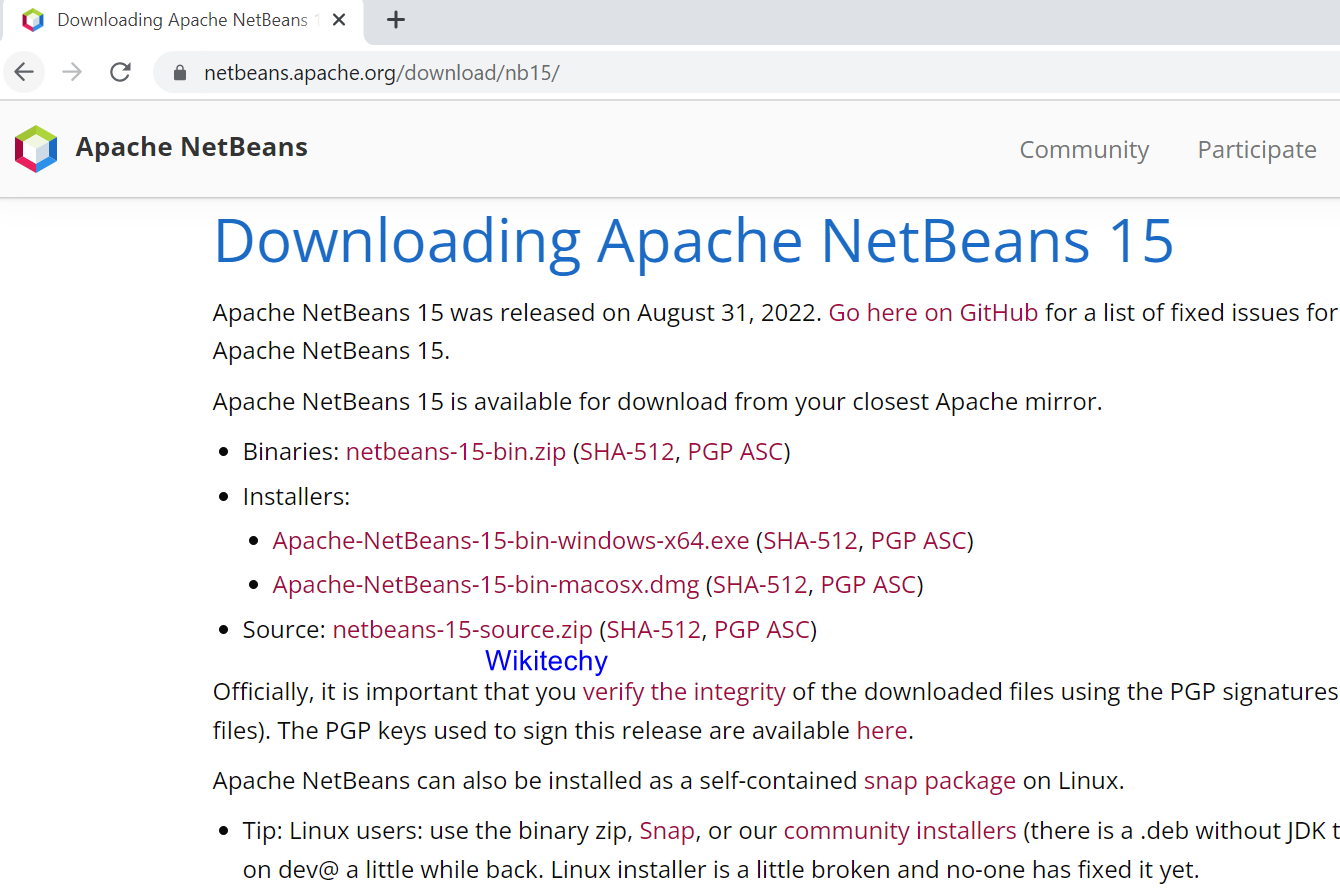
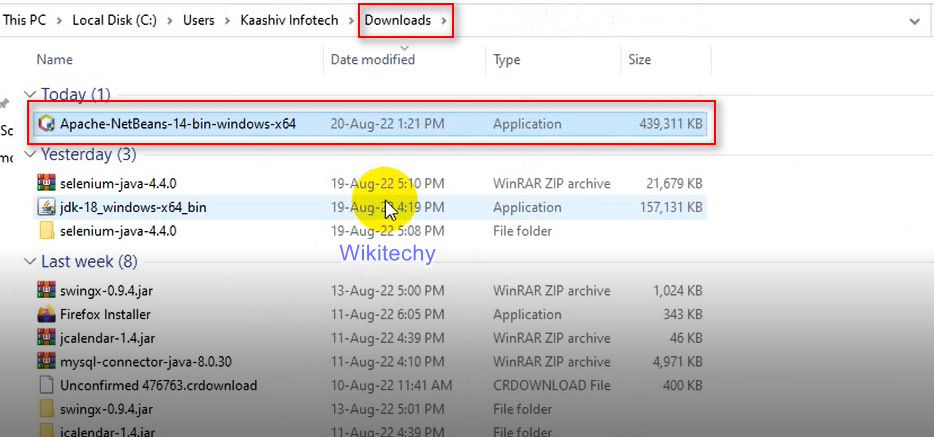
- Click this below mentioned link after clicking this link file will be downloaded

- Go to the download folder. Click this downloaded link and install it. Double click on Netbeans.exe file from download folder.
Steps to Install Selenium WebDriver
- Click this link and click the downloads button https://www.selenium.dev/
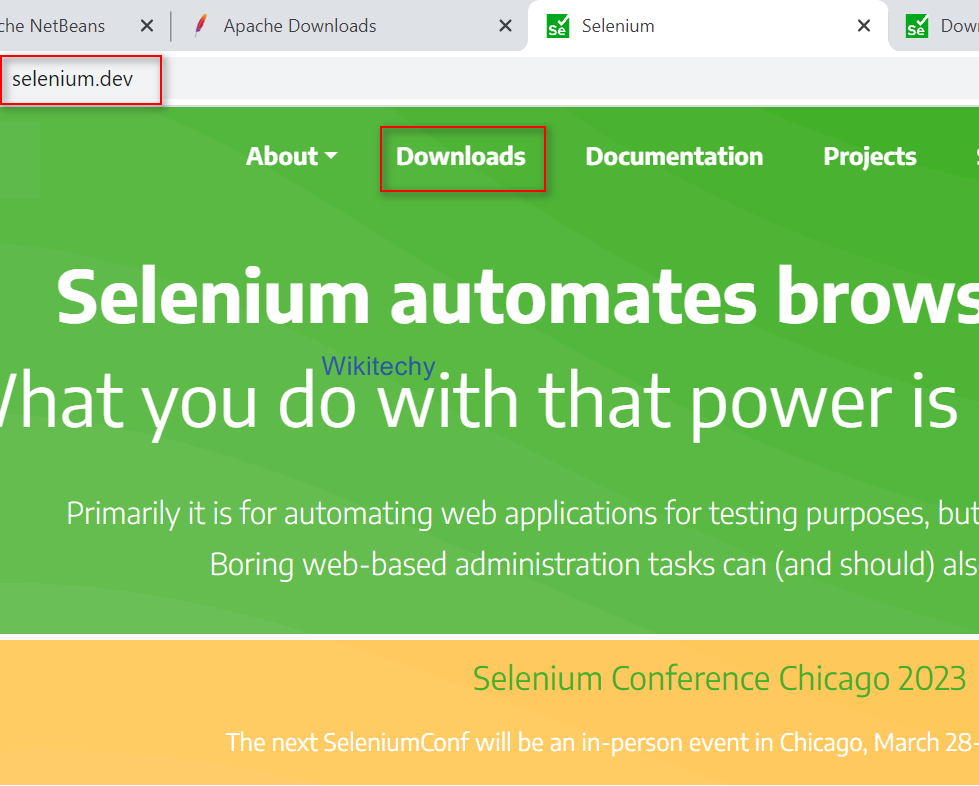
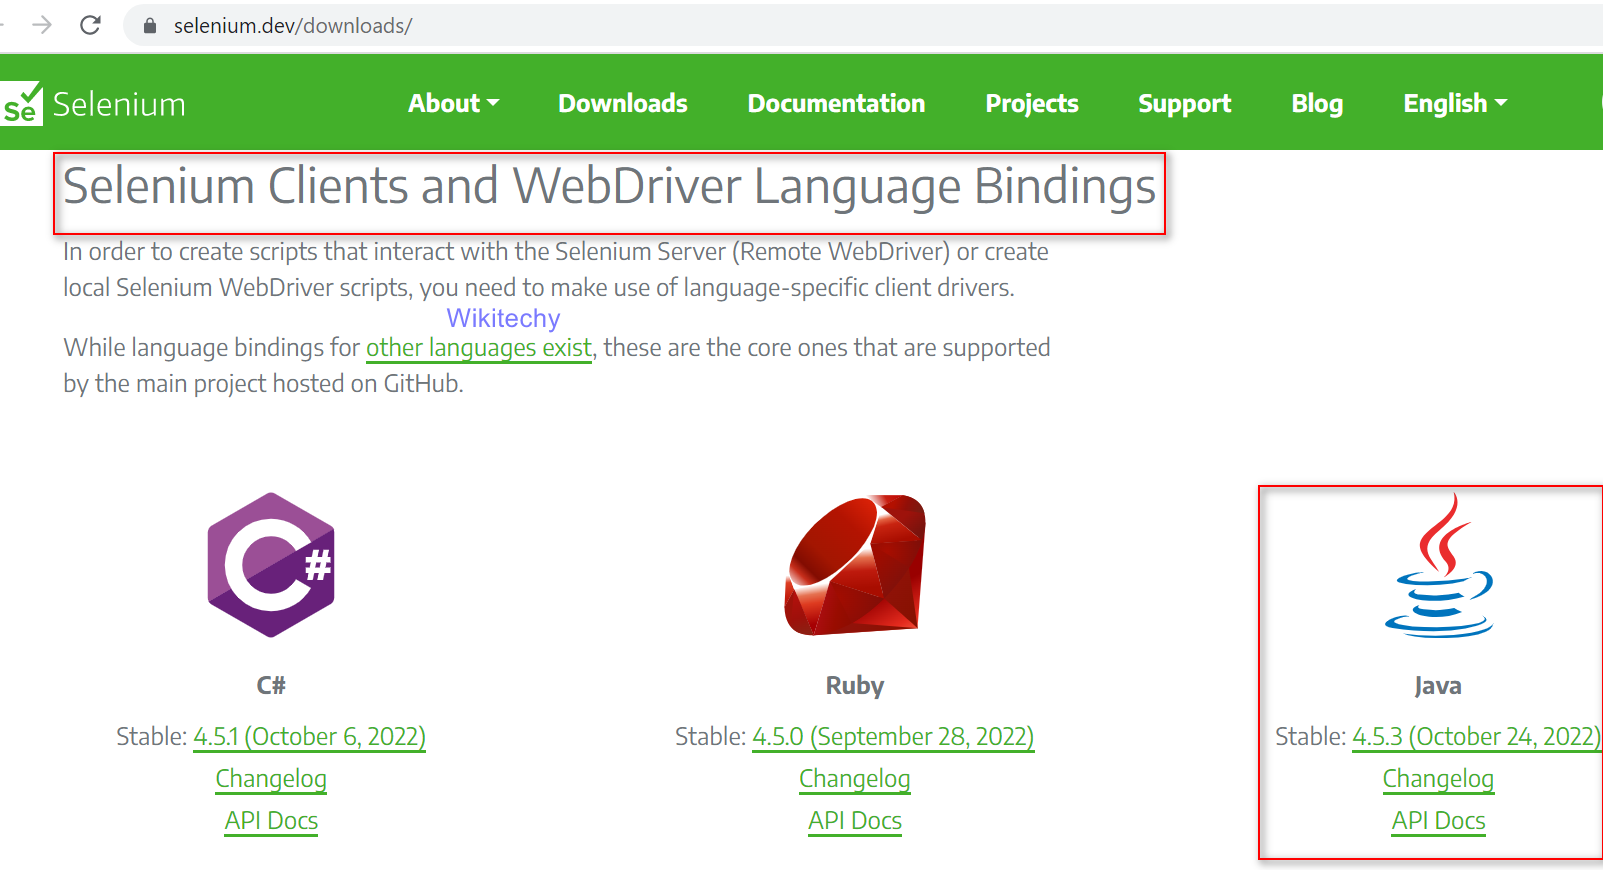
- After clicking this download button it goes to another page, you can scroll down and see the Selenium Clients and WebDriver Language Bindings. There you can choose Java
Read Also
Selenium Training in Chennai , Selenium Placement Training institutes in Chennai , best selenium training institute in chennai- If you click this Java, it will automatically downloads in download folder. You can right click and extract this selenium java file and install it.

Steps to Create a Project in Apache NetBeans
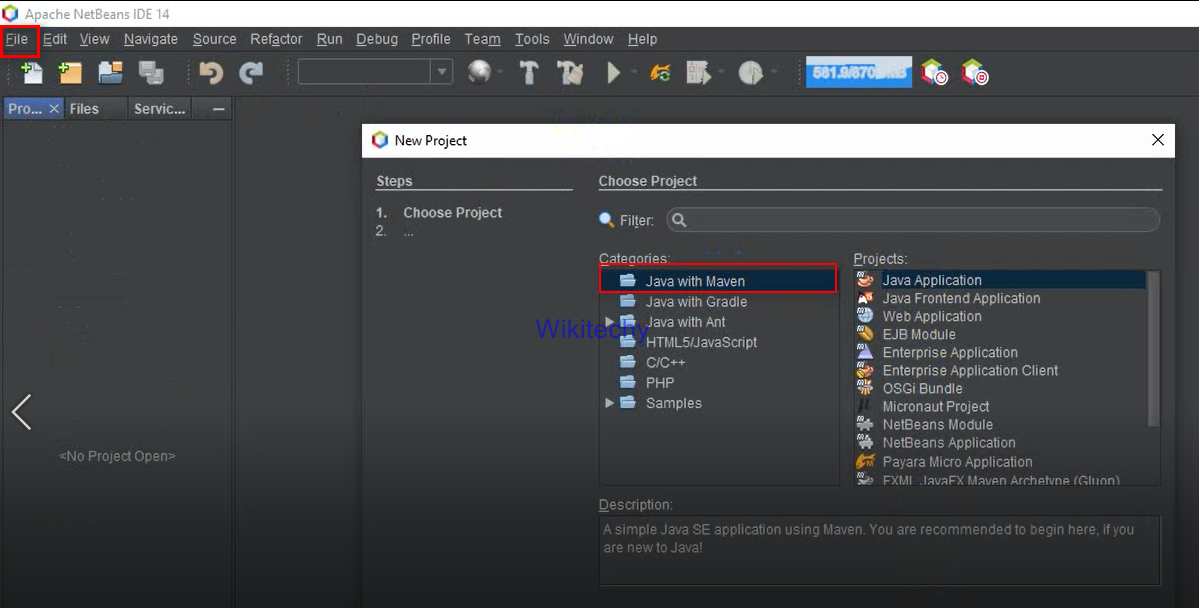
Step 1
- Click on File->choose any one among the three: java wih maven, java with gradle or java with ant. Here am choosing java with maven>java application.
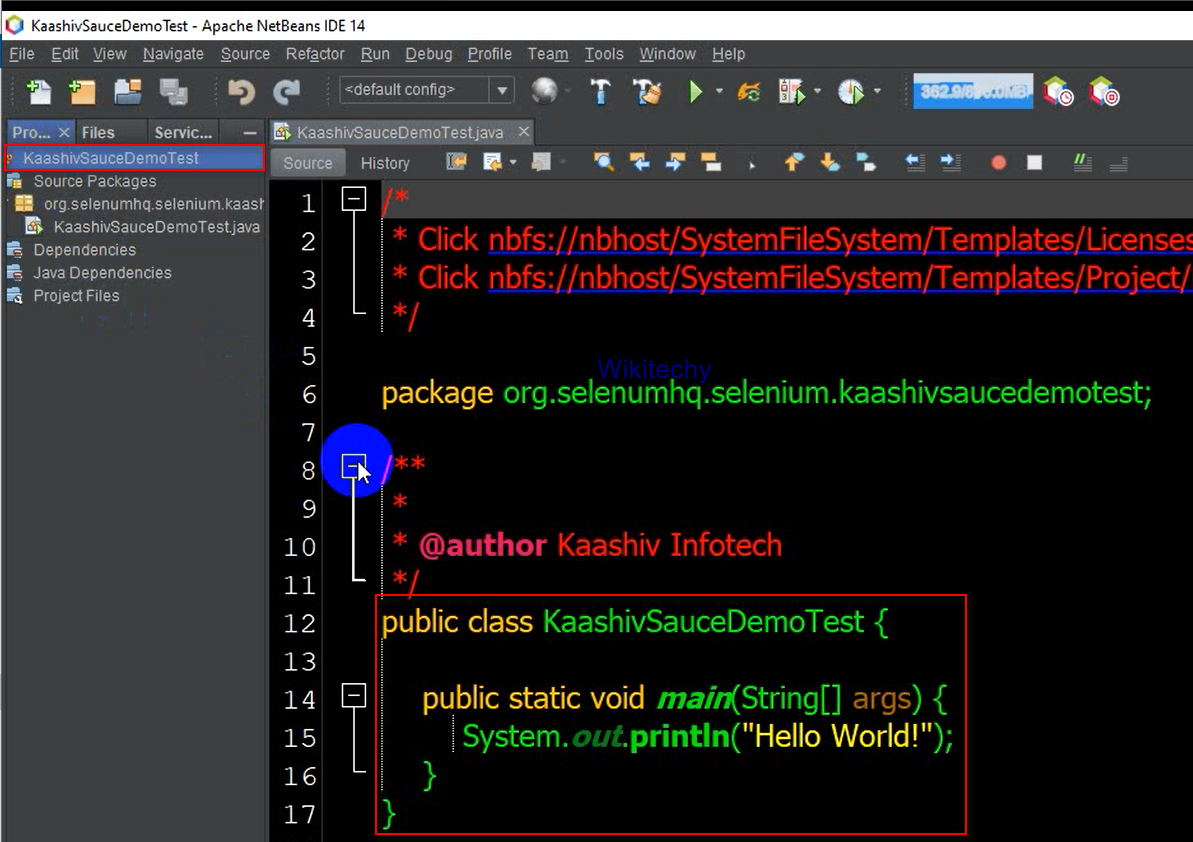
Creating a Selenium Projects
Enter the name of the project as KaashivSauceDemoTest and click on finish. Project will be created with a class.
Step 2
Here we can see, How to create Selenium Maven project, for testing a web application in selenium. In this step we will see how to add selenium jar files to our project.
- Select the project in the menu look for Tools->Libraries->Library Manager Window will open->choose class path->click on Add jar/folder.
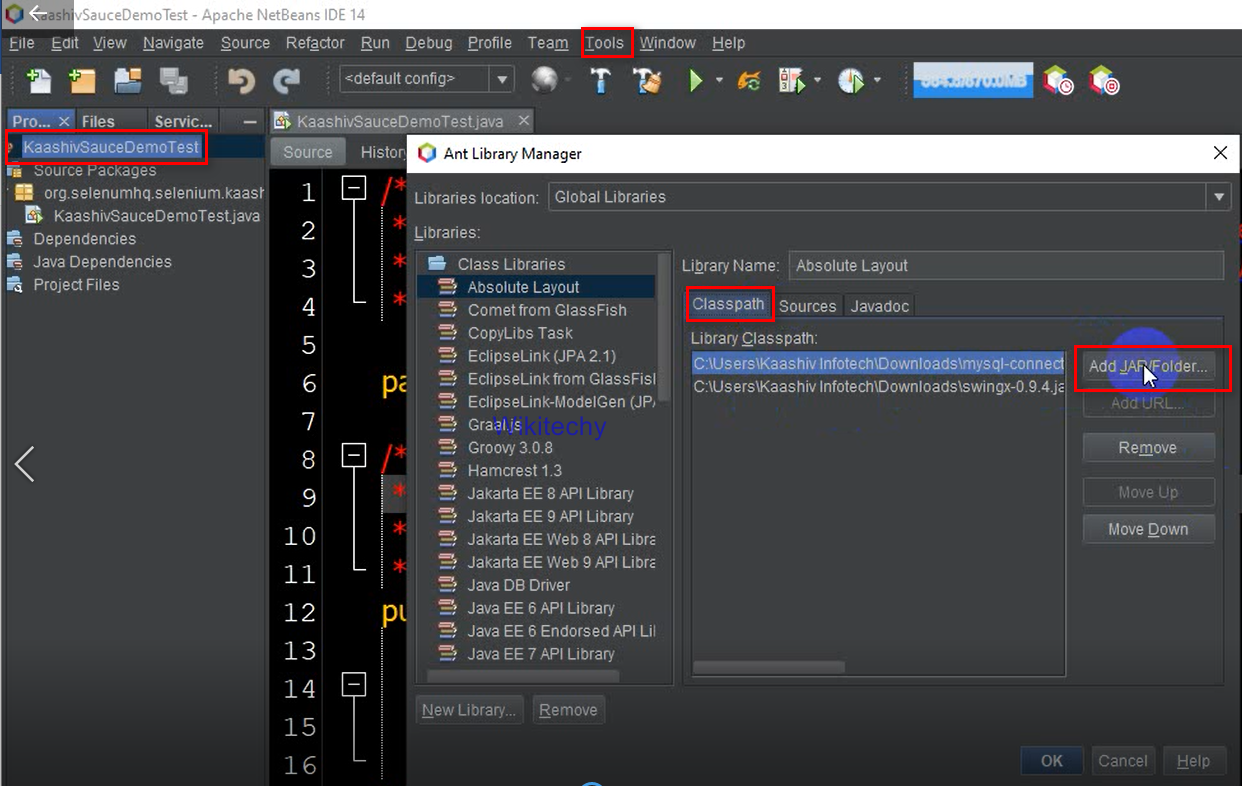
- Here select the selenium java web driver jar files that we have extracted from zip folder. After adding the jar files, add all the files under the lib folder also. Click on Ok. Selenium jar files will be added to the project.

- Once all the jar files have been added. We can see the added jar files under referenced libraries.
Step 3 : Let’s see How to add dependencies for maven :
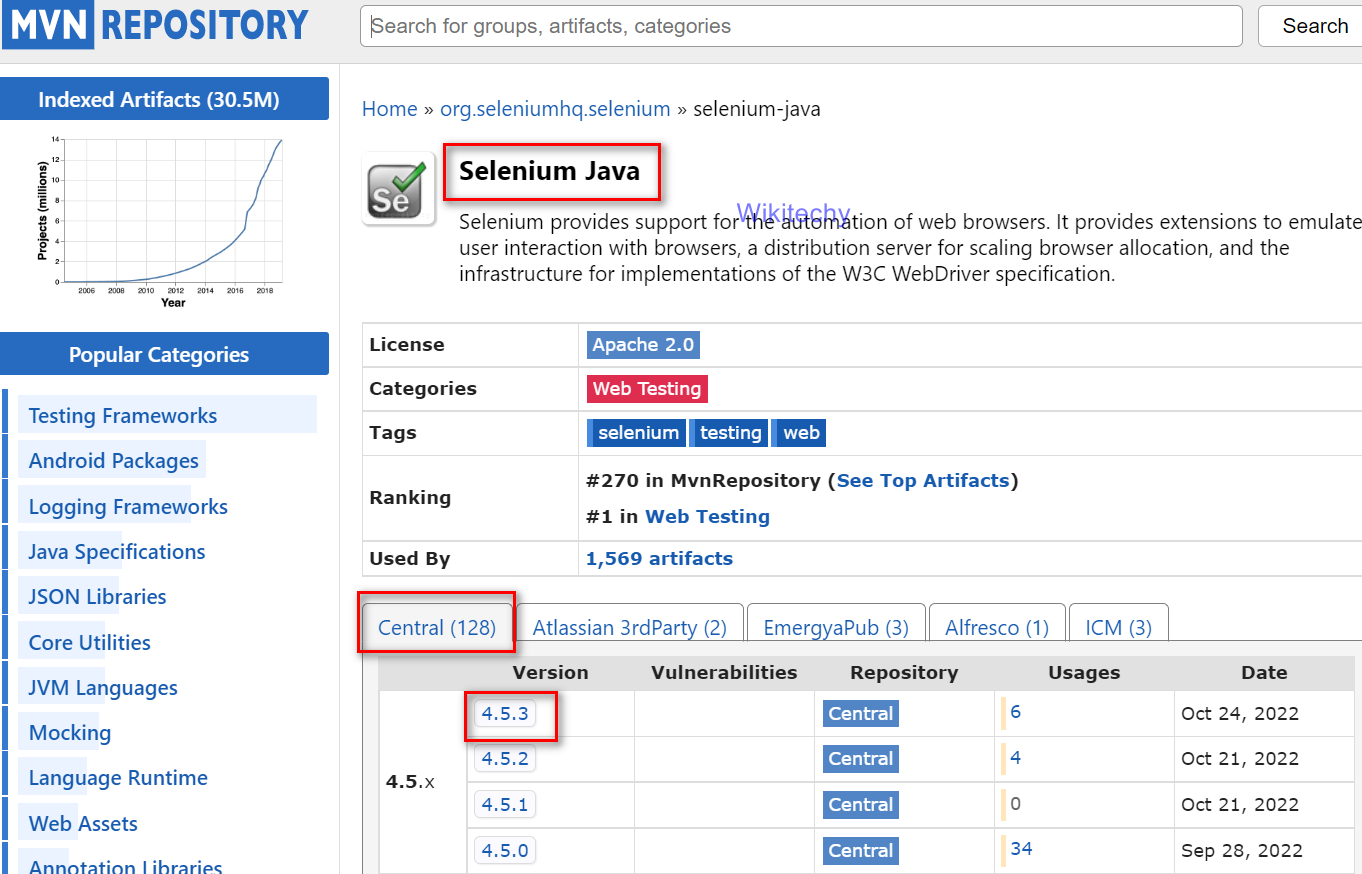
Open this URL : https://mvnrepository.com/ and search Selenium Java.
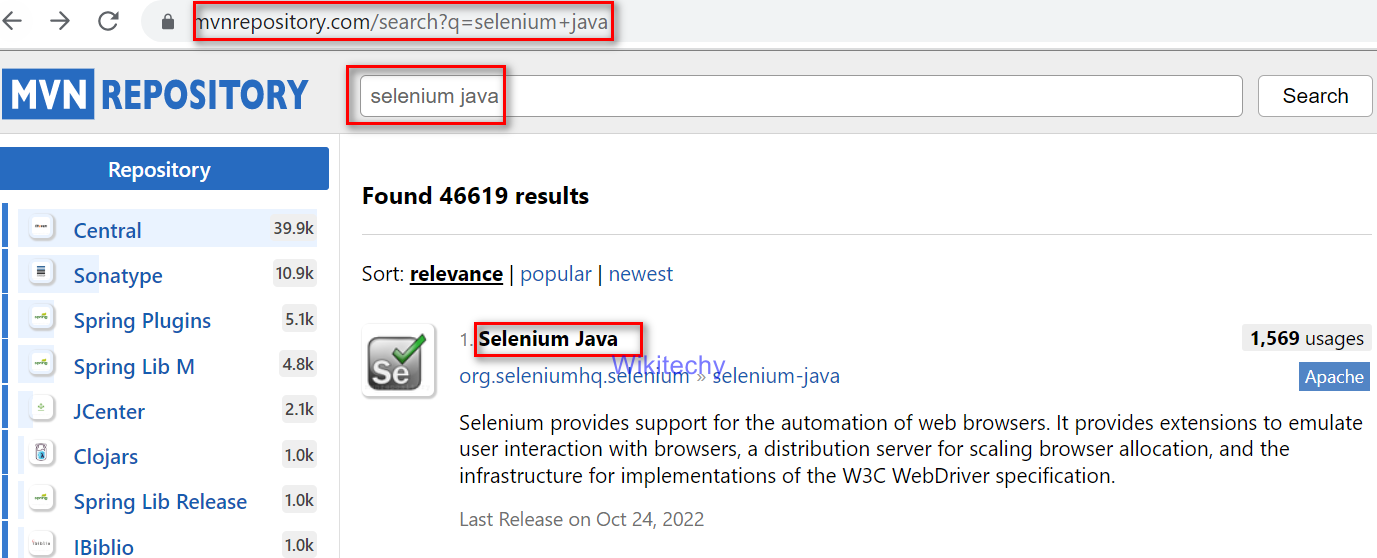
- A window opens and look out for Central Tab. Under Central Tab there will the latest version of maven dependencies. Click on the latest version.
- Under the maven tab you will see the maven dependencies. Copy that dependencies
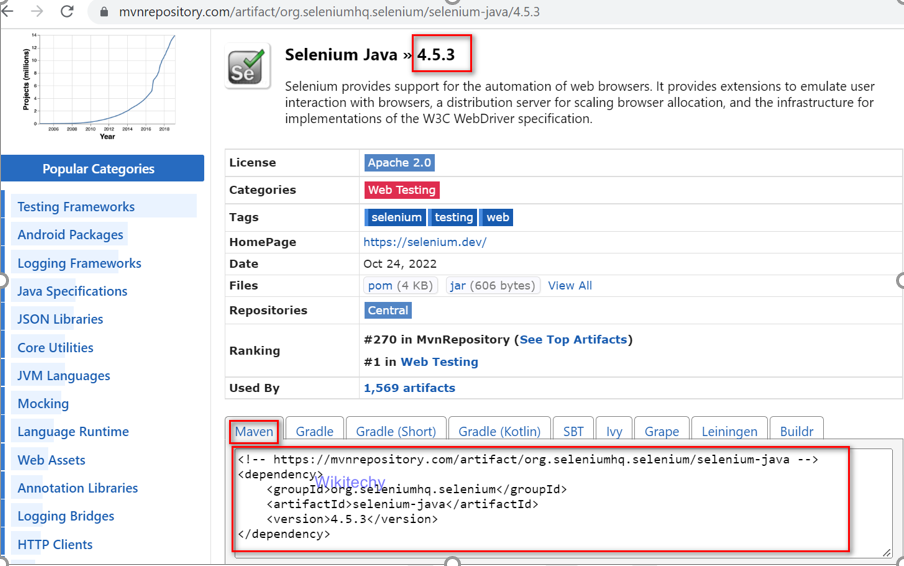
- The above dependency needs to be added in the pom.xml file in our project. Next go to our project files there we have a tab called Files. Click that we can find the pom.xml file. Click on the pom.xml file. In the XML file after the /version tag create a new tag called as <dependencies> and </dependencies>. Copy the above dependencies between these tags and save the dependencies.
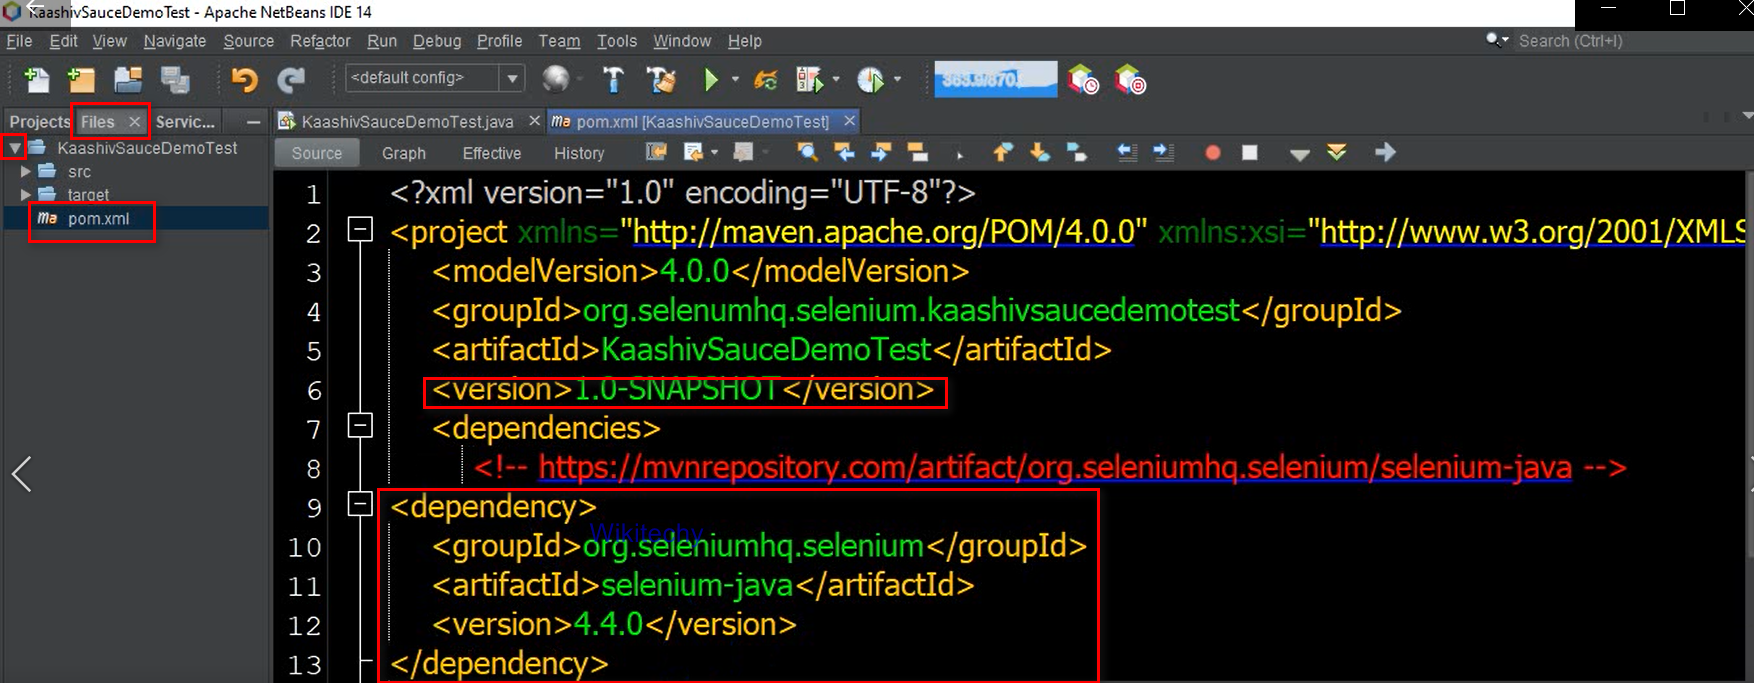
- Copy this code and Paste this in pom.xml file within that paste inside the <dependencies> </dependencies>.
<dependency>
    <groupId>lorg.seleniumhq.selenium</groupId>
    <artifactId>selenium-java</artifactId>
    <version>4.4.0</version>
</dependency>
- Next Dependencies that we need to add is web driver manager dependencies which can also be got from the maven central repository. Click this URL: https://mvnrepository.com/ and search webdrivermanager bonecharcia which takes us to the https://mvnrepository.com/artifact/io.github.bonigarcia/webdrivermanager

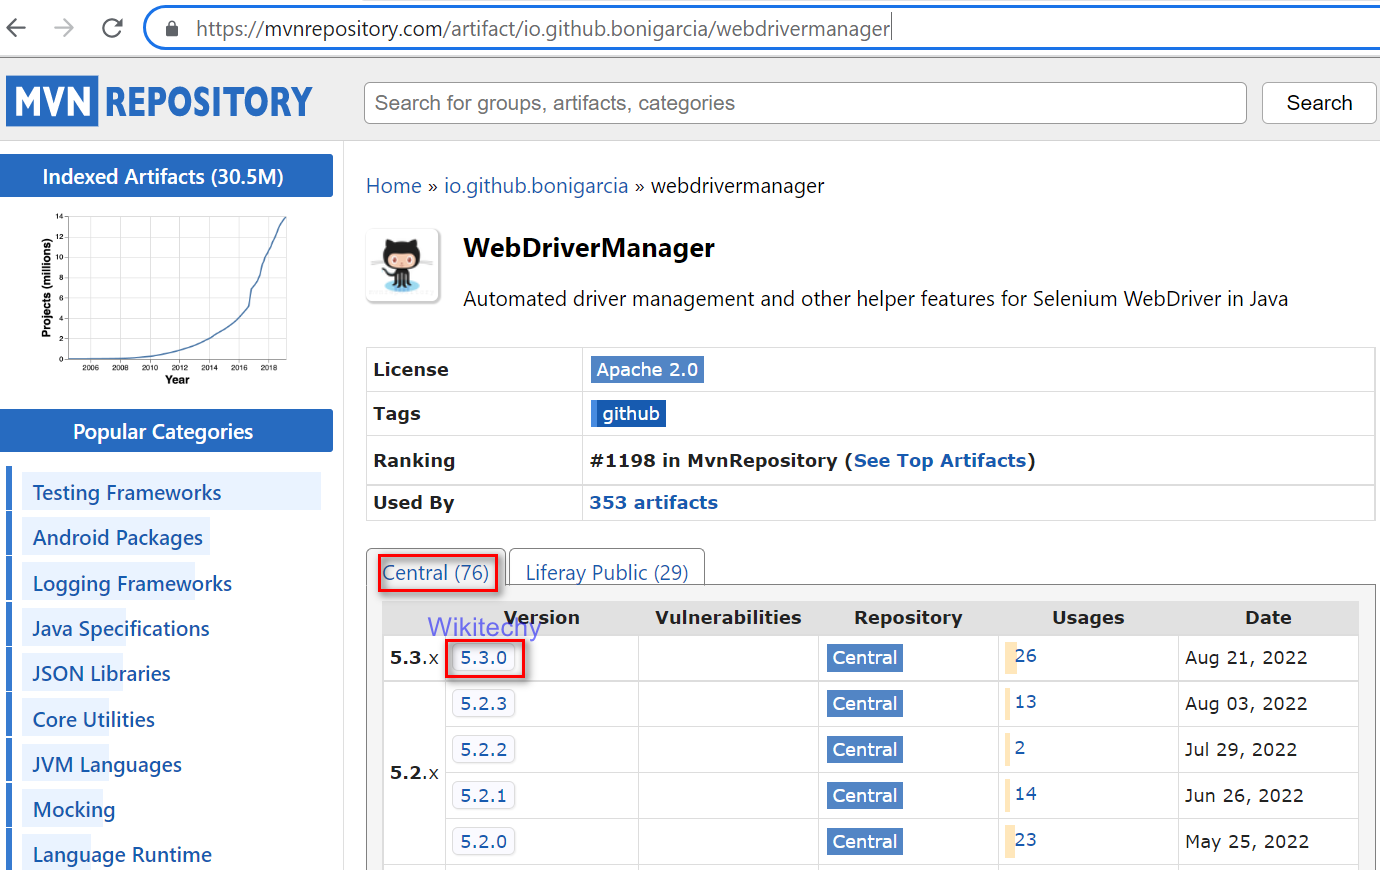
- Choose the latest version of the web driver manager dependency and copy the same dependencies.
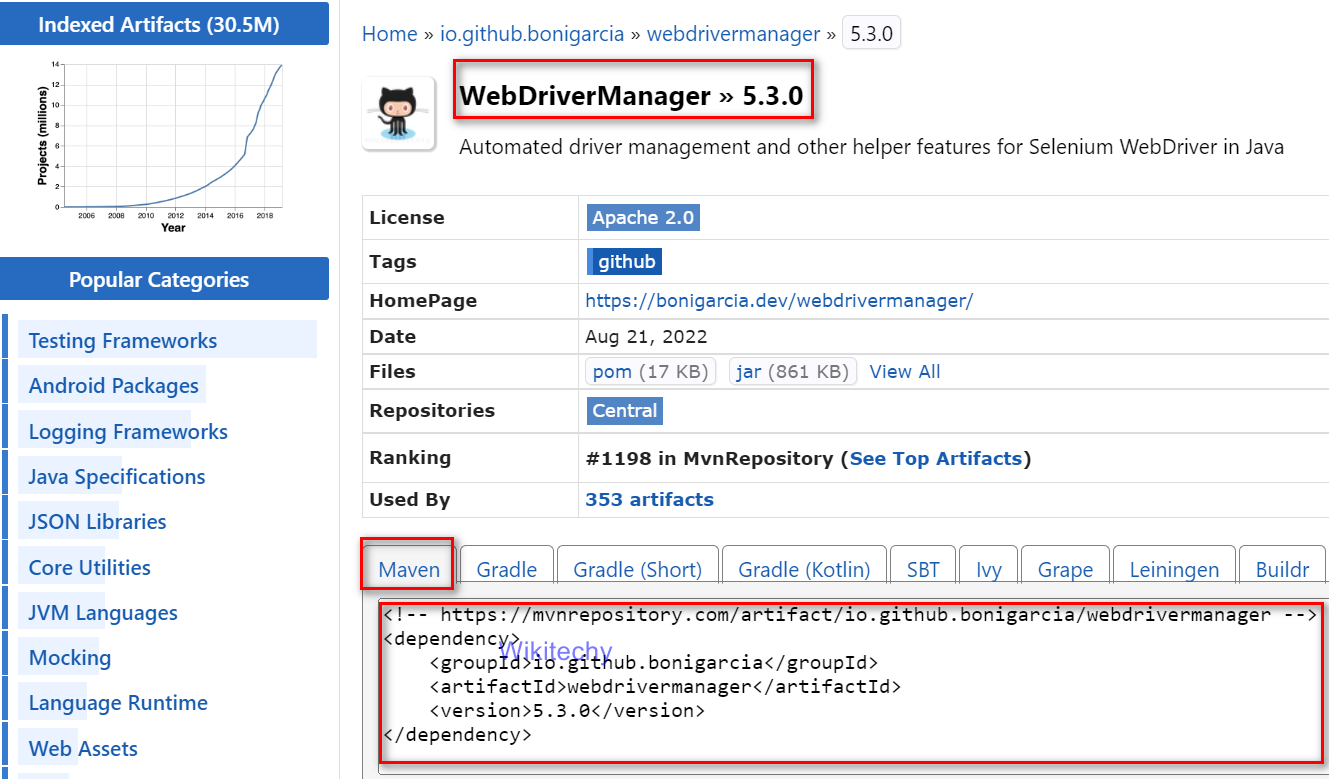
- Click on the pom.xml file. Copy the above dependencies between these tags and save the dependencies.

- After installing all the selenium jar files, maven and webmanager dependencies, our project is ready to test the web application AUT (Application Under Test). Application Name: https://www.saucedemo.com/
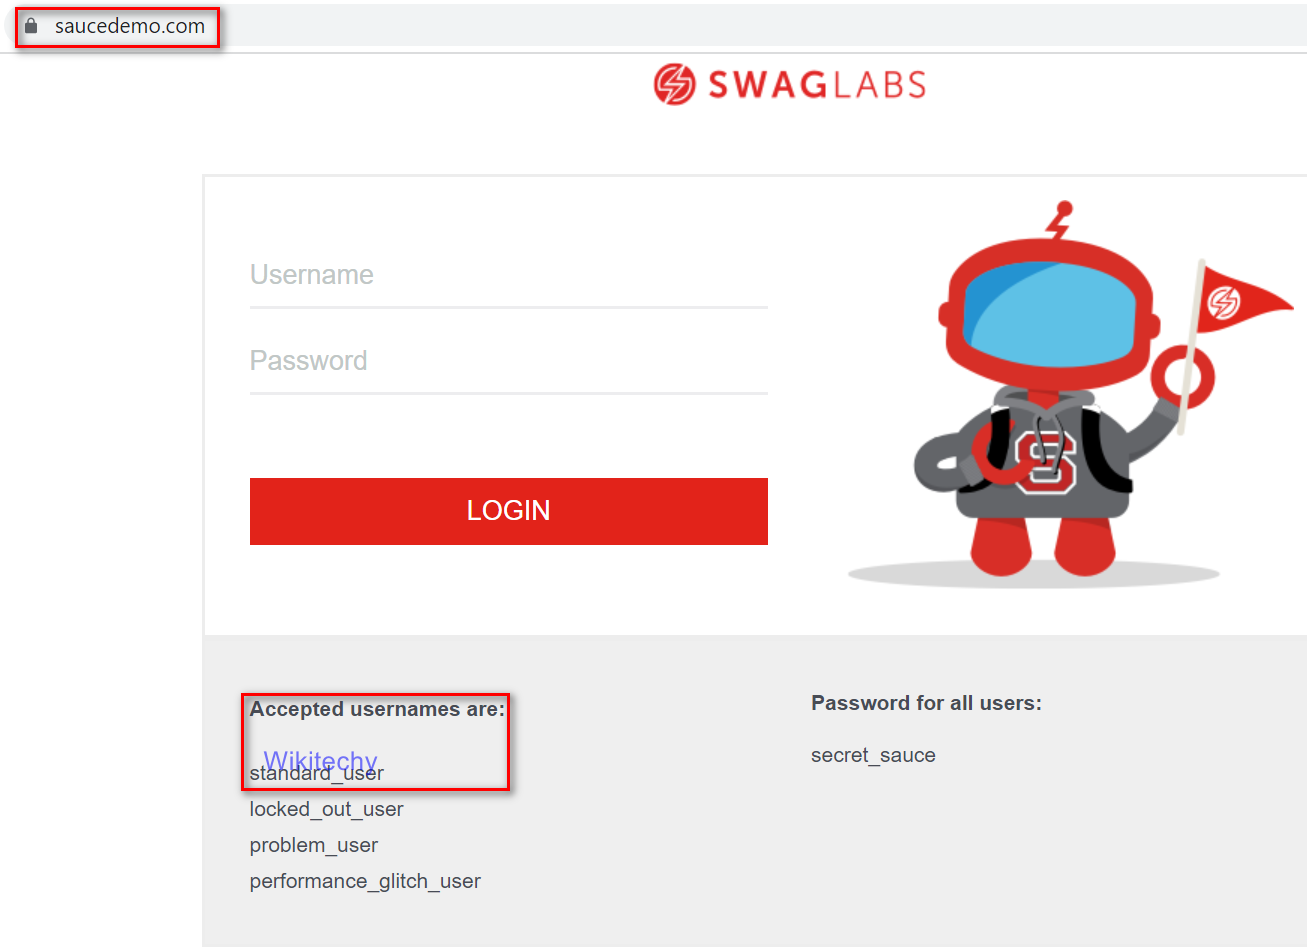
- So now let’s start automating the web application: https://www.saucedemo.com/ using selenium web driver and java.
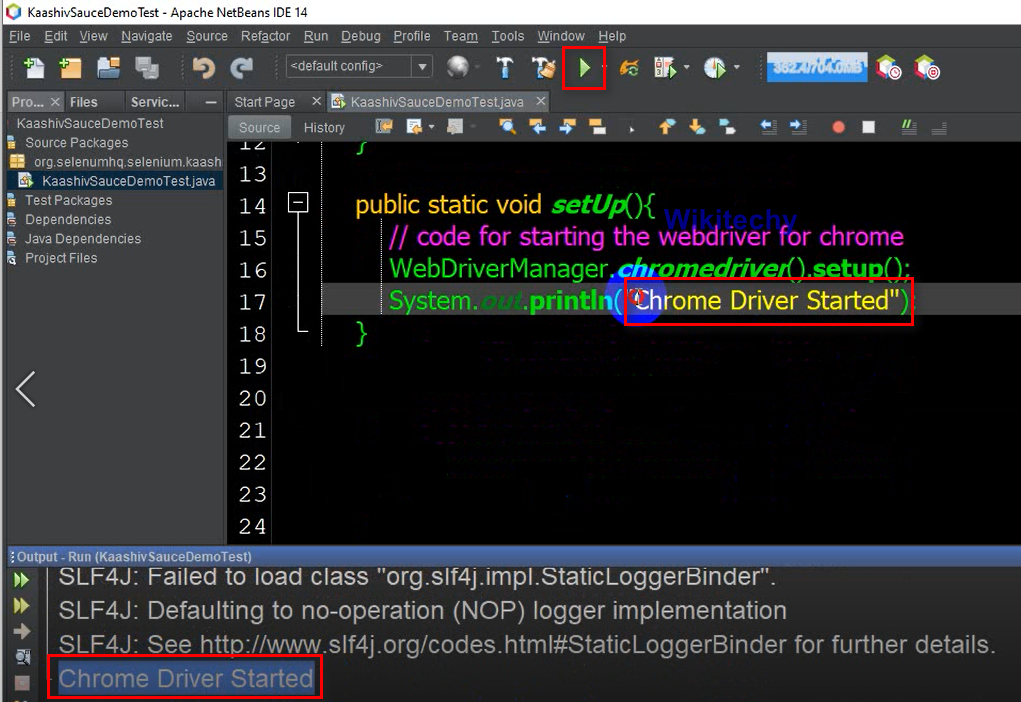
- To start chrome driver using Web driver Manager, dependencies already added in the pom.xml file of the project.
Code for starting the Web driver
public static void setUp(){
        WebDriverManager.chromedriver().setup();
    }
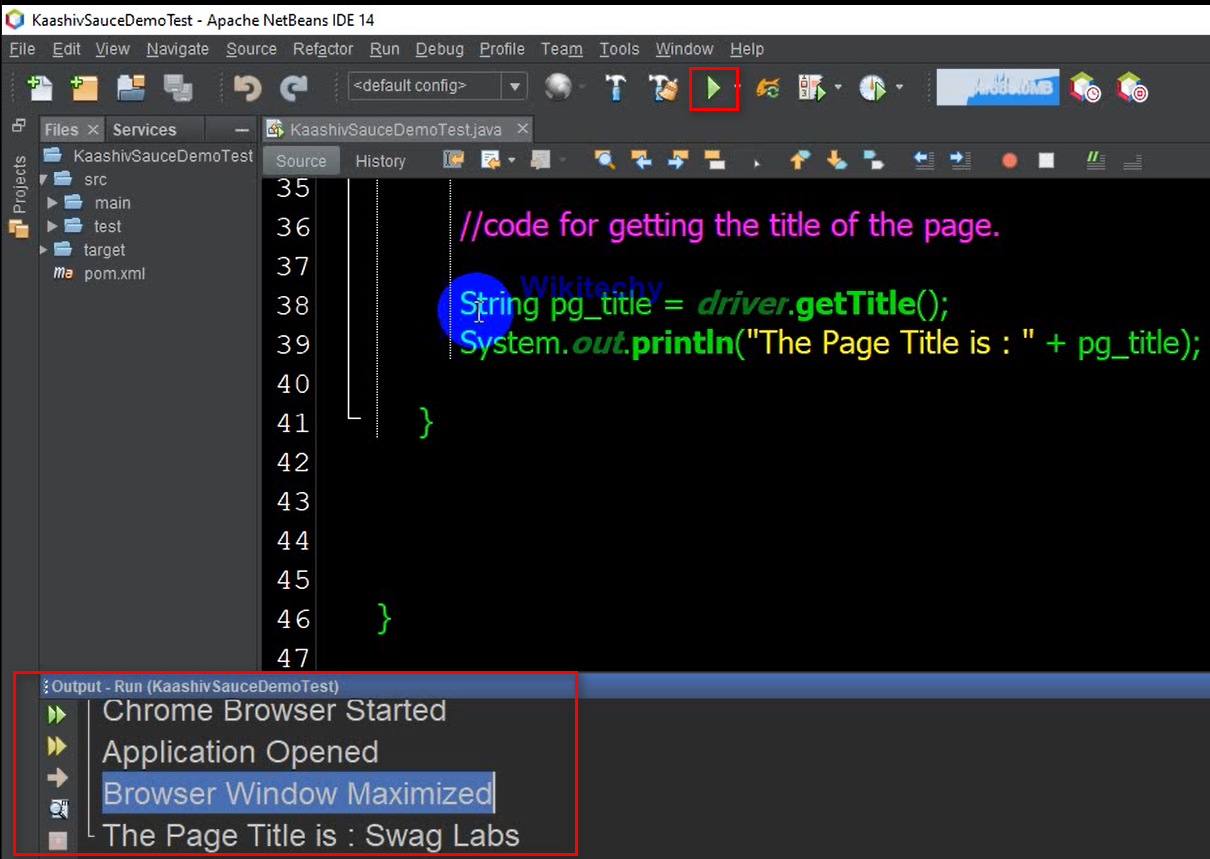
- Next step lets open the application in chromebrowser, maximize the browser,and get the title of the page.

Code
// code for opening the chrome browser:
driver = new ChromeDriver();
System.out.println("Chrome Browser Started ");


// code for opening the application:
driver.get("https://www.saucedemo.com/");
 System.out.println("Application Opened");


 // code for maximize the window.
 driver.manage().window().maximize();
 System.out.println("Browser Window Maximized");


 // code for getting the title of the page.
 String pg_title = driver.getTitle();
 System.out.println("The Page Title is : " + pg_title);
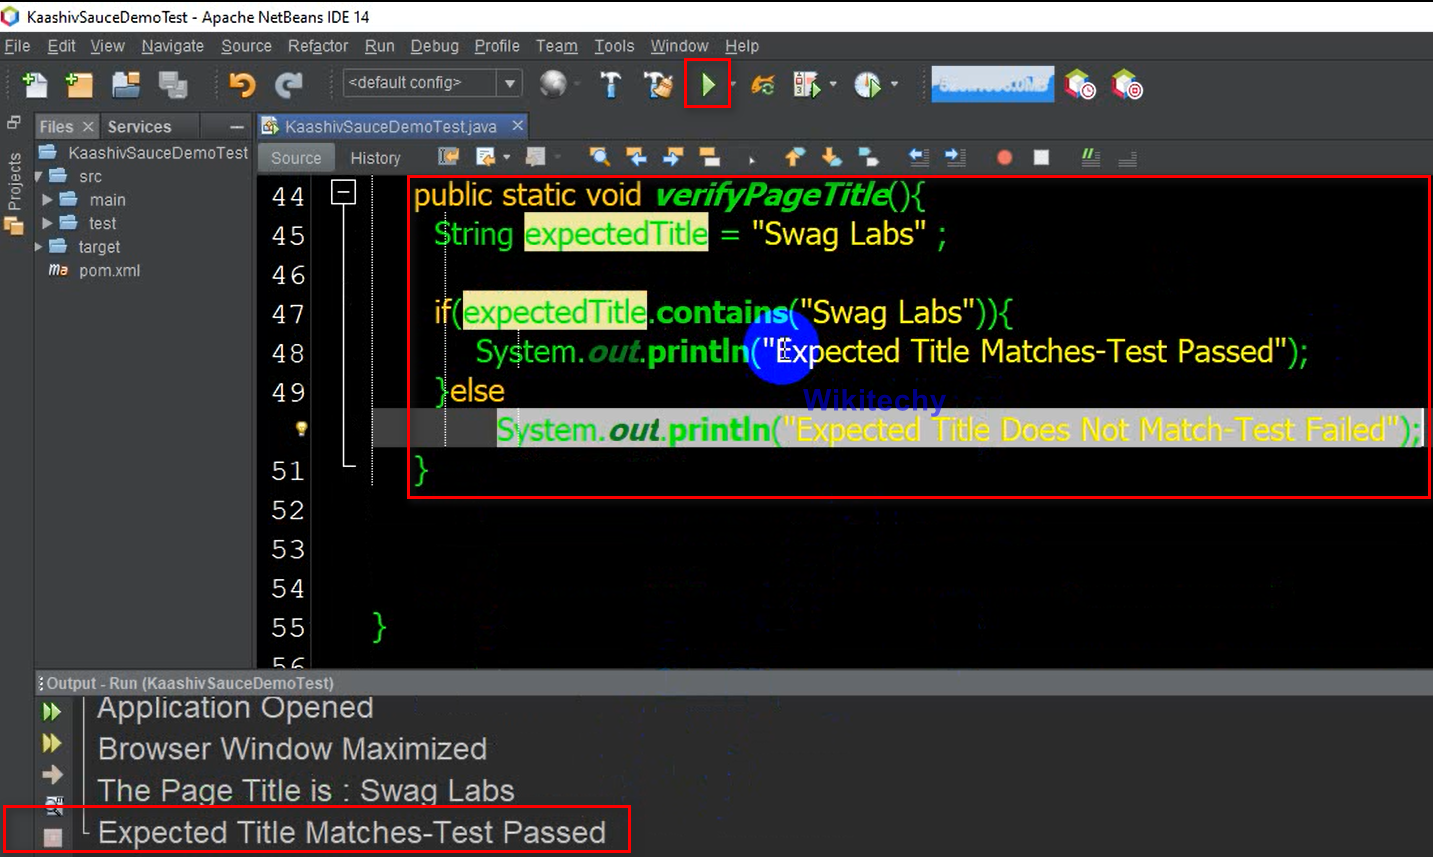
- We have got the page title in the last step. Now let us verify if the page title matches the actual title.
public static void verifyPageTitle(){
      String expectedTitle = "Swag Labs";
      if(expectedTitle.contains("Swag Labs")){
          System.out.println("Expected Title Matches-Test Passed");
      }else
            System.out.println("Expected Title Does Not Match-Test Failed");
    }
Now let us move to the next step of automating the login page. Here we will be performing negative testing click this Test URL : https://www.saucedemo.com/
Test Scenario
We have to leave the username and password blank and click on login
- User Name:
- Password: Click on Login Button
- Expected Result: Should display an Error Message: "Username is required".

- Let’s verify the expected result using selenium tool. If our expected result and actual result is the same, then our test is passed else it is failed.
- Let`s Automate it.
- First let us click on login button without entering the username and password.
- For this we have used "id" locator to find the login button element.
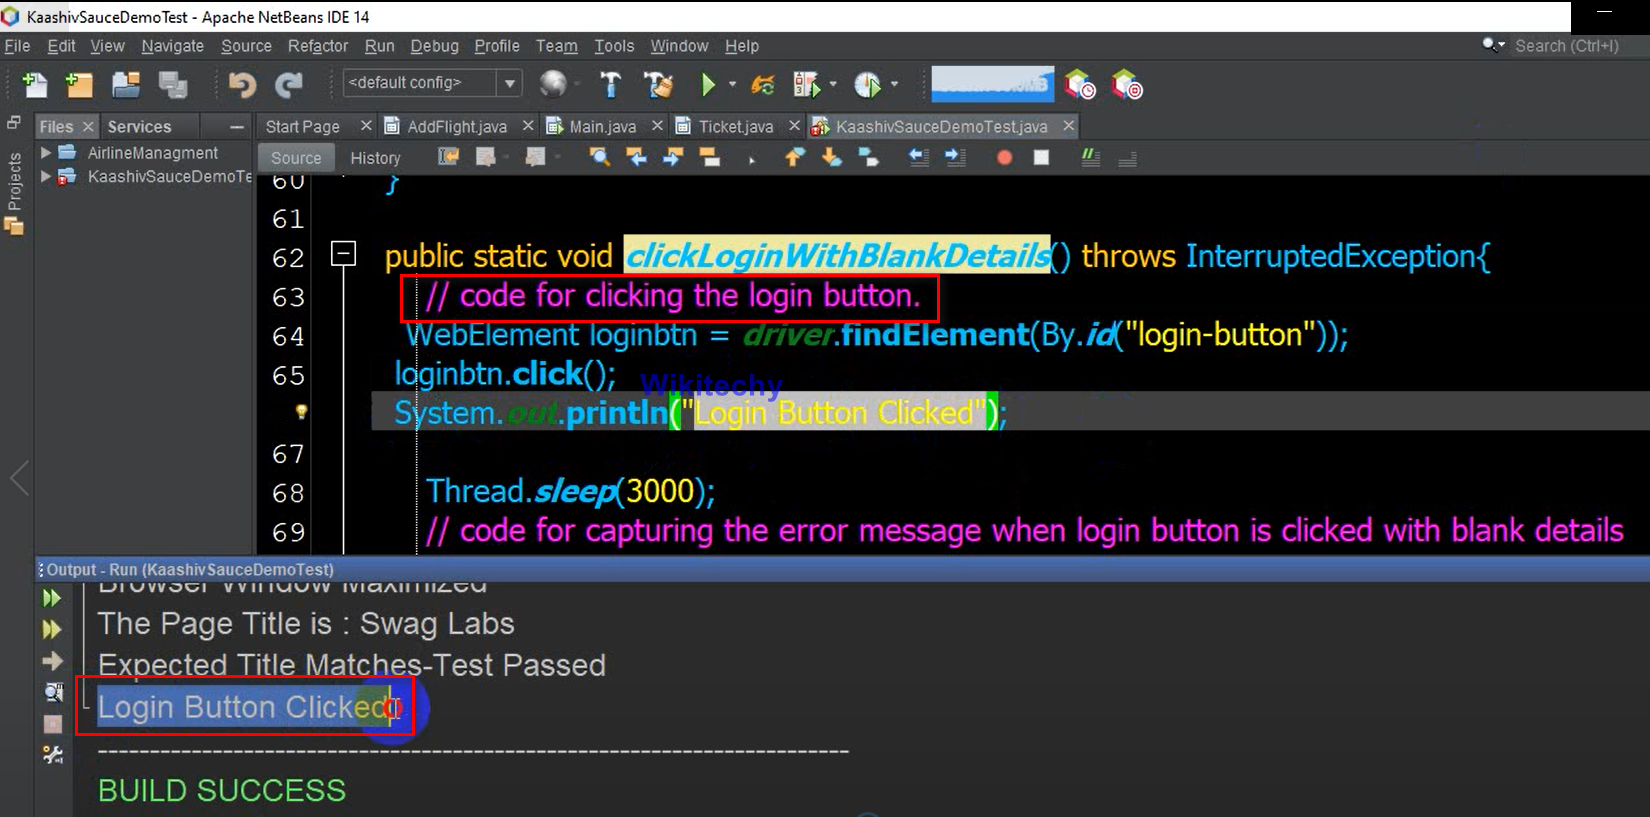
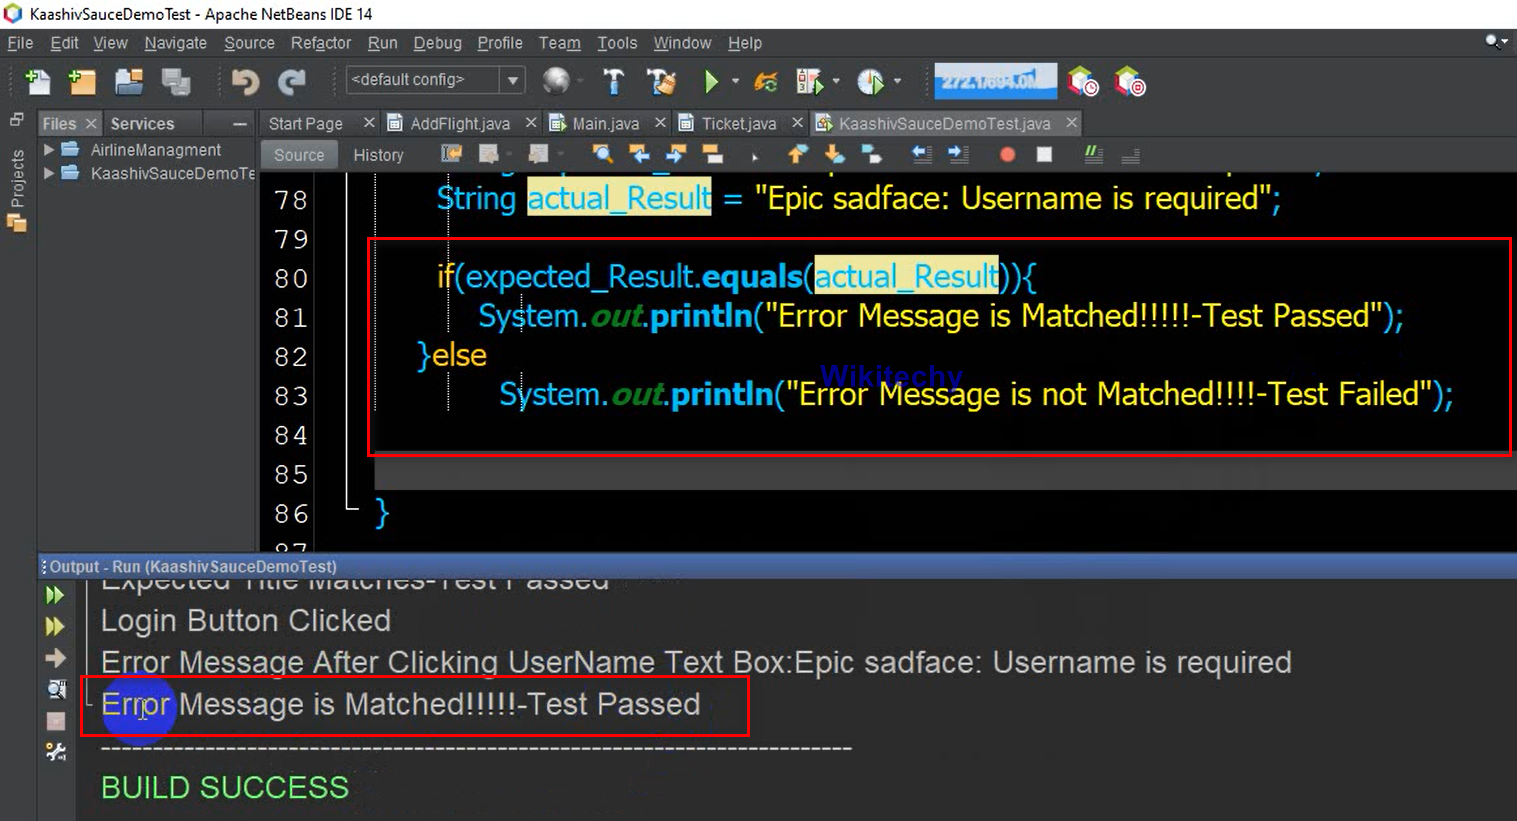
- So we have clicked on the login button. We got an error message: "Username is required". Let us create a script to capture the text message using selenium. Here i have used xpath element locator to identify the element.
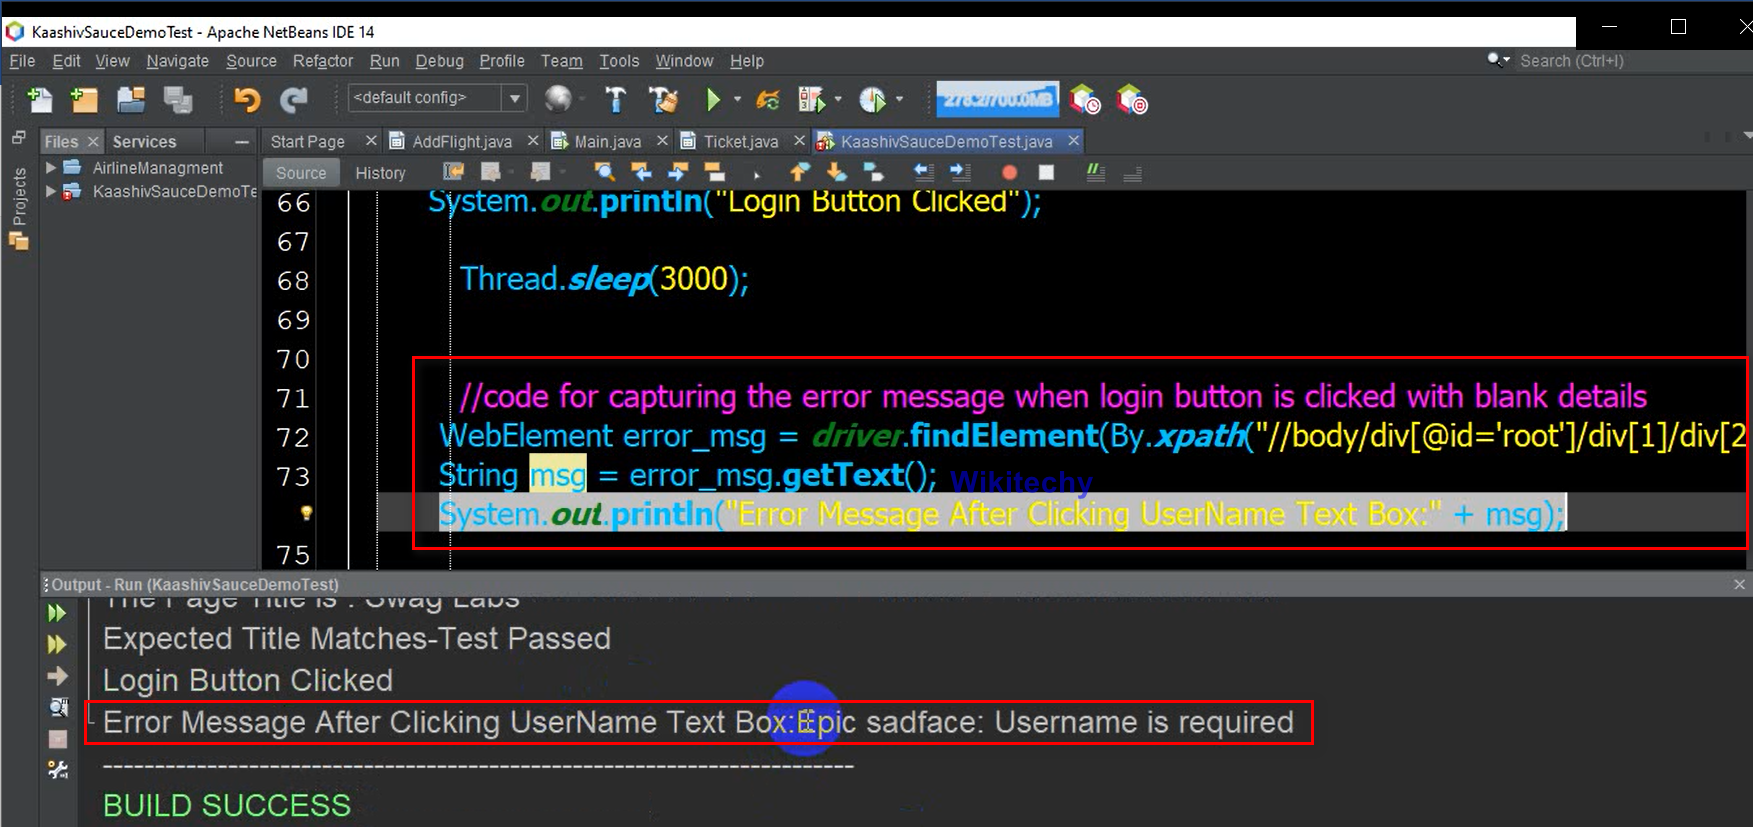
- We have verified the error message, both the expected result and actual result matched. So this test was passed.
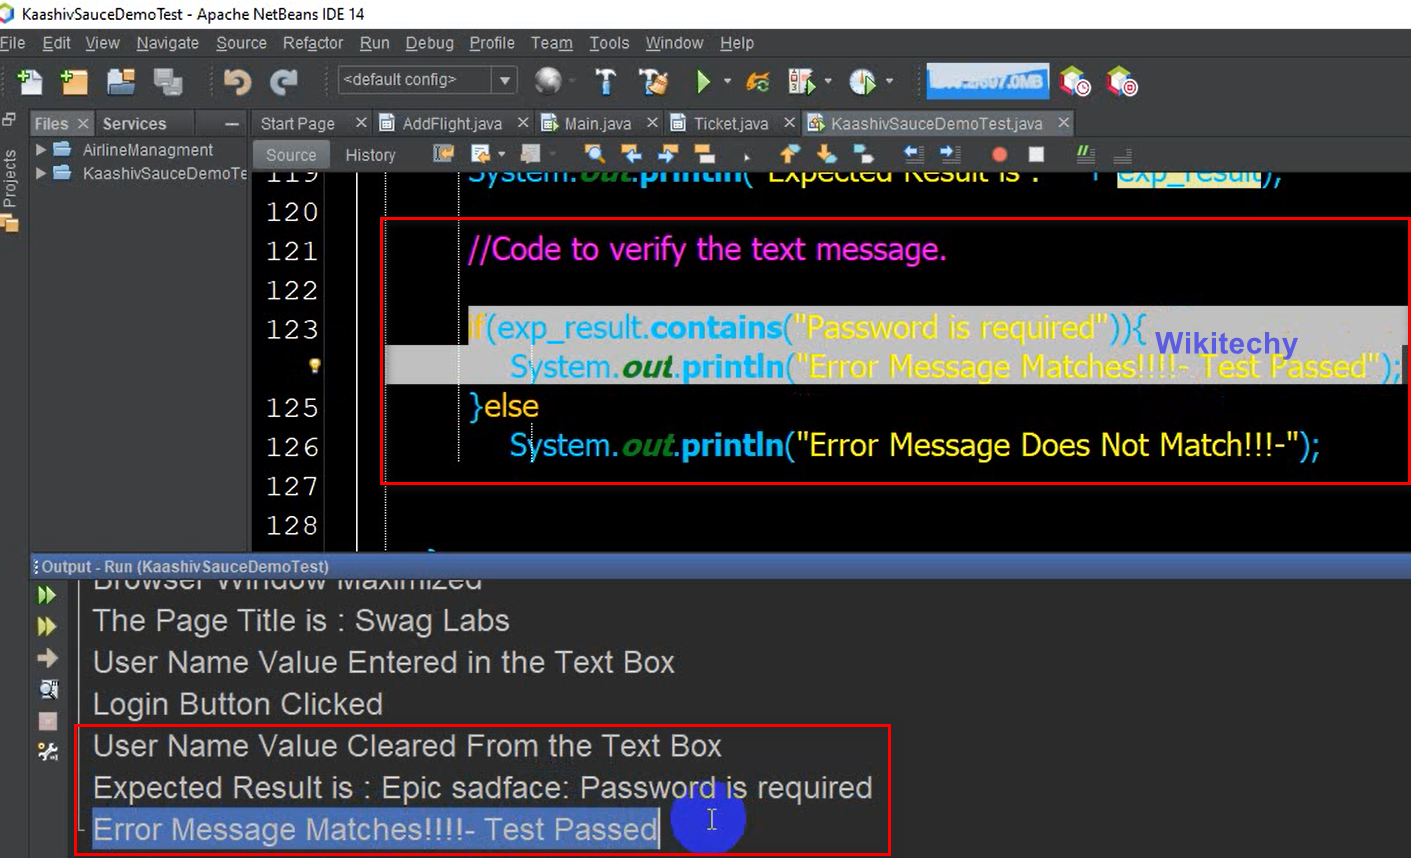
Clicking the login button with Valid UserName.
- Enter Valid Username: Standard_user. (Note: Username can be selected from any of the following from the application)
- Click on Login button
- Capture the error message: "Epic sadface: Password is required"
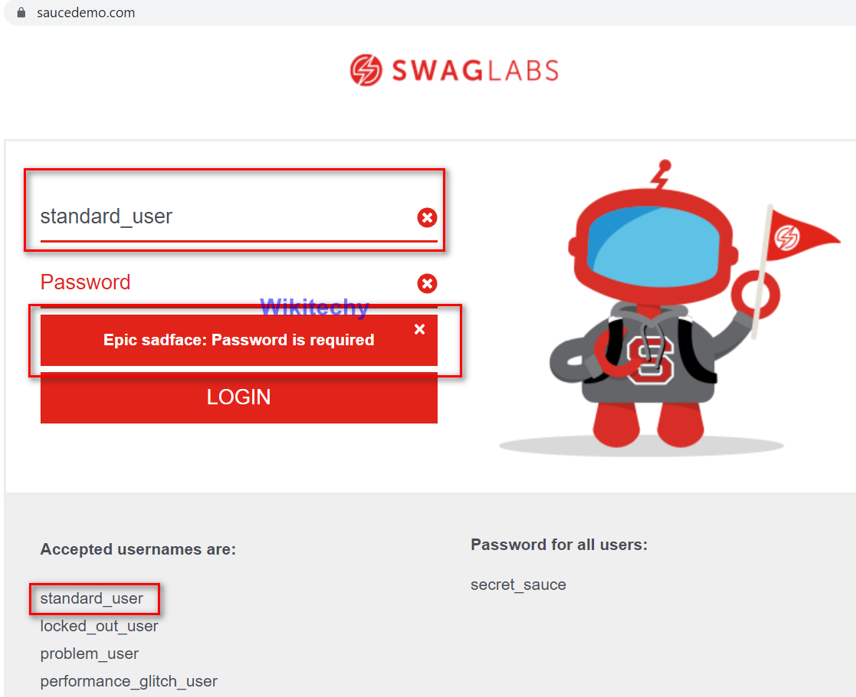
- Verify the error message with expected message. If both are equal the test is passed. Let`s Automate it
Test Scenario
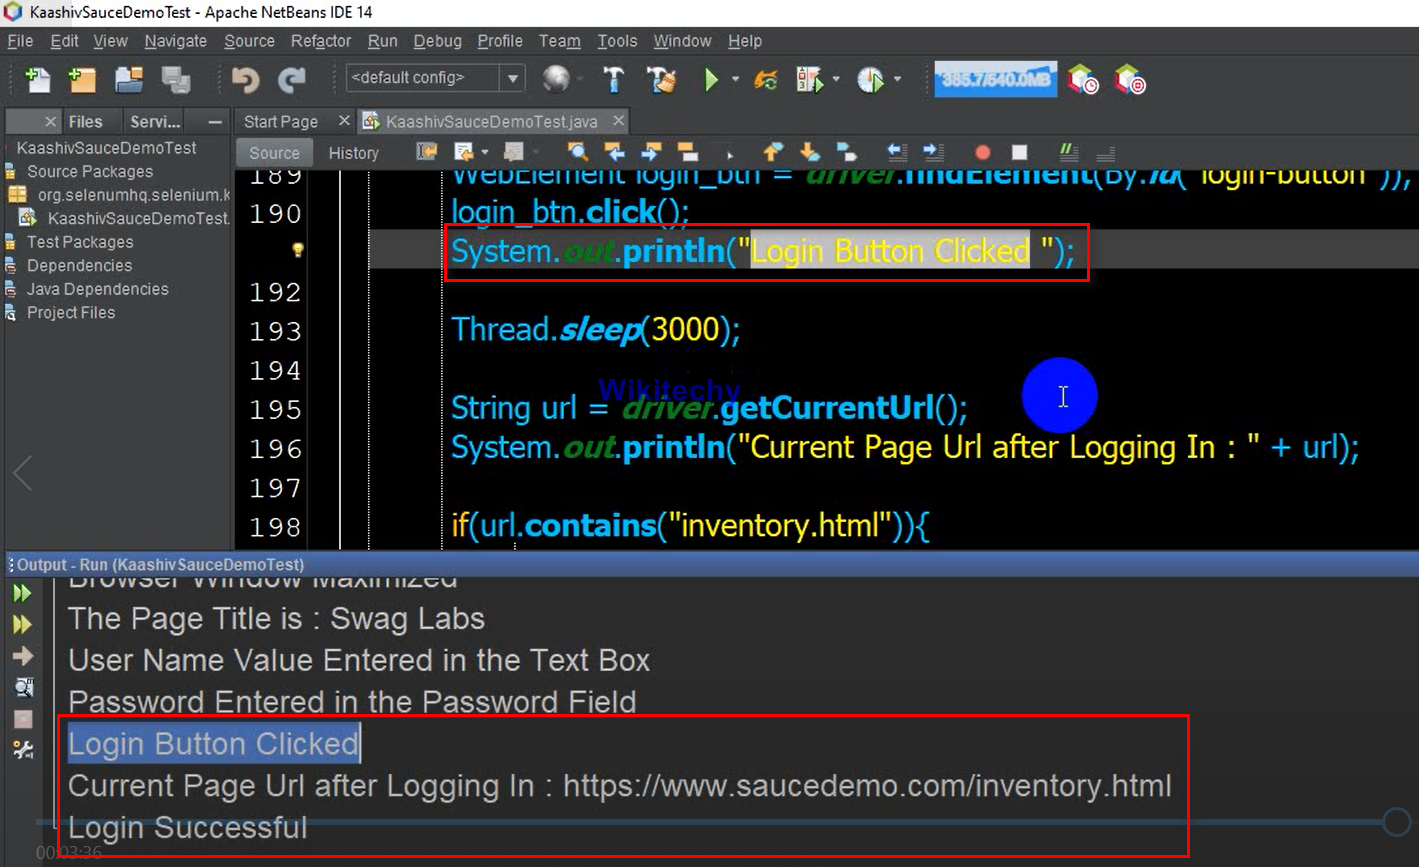
Let’s check the functionality of the login page by entering the valid user name and password and clicking on login button.
- Test Data: User name: standard_user (you can use any of the user name from the application) and Password: secret_sauce. Click on login button.


Verification: verify if the login was successful by capturing the current url after log in.
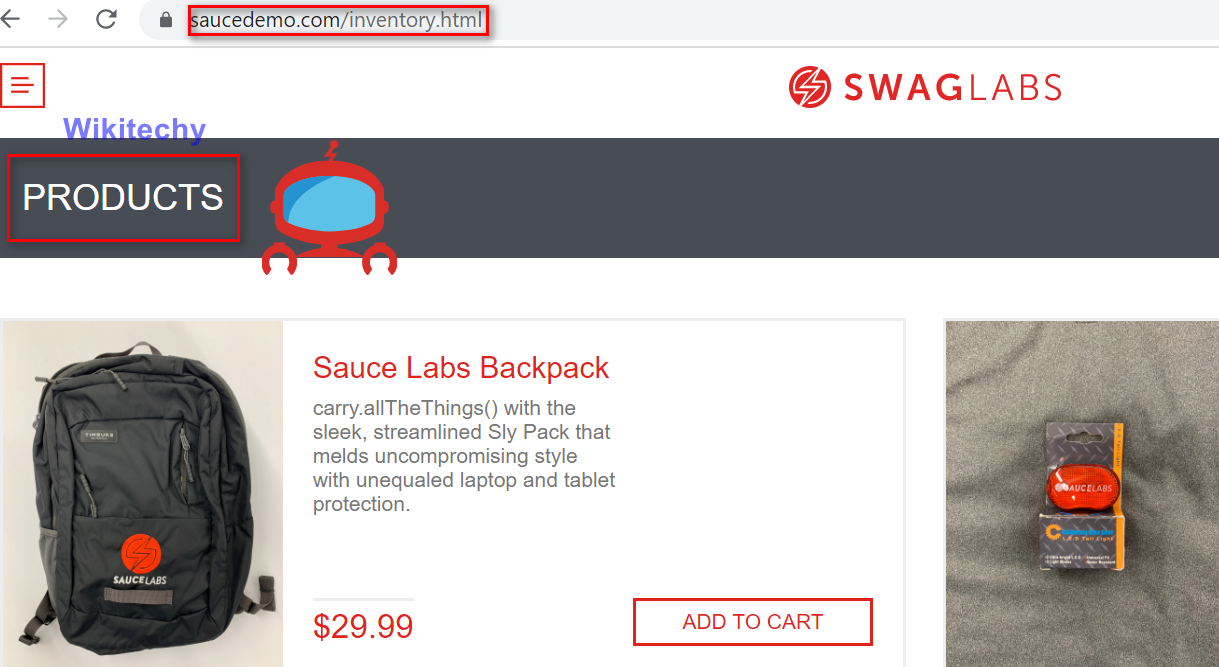
- Url to verified: https://www.saucedemo.com/inventory.html. If this matches login successful else login unsuccessful
Test Scenario
Now let’s check if we can get the header of the container:-Products. Verification: verify to check if the expected result is matched with the actual result. If expected result matches the actual result--Test Passed else Test Failed.
String Expected = "PRODUCTS"; Let’s automate it.
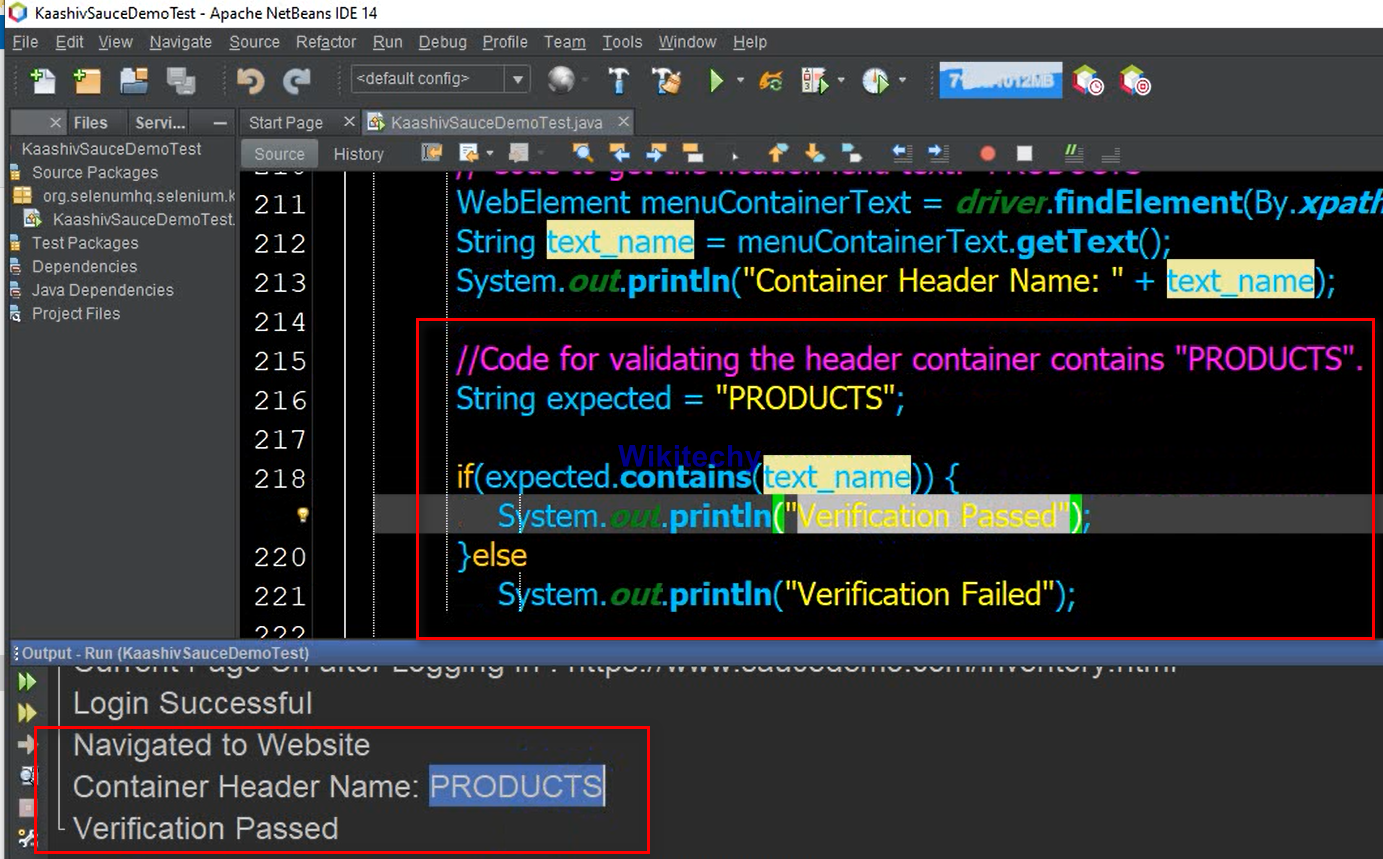
- Here we have verified the "Products" Title present in the container. In this page we will select the values from the names dropdown and get all the values inside the drop down.
Test Scenario
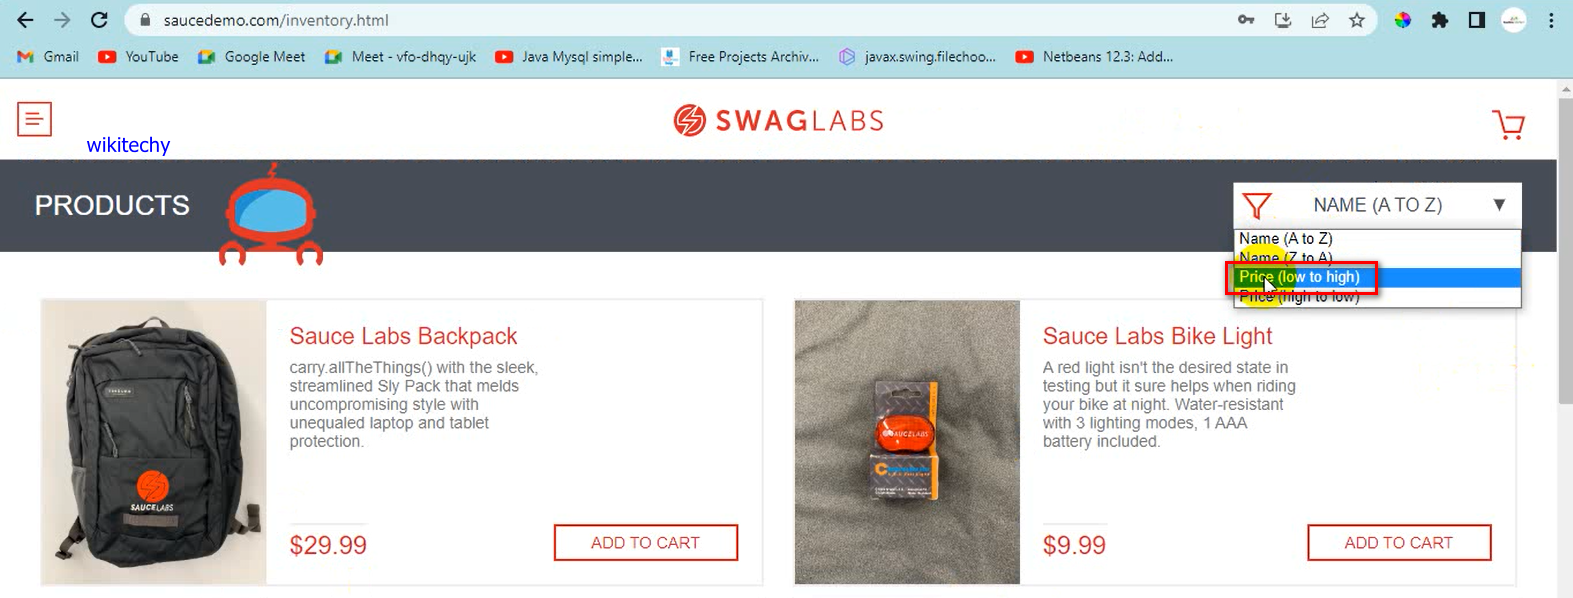
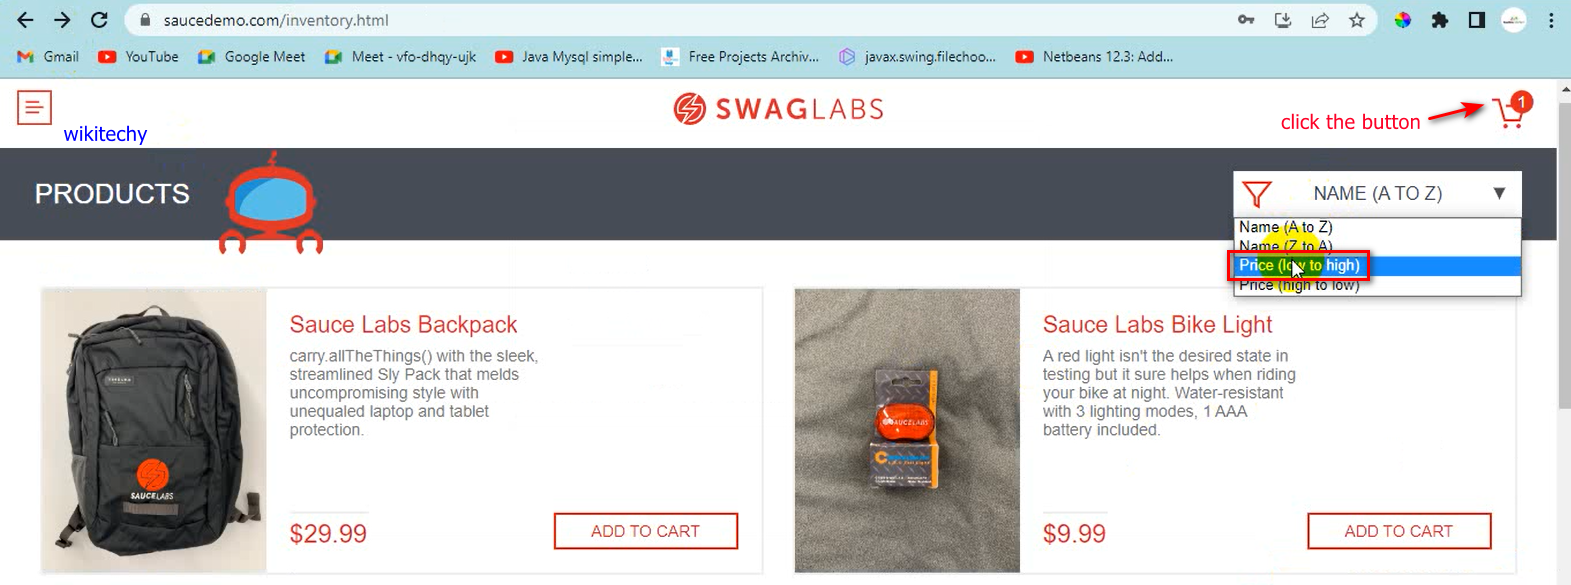
Verify if names dropdown is present in the container.
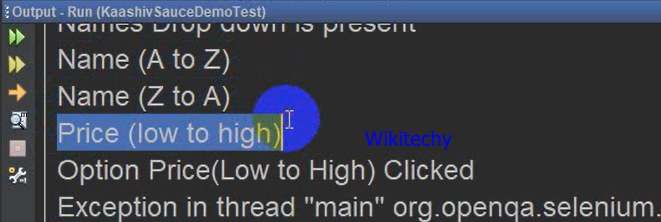
- If names dropdown is present, then get all the dropdown menu items, and then click on Price (Low to High) dropdown item.
Let’s automate this scenario.
Test Scenario
Here we are going to get the product name in the inventory list after clicking the dropdown price low to high.
- After getting the product name let us validate if the product name "Sauce Labs Onesie" matches with our output.
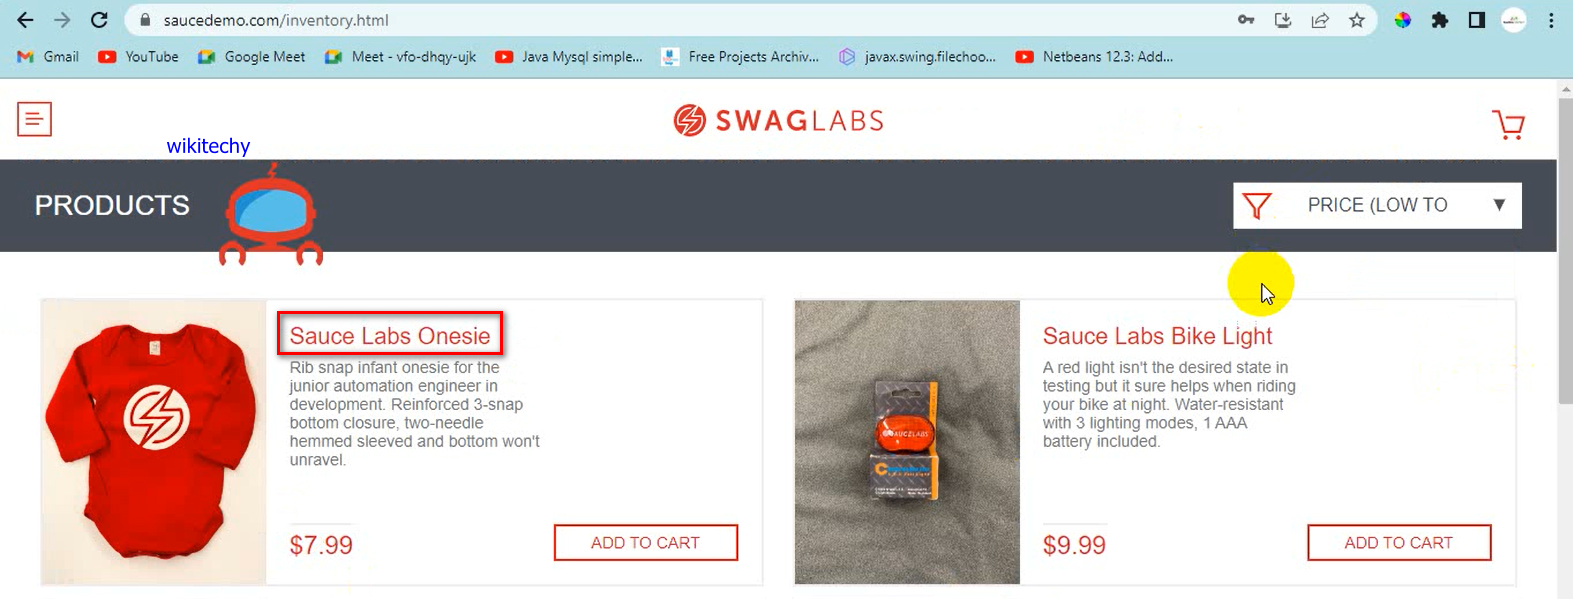
Let’s automate this scenario.

Test Scenario
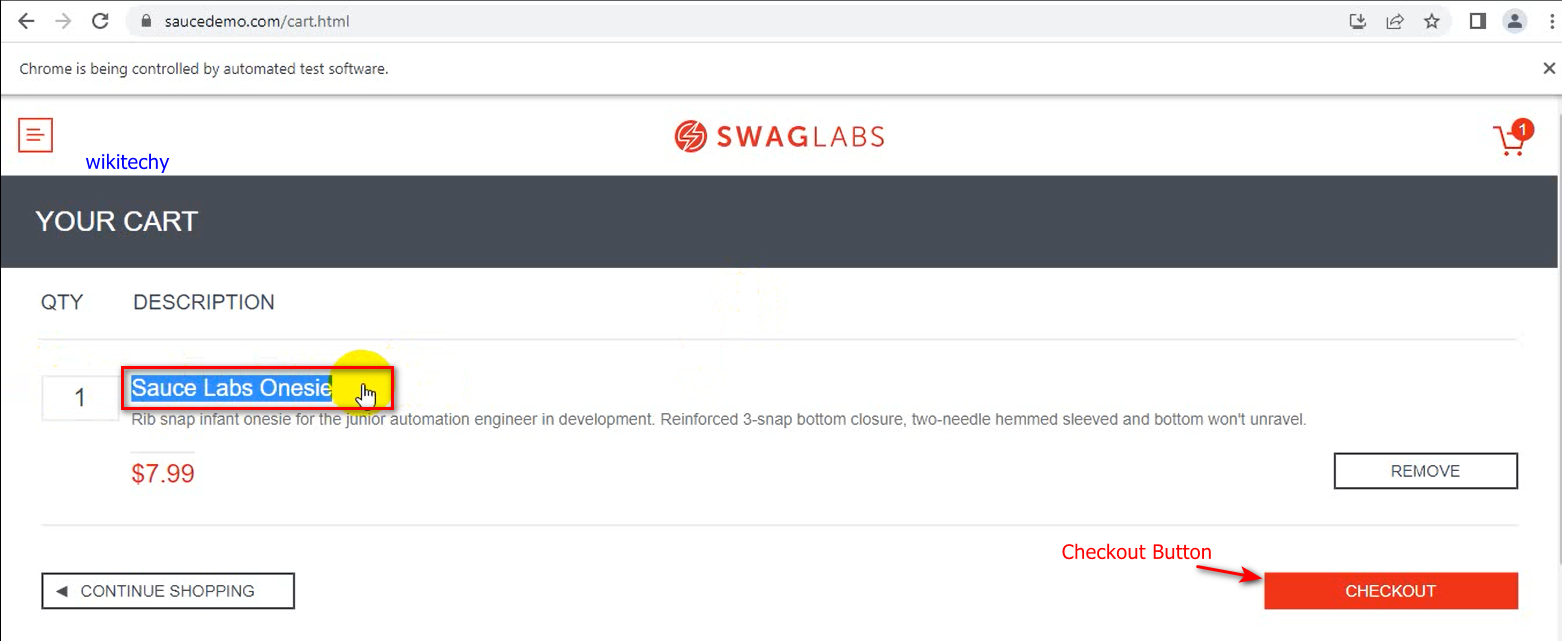
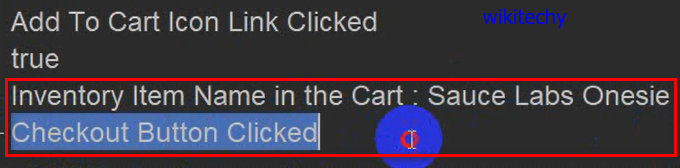
We have to get the product title once again which is "Sauce Labs Onesie", if the tile matches "Sauce Labs Onesie" the product should be added to the cart by clicking on add to cart button.
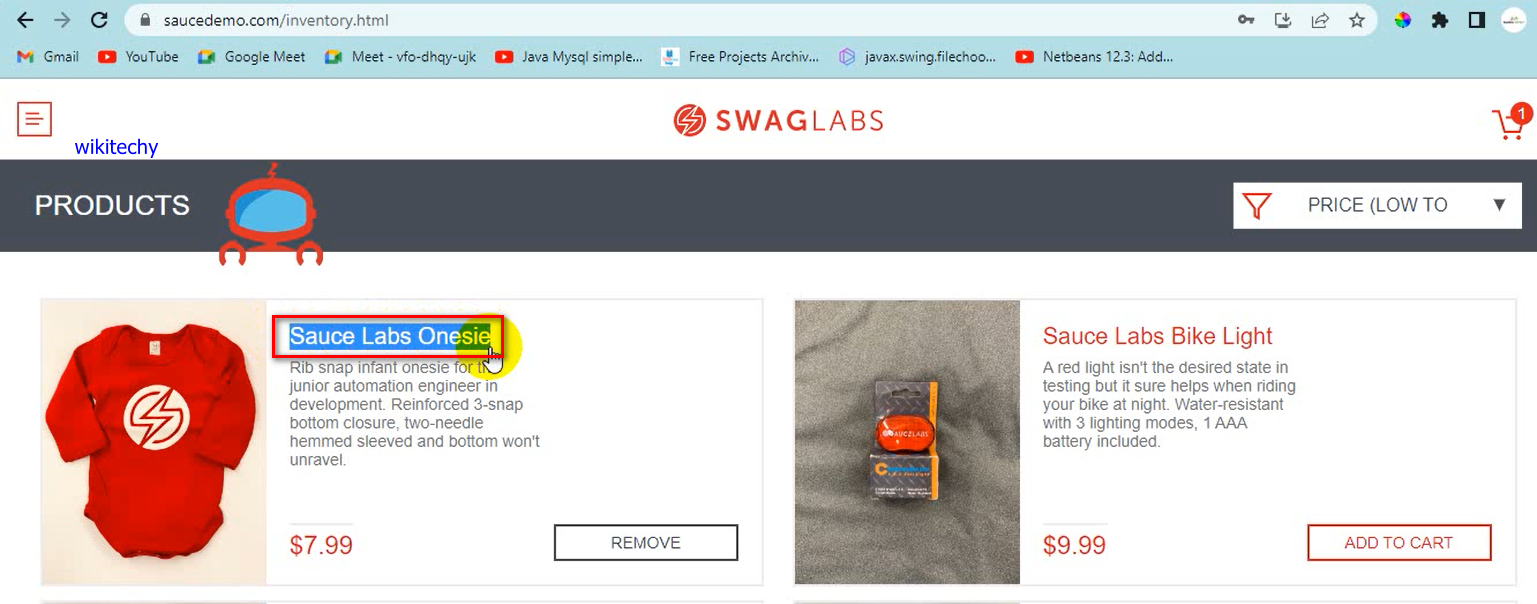
Let’s automate this scenario.

Test Scenario
We have to click the cart icon and verify if the product that is added to the cart is the correct product by verifying the product title name.
If the title name matches we have to click on checkout button.
Let’s automate this scenario.
Test Scenario
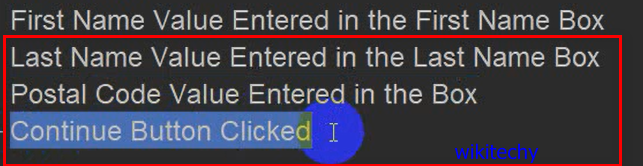
Automate the functionality of check out page. Get the checkout url: https://www.saucedemo.com/checkout-step-one.html and verify if it matches the actual url.if the url matches then enter the first name, last name, postal code details and click on continue button.

Let’s automate this scenario.

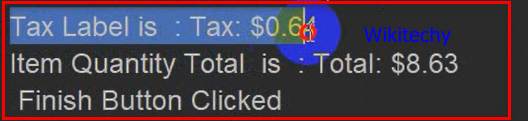
Test Scenario
In this scenario we have to verify the overview of the checkout details like Qty, description, product name, product price, payment information, shipping information, item total, tax and total for the item added in the cart and after verifying the above details we have to click the finish button.
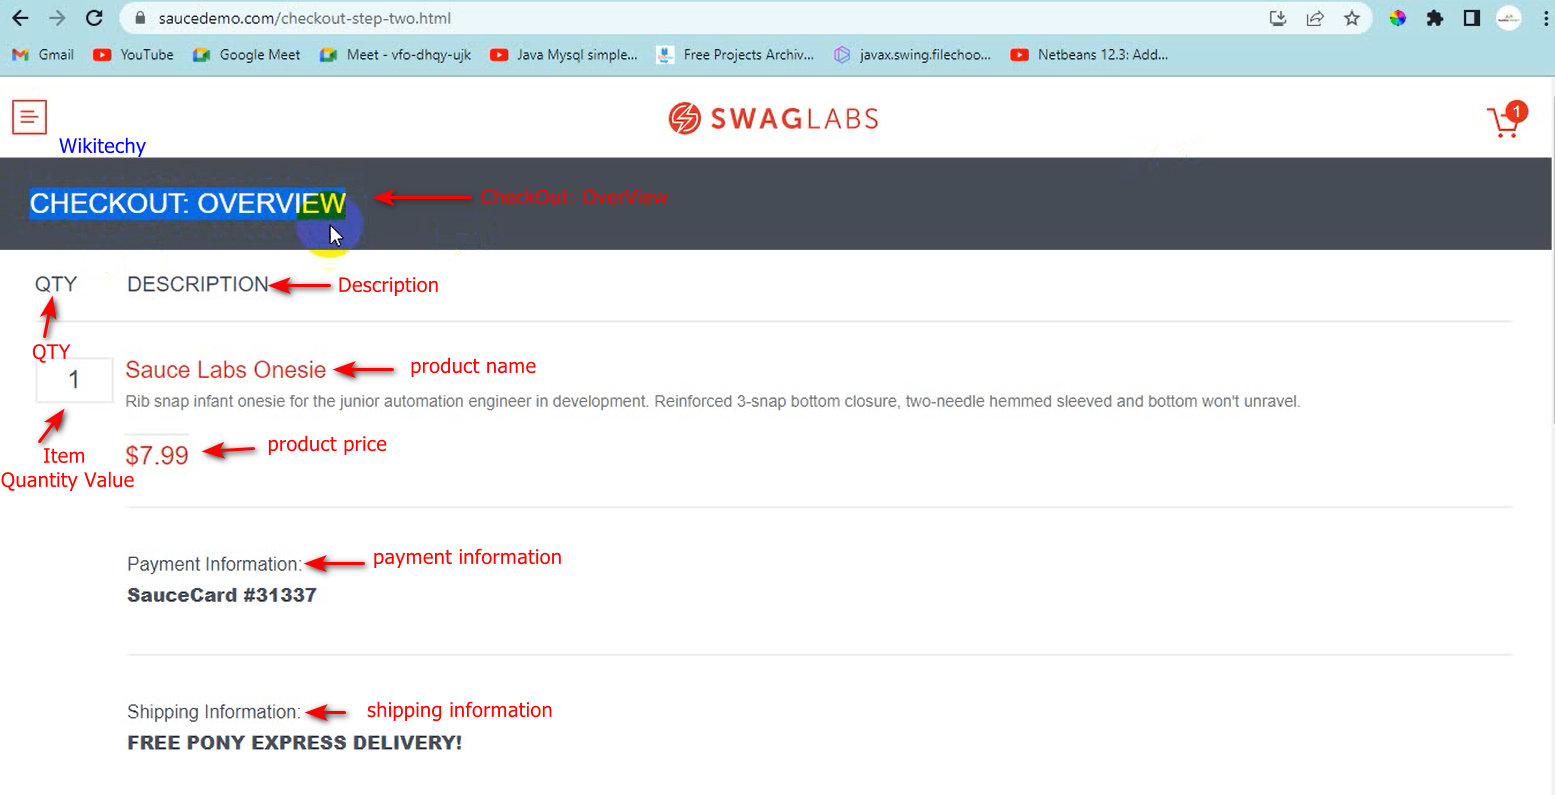
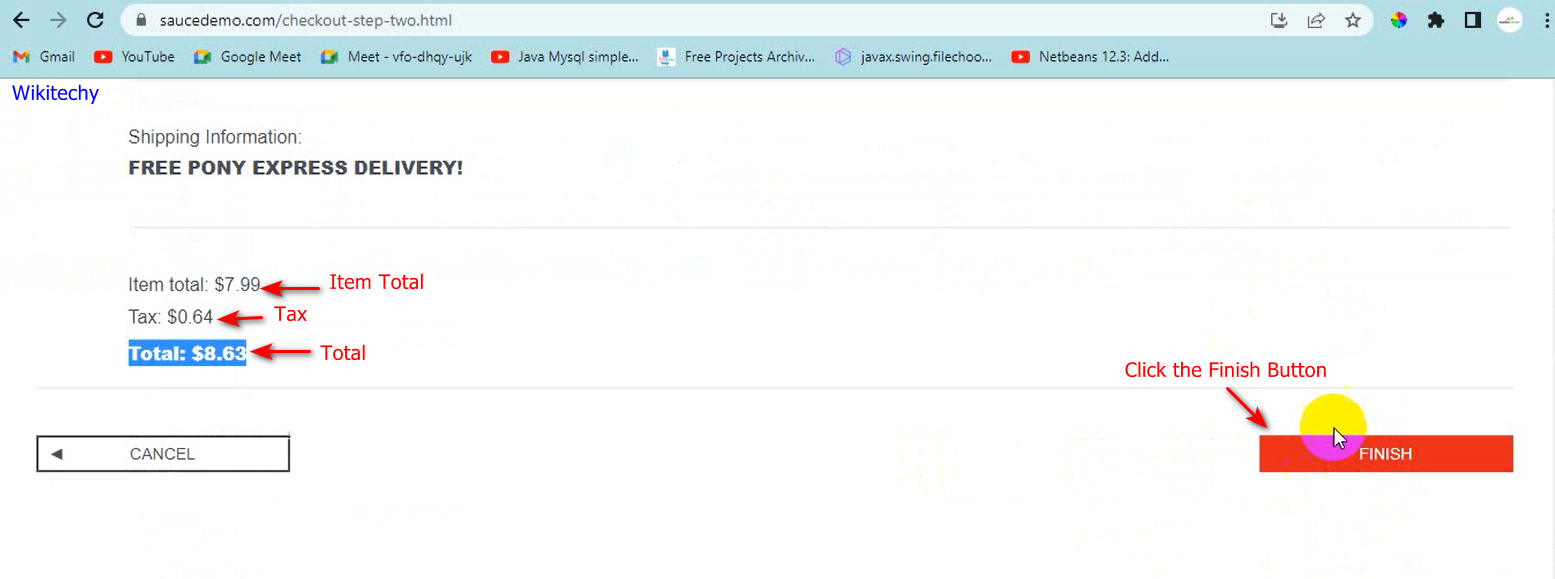
Let’s automate this scenario.


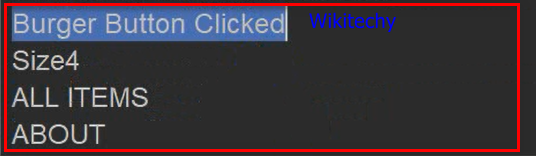
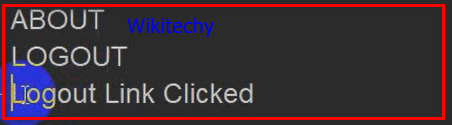
Test Scenario
Clicking on the burger menu button and get all the links under the burger menu. We have to check if logout button is present, if the logout button is present, then click on it.

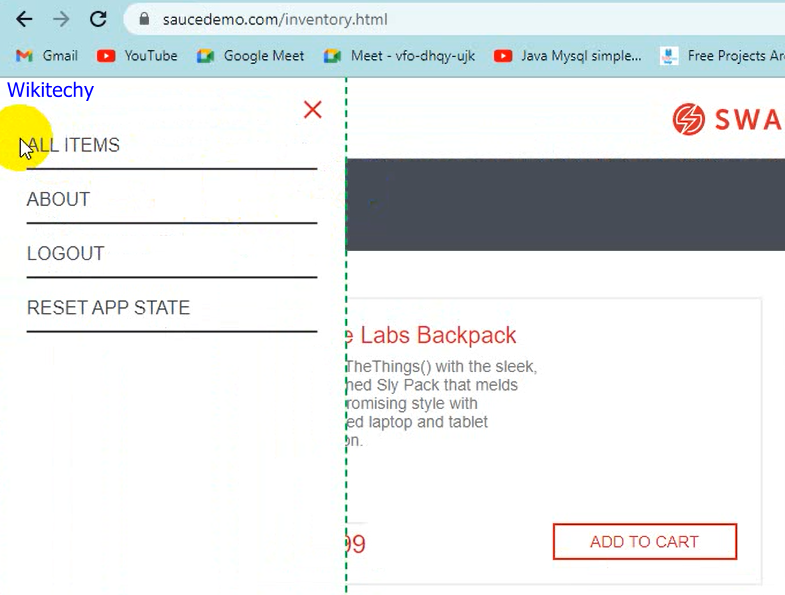
Let’s automate this scenario.