sqoop - Sqoop - Installation - apache sqoop - sqoop tutorial - sqoop hadoop
How to install Sqoop?
- As Sqoop is a sub-project of Hadoop, it can only work on Linux operating system.
- Follow the steps given below to install Sqoop on your system.
Step 1: Verifying JAVA Installation
You need to have Java installed on your system before installing Sqoop. Let us verify Java installation using the following command:
$ java -version
Click "Copy code" button to copy into clipboard - By wikitechy - sqoop tutorial - team
If Java is already installed on your system, you get to see the following response:
java version "1.7.0_71"Java(TM) SE RuntimeEnvironment(build 1.7.0_71-b13)JavaHotSpot(TM)Client VM (build 25.0-b02, mixed mode)
Click "Copy code" button to copy into clipboard - By wikitechy - sqoop tutorial - team
If Java is not installed on your system, then follow the steps given below.
Installing Java
Follow the simple steps given below to install Java on your system.
Step 1
- Download Java (JDK
- X64.tar.gz) by visiting the following link - Then jdk-7u71-linux-x64.tar.gz will be downloaded onto your system.
Step 2
- Generally, you can find the downloaded Java file in the Downloads folder.
- Verify it and extract the jdk-7u71-linux-x64.gz file using the following commands.
$ cd Downloads/
Click "Copy code" button to copy into clipboard - By wikitechy - sqoop tutorial - team
$ ls
jdk-7u71-linux-x64.gz
$ tar zxf jdk-7u71-linux-x64.gz
$ ls
jdk1.7.0_71 jdk-7u71-linux-x64.gz
Click "Copy code" button to copy into clipboard - By wikitechy - sqoop tutorial - team
Step 3
- To make Java available to all the users, you have to move it to the location “/usr/local/”. Open root, and type the following commands
$ su
password:
# mv jdk1.7.0_71 /usr/local/java# exitStep IV:
Click "Copy code" button to copy into clipboard - By wikitechy - sqoop tutorial - team
Step 4
For setting up PATH and JAVA_HOME variables, add the following commands to ~/.bashrc file.
export JAVA_HOME=/usr/local/javaexport PATH=$PATH:$JAVA_HOME/bin
Click "Copy code" button to copy into clipboard - By wikitechy - sqoop tutorial - team
Now apply all the changes into the current running system
\$ source~/.bashrc
Click "Copy code" button to copy into clipboard - By wikitechy - sqoop tutorial - team
Step 5
Use the following commands to configure Java alternatives:
# alternatives --install /usr/bin/java java usr/local/java/bin/java 2# alternatives --install /usr/bin/javacjavacusr/local/java/bin/javac 2# alternatives --install /usr/bin/jar jar usr/local/java/bin/jar 2
# alternatives --set java usr/local/java/bin/java# alternatives --set javacusr/local/java/bin/javac# alternatives --set jar usr/local/java/bin/jar
Click "Copy code" button to copy into clipboard - By wikitechy - sqoop tutorial - team
- Now verify the installation using the command java -version from the terminal as explained above.
Step 2: Verifying Hadoop Installation
- Hadoop must be installed on your system before installing Sqoop. Let us verify the Hadoop installation using the following command:
$ hadoop version
Click "Copy code" button to copy into clipboard - By wikitechy - sqoop tutorial - team
- If Hadoop is already installed on your system, then you will get the following response:
Hadoop2.4.1--Subversion https://svn.apache.org/repos/asf/hadoop/common -r 1529768Compiledbyhortonmu on 2013-10-07T06:28ZCompiledwithprotoc2.5.0From source with checksum 79e53ce7994d1628b240f09af91e1af4
Click "Copy code" button to copy into clipboard - By wikitechy - sqoop tutorial - team
- If Hadoop is not installed on your system, then proceed with the following steps:
Downloading Hadoop
- Download and extract Hadoop 2.4.1 from Apache Software Foundation using the following commands.
$ su
password:
# cd /usr/local# wget http://apache.claz.org/hadoop/common/hadoop-2.4.1/
hadoop-2.4.1.tar.gz# tar xzf hadoop-2.4.1.tar.gz# mv hadoop-2.4.1/* to hadoop/# exit
Click "Copy code" button to copy into clipboard - By wikitechy - sqoop tutorial - team
Installing Hadoop in Pseudo Distributed Mode
- Follow the steps given below to install Hadoop 2.4.1 in pseudo-distributed mode.
Step 1: Setting up Hadoop
- You can set Hadoop environment variables by appending the following commands to ~/.bashrc file.
export HADOOP_HOME=/usr/local/hadoopexport HADOOP_MAPRED_HOME=$HADOOP_HOMEexport HADOOP_COMMON_HOME=$HADOOP_HOMEexport HADOOP_HDFS_HOME=$HADOOP_HOMEexport YARN_HOME=$HADOOP_HOMEexport HADOOP_COMMON_LIB_NATIVE_DIR=$HADOOP_HOME/lib/nativeexport PATH=$PATH:$HADOOP_HOME/sbin:$HADOOP_HOME/bin
Click "Copy code" button to copy into clipboard - By wikitechy - sqoop tutorial - team
- Now, apply all the changes into the current running system.
$ source~/.bashrc
Click "Copy code" button to copy into clipboard - By wikitechy - sqoop tutorial - team
Step 2: Hadoop Configuration
- You can find all the Hadoop configuration files in the location “$HADOOP_HOME/etc/hadoop”.
- You need to make suitable changes in those configuration files according to your Hadoop infrastructure.
$ cd $HADOOP_HOME/etc/hadoop
Click "Copy code" button to copy into clipboard - By wikitechy - sqoop tutorial - team
- In order to develop Hadoop programs using java, you have to reset the java environment variables in hadoop-env.sh file by replacing JAVA_HOME value with the location of java in your system.
export JAVA_HOME=/usr/local/java
Click "Copy code" button to copy into clipboard - By wikitechy - sqoop tutorial - team
- Given below is the list of files that you need to edit to configure Hadoop.
core-site.xml
- The core-site.xml file contains information such as the port number used for Hadoop instance, memory allocated for the file system, memory limit for storing the data, and the size of Read/Write buffers.
- Open the core-site.xml and add the following properties in between the
and tags.
<configuration>
<property>
<name>fs.default.name</name>
<value>hdfs://localhost:9000 </value>
</property></configuration>
Click "Copy code" button to copy into clipboard - By wikitechy - sqoop tutorial - team
hdfs-site.xml
- The hdfs-site.xml file contains information such as the value of replication data, namenode path, and datanode path of your local file systems.
- It means the place where you want to store the Hadoop infrastructure.
- Let us assume the following data.
dfs.replication(data replication value)=1
(In the following path /hadoop/is the user name.
hadoopinfra/hdfs/namenodeis the directory created byhdfs file system.)
namenode path =//home/hadoop/hadoopinfra/hdfs/namenode
(hadoopinfra/hdfs/datanodeis the directory created byhdfs file system.)
datanode path =//home/hadoop/hadoopinfra/hdfs/datanode
Click "Copy code" button to copy into clipboard - By wikitechy - sqoop tutorial - team
- Open this file and add the following properties in between the
, tags in this file.
<configuration>

<property>
<name>dfs.replication</name>
<value>1</value>
</property>

<property>
<name>dfs.name.dir</name>
<value>file:///home/hadoop/hadoopinfra/hdfs/namenode </value>
</property>

<property>
<name>dfs.data.dir</name>
<value>file:///home/hadoop/hadoopinfra/hdfs/datanode </value>
</property>
</configuration>
Click "Copy code" button to copy into clipboard - By wikitechy - sqoop tutorial - team
Note:
In the above file, all the property values are user-defined and you can make changes according to your Hadoop infrastructure.
yarn-site.xml
This file is used to configure yarn into Hadoop. Open the yarn-site.xml file and add the following properties in between the
<configuration>
<property>
<name>yarn.nodemanager.aux-services</name>
<value>mapreduce_shuffle</value>
</property></configuration>
Click "Copy code" button to copy into clipboard - By wikitechy - sqoop tutorial - team
mapred-site.xml
- This file is used to specify which MapReduce framework we are using. By default, Hadoop contains a template of yarn-site.xml.
- First of all, you need to copy the file from mapred-site.xml.template to mapred-site.xml file using the following command.
$ cpmapred-site.xml.template mapred-site.xml
Click "Copy code" button to copy into clipboard - By wikitechy - sqoop tutorial - team
- Open mapred-site.xml file and add the following properties in between the
, tags in this file
<configuration>
<property>
<name>mapreduce.framework.name</name>
<value>yarn</value>
</property></configuration>
Click "Copy code" button to copy into clipboard - By wikitechy - sqoop tutorial - team
Verifying Hadoop Installation
The following steps are used to verify the Hadoop installation.
Step 1: Name Node Setup
- Set up the namenode using the command “hdfsnamenode -format” as follows.
$ cd ~
$ hdfsnamenode-format
Click "Copy code" button to copy into clipboard - By wikitechy - sqoop tutorial - team
The expected result is as follows.
10/24/14 21:30:55 INFO namenode.NameNode: STARTUP_MSG:
/************************************************************
STARTUP_MSG: Starting NameNode
STARTUP_MSG: host = localhost/192.168.1.11
STARTUP_MSG: args = [-format]
STARTUP_MSG: version = 2.4.1
...
...
10/24/14 21:30:56 INFO common.Storage: Storage directory
/home/hadoop/hadoopinfra/hdfs/namenode has been successfully formatted.
10/24/14 21:30:56 INFO namenode.NNStorageRetentionManager: Going to
retain 1 images with txid>= 0
10/24/14 21:30:56 INFO util.ExitUtil: Exiting with status 0
10/24/14 21:30:56 INFO namenode.NameNode: SHUTDOWN_MSG:
/************************************************************
SHUTDOWN_MSG: Shutting down NameNode at localhost/192.168.1.11
************************************************************/
Click "Copy code" button to copy into clipboard - By wikitechy - sqoop tutorial - team
Step 2: Verifying Hadoopdfs
- The following command is used to start dfs. Executing this command will start your Hadoop file system.
$ start-dfs.sh
Click "Copy code" button to copy into clipboard - By wikitechy - sqoop tutorial - team
The expected output is as follows:
10/24/14 21:37:56
Starting namenodes on [localhost]
localhost: starting namenode, logging to /home/hadoop/hadoop-
2.4.1/logs/hadoop-hadoop-namenode-localhost.out
localhost: starting datanode, logging to /home/hadoop/hadoop-
2.4.1/logs/hadoop-hadoop-datanode-localhost.out
Starting secondary namenodes [0.0.0.0]
Click "Copy code" button to copy into clipboard - By wikitechy - sqoop tutorial - team
Step 3: Verifying Yarn Script
- The following command is used to start the yarn script. Executing this command will start your yarn daemons.
$ start-yarn.sh
Click "Copy code" button to copy into clipboard - By wikitechy - sqoop tutorial - team
The expected output is as follows:
starting yarn daemons
starting resourcemanager, logging to /home/hadoop/hadoop-
2.4.1/logs/yarn-hadoop-resourcemanager-localhost.out
localhost: starting node manager, logging to /home/hadoop/hadoop-
2.4.1/logs/yarn-hadoop-nodemanager-localhost.out
Click "Copy code" button to copy into clipboard - By wikitechy - sqoop tutorial - team
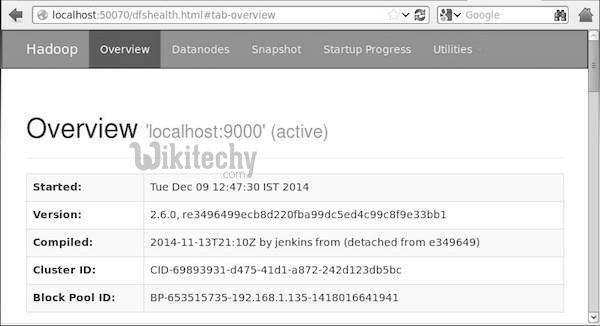
Step 4: Accessing Hadoop on Browser
The default port number to access Hadoop is 50070. Use the following URL to get Hadoop services on your browser.
http://localhost:50070/
Click "Copy code" button to copy into clipboard - By wikitechy - sqoop tutorial - team
The following image depicts a Hadoop browser.
Learn sqoop - sqoop tutorial - - sqoop examples - sqoop programs
Step 5: Verify All Applications for Cluster
- The default port number to access all applications of cluster is 8088. Use the following url to visit this service.
http://localhost:8088/
Click "Copy code" button to copy into clipboard - By wikitechy - sqoop tutorial - team
- The following image depicts the Hadoop cluster browser.
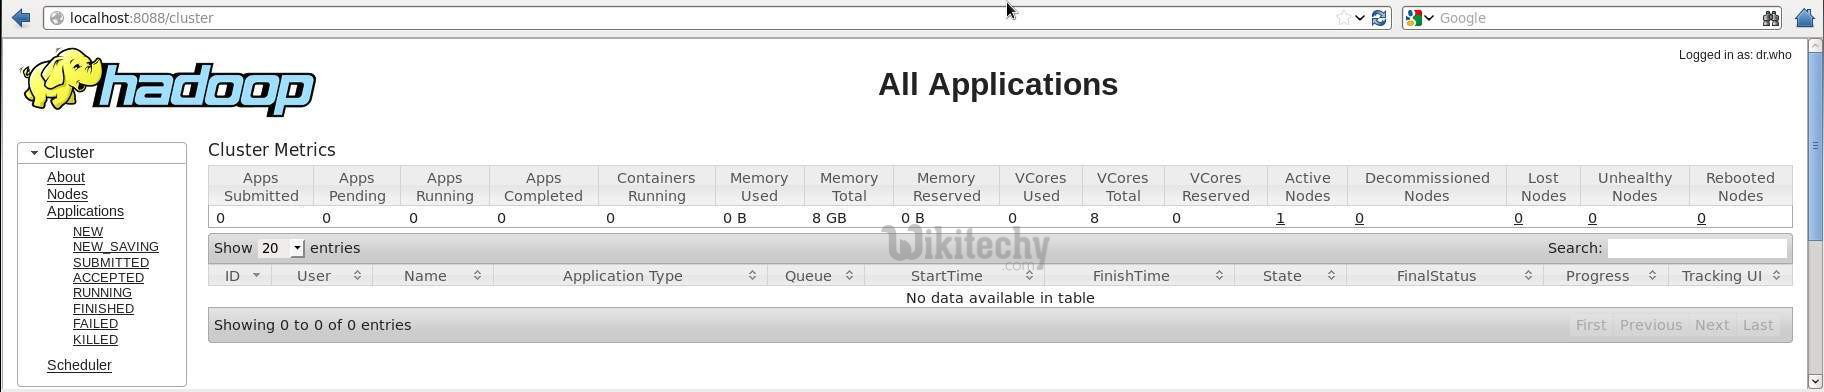
Learn sqoop - sqoop tutorial - - sqoop examples - sqoop programs
Step 3: Downloading Sqoop
We can download the latest version of Sqoop from the following link
Step 4: Installing Sqoop
- The following commands are used to extract the Sqoop tar ball and move it to “/usr/lib/sqoop” directory.
$tar -xvf sqoop-1.4.4.bin__hadoop-2.0.4-alpha.tar.gz
$ su
password:
# mv sqoop-1.4.4.bin__hadoop-2.0.4-alpha /usr/lib/sqoop#exit
Click "Copy code" button to copy into clipboard - By wikitechy - sqoop tutorial - team
Step 5: Configuring bashrc
- You have to set up the Sqoop environment by appending the following lines to ~/.bashrc file:
#Sqoopexport SQOOP_HOME=/usr/lib/sqoopexport PATH=$PATH:$SQOOP_HOME/bin
Click "Copy code" button to copy into clipboard - By wikitechy - sqoop tutorial - team
- The following command is used to execute ~/.bashrc file.
$ source~/.bashrc
Click "Copy code" button to copy into clipboard - By wikitechy - sqoop tutorial - team
Step 6: Configuring Sqoop
- To configure Sqoop with Hadoop, you need to edit the sqoop-env.sh file, which is placed in the $SQOOP_HOME/conf directory.
- First of all, Redirect to Sqoopconfig directory and copy the template file using the following command:
$ cd $SQOOP_HOME/conf
$ mv sqoop-env-template.sh sqoop-env.sh
Click "Copy code" button to copy into clipboard - By wikitechy - sqoop tutorial - team
Open sqoop-env.sh and edit the following lines:
export HADOOP_COMMON_HOME=/usr/local/hadoopexport HADOOP_MAPRED_HOME=/usr/local/hadoop
Click "Copy code" button to copy into clipboard - By wikitechy - sqoop tutorial - team
Step 7: Download and Configure mysql-connector-java
- We can download mysql-connector-java-5.1.30.tar.gz file from the following link
- The following commands are used to extract mysql-connector-java tarball and move mysql-connector-java-5.1.30-bin.jar to /usr/lib/sqoop/lib directory.
$ tar -zxf mysql-connector-java-5.1.30.tar.gz
$ su
password:
# cd mysql-connector-java-5.1.30# mv mysql-connector-java-5.1.30-bin.jar /usr/lib/sqoop/lib
Click "Copy code" button to copy into clipboard - By wikitechy - sqoop tutorial - team
Step 8: Verifying Sqoop
The following command is used to verify the Sqoop version.
$ cd $SQOOP_HOME/bin
$ sqoop-version
Click "Copy code" button to copy into clipboard - By wikitechy - sqoop tutorial - team
Expected output:
14/12/17 14:52:32 INFO sqoop.Sqoop: Running Sqoop version: 1.4.5
Sqoop 1.4.5 git commit id 5b34accaca7de251fc91161733f906af2eddbe83
Compiled by abe on Fri Aug 1 11:19:26 PDT 2014
Sqoop installation is complete.