react - React native - react js - reactjs
What is React native?
- React-Native has been around for about 2 years, and became a really interesting framework since it can be used for Android and let us build cross-platform mobile apps. A few contributors also customized the framework to build desktop apps for Mac and Windows, which is quite cool.
- React Native uses Node.js, a JavaScript runtime, to build your JavaScript code. If you don’t already have Node.js installed, it’s time to get it!
- First install Homebrew using the instructions on the Homebrew website. Then install Node.js by executing the following in a Terminal window:
learn reactjs tutorial -
react native
- reactjs example - react tutorial - reactjs - react
brew install node
click below button to copy the code. By reactjs tutorial team
- Next, use homebrew to install watchman, a file watcher from Facebook:
brew install watchman
click below button to copy the code. By reactjs tutorial team
- This is used by React Native to figure out when your code changes and rebuild accordingly. It’s like having Xcode do a build each time you save your file.
- Next use npm to install the React Native Command Line Interface (CLI) tool:
npm install -g react-native-cli
click below button to copy the code. By reactjs tutorial team
- This uses the Node Package Manager to fetch the CLI tool and install it globally; npm is similar in function to CocoaPods or Carthage and is packaged with Node.js.
- Navigate to the folder where you would like to develop your app and run the following in Terminal:
react-native init PropertyFinder
click below button to copy the code. By reactjs tutorial team
- This uses the CLI tool to create a starter project containing everything you need to build and run a React Native app.
- If you get complaints about the version of node, make sure the one installed by brew is the one in use. Run brew link --overwrite node in the terminal.
In Terminal, run:
cd PropertyFinder
click below button to copy the code. By reactjs tutorial team
In the created folders and files you will find a few items of note:
- In the created folders and files you will find a few items of note:
- Open the PropertyFinder.xcodeproj in the ios folder with Xcode, then build and run. The simulator will start and display the following:
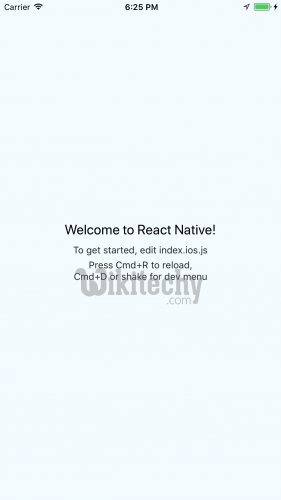
react native
- You might also have noticed that a terminal window has popped up, displaying the
- following:
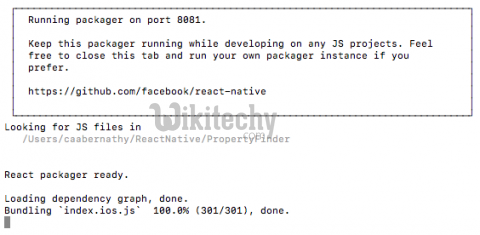
learn react - react package - react example
- This is the React Native packager, running under node. You’ll find out what it does shortly.
- Note: If you get an error starting up the packager, then in Terminal run: react-native start
- Don’t close the terminal window; just keep it running in the background. If you do close it by mistake, simply stop and re-run the project via Xcode.
- Note: You’ll be mostly writing JavaScript code for this React Native tutorial. Instead of using Xcode, I use Sublime Text, which is a cheap and versatile editor, but Atom, Brackets or any other lightweight editor will do the job.
Article tag : react , react native , react js tutorial , create react app , react tutorial , learn react
React Native Basics
- In this section, you’ll be introduced to React Native basics as you begin working on PropertyFinder.
- Open index.ios.js in your text editor of choice and take a look at the structure of the code in the file:
import React, { Component } from 'react'; // 1
import {
  AppRegistry,
  StyleSheet,
  Text,
  View
} from 'react-native';

export default class PropertyFinder extends Component { ... } // 2

const styles = StyleSheet.create({ ... }); // 3

AppRegistry.registerComponent('PropertyFinder', () => PropertyFinder); // 4
click below button to copy the code. By reactjs tutorial team
Article tag : react , react native , react js tutorial , create react app , react tutorial , learn react
Let’s go through the code step-by-step:
- In this section, you’ll be introduced to React Native basics as you begin working on PropertyFinder.
- Import the required modules.
- Defines the component that represents the UI.
- Creates a style object that controls the component’s layout and appearance.
- Registers the component that handles the app’s entry point.
- Open index.ios.js in your text editor of choice and take a look at the structure of the code in the file:
Take a closer look at this import statement:
import React, { Component } from 'react';
click below button to copy the code. By reactjs tutorial team
- This uses the ECMAScript 6 (ES6) import syntax to load the react module and assign it to a variable called React. This is roughly equivalent to linking and importing libraries in Swift.
- It also uses what’s called a destructuring assignment to bring in the Component object. Destructuring lets you extract multiple object properties and assign them to variables using a single statement.
- React Native uses a tool called Babel
- Back to index.ios.js, check out the class definition:
export default class PropertyFinder extends Component
click below button to copy the code. By reactjs tutorial team
- This defines a class which extends a React Component. The export default class modifier makes the class “public”, allowing it to be used in other files.
- It’s time to start building your app.
- In index.ios.js, add the following at the top of the file, just before the import statements:
'use strict';
click below button to copy the code. By reactjs tutorial team
- This enables Strict Mode, which adds improved error handling and disables some less-than-ideal JavaScript language features. In simple terms, it makes JavaScript better!
- Inside the PropertyFinder class replace render() with the following:
render() {
  return React.createElement(Text, {style: styles.description}, "Search for houses to buy!");
}
click below button to copy the code. By reactjs tutorial team
- PropertyFinder extends React.Component, the basic building block of the React UI. Components contain immutable properties, mutable state variables and expose a method for rendering. Your current application is quite simple and only requires a render method.
- React Native components are not UIKit classes; instead they are a lightweight equivalent. The framework takes care of transforming the tree of React components into the required native UI.
- Next, replace the const styles statement with the following:
const styles = StyleSheet.create({
  description: {
    fontSize: 18,
    textAlign: 'center',
    color: '#656565',
    marginTop: 65,
  },
});
click below button to copy the code. By reactjs tutorial team
- This defines a single style that you’ve applied to the description text.
- If you’ve done any web development before, you’ll probably recognize those property names.
- The React Native StyleSheet class used to style the application UI is similar to the Cascading Style Sheets (CSS) used on the Web.
- Save your changes to index.ios.js and return to the simulator. Press Cmd+R, and you’ll see your fledgling property search app starting to take shape:
- That’s a JavaScript application running in the simulator, rendering a native UI, without a browser in sight!
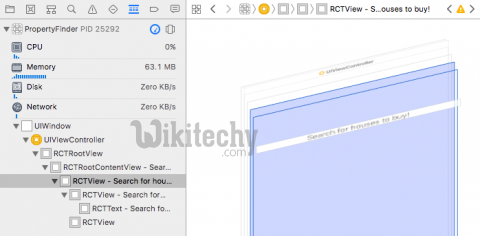
- Still don’t trust me? :] Verify it for yourself: within Xcode, select Debug\View Debugging\Capture View Hierarchy and take a look at the native view hierarchy.
- To see no UIWebView instances anywhere! Your text is being displayed in a view called RCTText. But what is that? Back in Xcode select File\Open Quickly…and type in RCTView.h. Notice RCTView inherits directly from UIView. Neat!
react property finder
- The Terminal window that was opened when you ran this application started a packager and server that allows your JavaScript code to be fetched, by default on port 8081. For example:
http://localhost:8081/index.ios.bundle
click below button to copy the code. By reactjs tutorial team
- Open this URL in Safari; you’ll see the JavaScript code for your app. You can find your “Search for houses to buy!” description code embedded among the React Native framework.
- When your app starts, this code is loaded and executed by the JavaScriptCore framework. In the case of your application, it loads the PropertyFinder component, then constructs the native UIKit view.