Switch Statement in C++ - Learn C++ - C++ Tutorial - C++ programming
Learn c++ - c++ tutorial - switch statement in c++ - c++ examples - c++ programs
What is Switch Statement in C++
- A switch statement allows a variable to be tested for equality against a list of values.
- Each value is called a case, and the variable being switched on is checked for each switch case.
- It is the chain many if-else statements together, this is difficult to read. Consider the following program:
learn c++ tutorials - switch case statement Example
Syntax:
switch(expression){
case value1:
 //code to be executed;
 break;  //optional
case value2:
 //code to be executed;
 break;  //optional
......

default:
 code to be executed if all cases are not matched;
}
#include <iostream>

enum Colors
{
    COLOR_BLACK,
    COLOR_WHITE,
    COLOR_RED,
    COLOR_GREEN,
    COLOR_BLUE
};

void printColor(Colors color)
{
    if (color == COLOR_BLACK)
        std::cout << "Black";
    else if (color == COLOR_WHITE)
        std::cout << "White";
    else if (color == COLOR_RED)
        std::cout << "Red";
    else if (color == COLOR_GREEN)
        std::cout << "Green";
    else if (color == COLOR_BLUE)
        std::cout << "Blue";
    else
        std::cout << "Unknown";
}

int main()
{
    printColor(COLOR_GREEN);

    return 0;
}- Because doing if-else chains on a single variable testing for equality is so common
- C++ provides an alternative conditional branching operator called a switch.
- Here is the same program as above in switch form:
void printColor(Colors color)
{
    switch (color)
    {
        case COLOR_BLACK:
            std::cout << "Black";
            break;
        case COLOR_WHITE:
            std::cout << "White";
            break;
        case COLOR_RED:
            std::cout << "Red";
            break;
        case COLOR_GREEN:
            std::cout << "Green";
            break;
        case COLOR_BLUE:
            std::cout << "Blue";
            break;
        default:
            std::cout << "Unknown";
            break;
    }
}- The overall idea behind switch statements is simple: the switch expression is evaluated to produce a value, and each case label is tested against this value for equality.
- If a case label matches, the statements after the case label are executed.
- If no case label matches the switch expression, the statements after the default label are executed (if it exists).
- Because of the way they are implemented, switch statements are typically more efficient than if-else chains.
- Let’s examine each of these concepts in more detail.
Starting a switch
- We start a switch statement by using the switch keyword, followed by the expression that we would like to evaluate.
- Floating point variables and other non-integral types may not be used here.
- Following the switch expression, we declare a block. Inside the block, we use labels to define all of the values we want to test for equality. There are two kinds of labels.
Case labels
- The first kind of label is the case label, which is declared using the case keyword and followed by a constant expression.
- A constant expression is one that evaluates to a constant value -- in other words, either a literal (such as 5), an enum (such as COLOR_RED), or a constant variable (such as x, when x has been defined as a const int).
- The constant expression following the case label is tested for equality against the expression following the switch keyword. If they match, the code under the case label is executed.
- It is worth noting that all case label expressions must evaluate to a unique value. That is, you can not do this:
switch (x)
{
    case 4:
    case 4:  // illegal -- already used value 4!
    case COLOR_BLUE: // illegal, COLOR_BLUE evaluates to 4!
};- It is possible to have multiple case labels refer to the same statements. The following function uses multiple cases to test if the ‘c’ parameter is an ASCII digit.
bool isDigit(char c)
{
    switch (c)
    {
        case '0': // if c is 0
        case '1': // or if c is 1
        case '2': // or if c is 2
        case '3': // or if c is 3
        case '4': // or if c is 4
        case '5': // or if c is 5
        case '6': // or if c is 6
        case '7': // or if c is 7
        case '8': // or if c is 8
        case '9': // or if c is 9
            return true; // then return true
        default:
            return false;
    }
}- In the case where c is an ASCII digit, the first statement after the matching case statement is executed, which is “return true”.
Learn C++ , C++ Tutorial , C++ programming - C++ Language -Cplusplus
The default label
- The second kind of label is the default label (often called the “default case”), which is declared using the default keyword. The code under this label gets executed if none of the cases match the switch expression.
- The default label is optional, and there can only be one default label per switch statement. It is also typically declared as the last label in the switch block, though this is not strictly necessary.
- In the isDigit() example above, if c is not an ASCII digit, the default case executes and returns false.
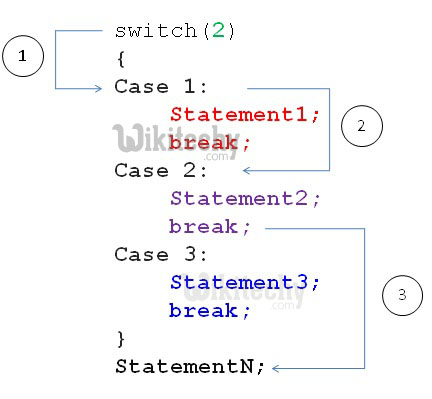
Switch execution and fall-through
- One of the trickiest things about case statements is the way in which execution proceeds when a case is matched.
- When a case is matched (or the default is executed), execution begins at the first statement following that label and continues until one of the following termination conditions is true:
- The end of the switch block is reached
- A return statement occurs
- A goto statement occurs
- A break statement occurs
- Note that if none of these termination conditions are met, cases will overflow into subsequent cases! Consider the following snippet:
switch (2)
{
   case 1: // Does not match
       std::cout << 1 << '\n'; // skipped
   case 2: // Match!
       std::cout << 2 << '\n'; // Execution begins here
   case 3:
       std::cout << 3 << '\n'; // This is also executed
   case 4:
       std::cout << 4 << '\n'; // This is also executed
   default:
       std::cout << 5 << '\n'; // This is also executed
}
This snippet prints the result:
2
3
4
5
- This is probably not what we wanted! When execution flows from one case into another case, this is called fall-through.
- Fall-through is almost never desired by the programmer, so in the rare case where it is, it is common practice to leave a comment stating that the fall-through is intentional.
Break statements
- A break statement (declared using the break keyword) tells the compiler that we are done with this switch (or while, do while, or for loop).
- After a break statement is encountered, execution continues with the statement after the end of the switch block.
- Let’s look at our last example with break statements properly inserted:
switch (2)
{
   case 1: // Does not match -- skipped
       std::cout << 1 << '\n';
       break;
   case 2: // Match!  Execution begins at the next statement
       std::cout << 2 << '\n'; // Execution begins here
       break; // Break terminates the switch statement
   case 3:
       std::cout << 3 << '\n';
       break;
   case 4:
       std::cout << 4 << '\n';
       break;
   default:
       std::cout << 5 << '\n';
       break;
}
// Execution resumes here
Multiple statements inside a switch block
- One other bit of weirdness about switches is that you can have multiple statements underneath each case without defining a new block.
switch (1)
{
    case 1:
        std::cout << 1;
        foo();
        std::cout << 2;
        break;
    default:
        std::cout << "default case\n";
        break;
}
Variable declaration and initialization inside case statements
- You can declare, but not initialize, variables inside the case statements:
switch (x)
{
    case 1:
        int y; // okay, declaration is allowed
        y = 4; // okay, this is an assignment
        break;

    case 2:
        y = 5; // okay, y was declared above, so we can use it here too
        break;

    case 3:
        int z = 4; // illegal, you can't initialize new variables in the case statements
        break;

    default:
        std::cout << "default case" << std::endl;
        break;
}- Note that although variable y was defined in case 1, it was used in case 2 as well. All cases are considered part of the same scope, so a declaration in one case can be used in subsequent cases.
- This may seem a bit counter-intuitive, so let’s examine why. When you define a local variable like “int y;”, the variable isn’t created at that point.
- So with that in mind, it’s a little less weird that a variable declared in one case statement can be used in another cases statement, even if the case statement that declares the variable is never executed.
- However, initialization of variables directly underneath a case label is disallowed and will cause a compile error.
- This is because initializing a variable does require execution, and the case statement containing the initialization may not be executed!
- If a case needs to define and/or initialize a new variable, best practice is to do so inside a block underneath the case statement:
switch (1)
{
    case 1:
    { // note addition of block here
        int x = 4; // okay, variables can be initialized inside a block inside a case
        std::cout << x;
        break;
    }
    default:
        std::cout << "default case" << std::endl;
        break;
}