Clearfix :
A clearfix is a way for an element to automatically clear its child elements, so that you don’t need to add additional markup. It’s generally used in float layouts where elements are floated to be stacked horizontally. The clearfix is a way to combat the zero-height container problem for floated elements.
Table Of Content
When and How to use a Clearfix :
A CSS clearfix is used to fix issues related to floating child elements within a parent element. Without a clearfix your child elements wont behave as you expect them too. When a HTML element is floated it can appear to sit outside its parent element and that means it wont adjust the parents height accordingly.
It is important to remember that a clearfix is a type of hack used to fix problems associated with floating child elements within a parent element. Float was intended to be used; as an example – to position elements like images within a page. When you float an image left or right the text will wrap around it.
What Happens when you Don’t use a Clearfix :
Lets assume you have a div with a class container. Inside this div you have two more divs with the classes content and sidebar respectively and you want to float them so your content is on the left and your sidebar on the right.
Without a clearfix the following would happen.
Figure I :
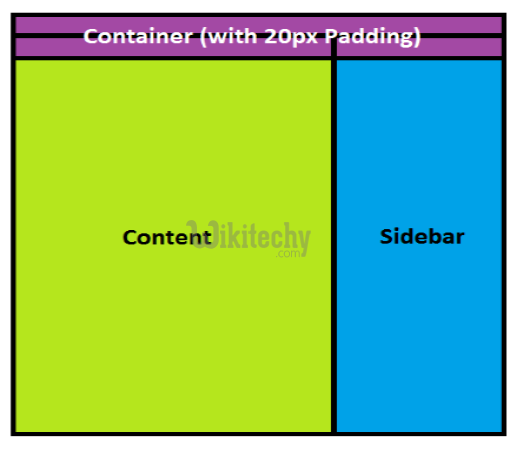
Notice how the two floated Divs (elements) are outside the parent container and are only influenced by the padding at the top. In this case there is 20px of padding on all sides of the parent container. So both the content and sidebar will be pushed down by 10px. However we also wanted 10px of clearance on the left, right and bottom but since floated elements get pushed outside the parent container this is not happening.
On a real websites the results are a whacky looking website.
[ad type=”banner”]Figure II :
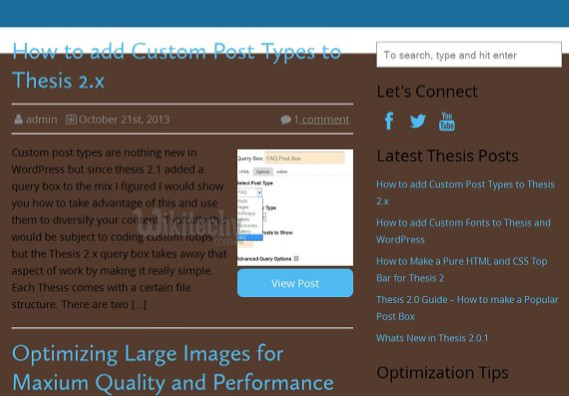
What your seeing here is the same as figure I on blog. The brown colored background is coming from the optin form right at the bottom. Without a clearfix it fills the space that should be occupied by the parent container which houses both the sidebar and content. The white space you see at the top is the padding.
What Happens when you Include a Clearfix :
When you include a clearfix the issues presented in figures I & II will be rectified. Here is the same illustration shown in figure I with a clearfix.
Figure III :
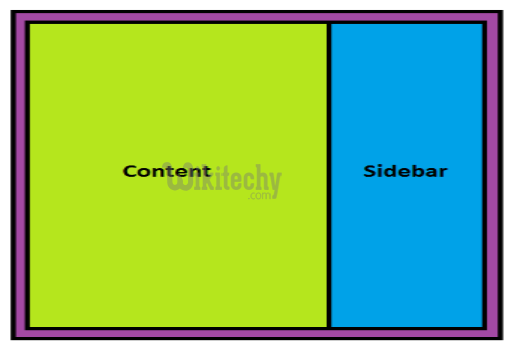
As you can see the parent container now wraps around the two child elements ( content and sidebar) and this gives us the desired behavior that we would expect. This would also fix the issue seen in figure II as the footer and optin form would sit below the container. You will also notice the padding ( seen in purple) also behaves as we would expect.
How to use a Clearfix?
When applying classes to your HTML elements you should be mindful of which elements require a clearfix. Any HTML element will have floated child elements will require a clearfix. You can do this by adding the class clearfix to your existing classes ( assuming you have access to editing those classes).
[pastacode lang=”markup” manual=”%3Cdiv%20class%3D%22container%20clearfix%22%3E%0A%20%20%20%20%3Cdiv%20class%3D%22content%22%3Eother%20content%20stuff…%3C%2Fdiv%3E%0A%20%20%20%20%3Cdiv%20class%3D%22sidebar%22%3ESidebar%20stuff…%3C%2Fdiv%3E%0A%3C%2Fdiv%3E%0A” message=”Html Code” highlight=”” provider=”manual”/] [ad type=”banner”]HTML classes can accept more than one class by separating them with a space. That means the container will accept CSS rules from both .container and .clearfix.
Methods of Clearfix :
“Reloaded” clearfix
“Beat That ClearFix”
Micro Clearfix
“Reloaded” clearfix :
Making a strong argument for dropping display: table in favor of display: block which has the advantage of not disabling margin-collapse between containers.
[pastacode lang=”css” manual=”.container%3A%3Aafter%20%7B%0A%20%20%20%20content%3A%22%22%3B%0A%20%20%20%20display%3Ablock%3B%0A%20%20%20%20clear%3Aboth%3B%0A%7D%0A” message=”Css Code” highlight=”” provider=”manual”/]“Beat That ClearFix“ :
when targeting modern browsers, we can now drop the zoom and ::before property/values and simply use:
[pastacode lang=”css” manual=”.container%3A%3Aafter%20%7B%0A%20%20%20%20content%3A%22%22%3B%0A%20%20%20%20display%3Atable%3B%0A%20%20%20%20clear%3Aboth%3B%0A%7D%0A” message=”Css Code” highlight=”” provider=”manual”/]If you start a new project from scratch, go for it, but don’t swap this technique with the one you have now, because even though you do not support oldIE, your existing rules prevent collapsing margins.”
Micro Clearfix :
The most recent and globally adopted clearfix solution, the Micro Clearfix
[pastacode lang=”css” manual=”.container%3A%3Abefore%2C%20.container%3A%3Aafter%20%7B%0A%20%20%20%20content%3A%22%22%3B%0A%20%20%20%20display%3Atable%3B%0A%7D%0A.container%3A%3Aafter%20%7B%0A%20%20%20%20clear%3Aboth%3B%0A%7D%0A.container%20%7B%0A%20%20%20%20zoom%3A1%3B%20%2F*%20For%20IE%206%2F7%20(trigger%20hasLayout)%20*%2F%0A%7D%0A” message=”Css Code” highlight=”” provider=”manual”/]