
Install Cassandra on Centos 6
Table Of Content
Apache Cassandra could be a NoSQL info meant for storing massive amounts of knowledge in a very suburbanized, extremely accessible cluster. NoSQL refers to information of a knowledge and information base with a data model apart from the tabular relations utilized in relative databases like MySQL, PostgreSQL, and Microsoft SQL
Pre-Flight Check
- These directions are supposed for putting in prophetess a pair of on one CentOS half dozen node.
- I’ll be engaging from a Liquid net Core Managed CentOS half dozen.4 server, and I’ll be logged in as root.
- You may be ready to skip to Step #2 if you have already got a stable version of Java seven (preferably the Oracle/Sun JVM). Check to check if your server already has Java put in by running the subsequent command: java -version
Step 1: Download Oracle Java SE Runtime Environment 7
Head over to Oracle’s web site and find the newest version of Oracle Java SE Runtime surroundings seven.
Accept the license agreement so transfer the UNIX x64 rate installer (which as of the writing of this text is jre-7u45-linux-x64.rpm ) to your native desktop.
Transfer the file to your Liquid net server. If you wish facilitate therewith, scrutinize this article: exploitation SFTP and SCP rather than FTP
Login to the server as root, so from the directory wherever you uploaded the package run the install by exploitation the command rate -ivh , or during this case:
[pastacode lang=”apacheconf” manual=”rpm%20-ivh%20jre-7u45-linux-x64.rpm” message=”” highlight=”” provider=”manual”/]Note:
Your command are slightly completely different if you downloaded a special version of Oracle Java SE Runtime surroundings seven. merely replace jre-7u45-linux-x64.rpm with the particular computer filename.
Then install the Java Native Access (JNA) which might improve Cassandra’s memory usage:
[pastacode lang=”apacheconf” manual=”yum%20install%20jna” message=”” highlight=”” provider=”manual”/]Add a symbolic link to the Oracle Java SE Runtime Environment 7 installation so that your server uses the Oracle JRE instead of the OpenJDK JRE:
[pastacode lang=”apacheconf” manual=”alternatives%20–install%20%2Fusr%2Fbin%2Fjava%20java%20%2Fusr%2Fjava%2Fjre1.7.0_45%2Fbin%2Fjava%2020000″ message=”” highlight=”” provider=”manual”/]Note:
Your command are going to be slightly completely different if you downloaded a distinct version of Oracle Java SE Runtime surroundings seven. merely replace jre1.7.0_45 with the particular version you’ve put in.
Then use the alternatives command to verify that the Oracle Java SE Runtime surroundings seven is chosen. If not, merely opt for the acceptable choice once you run the command:
[pastacode lang=”apacheconf” manual=”alternatives%20–config%20java” message=”” highlight=”” provider=”manual”/]The results of your command should look similar to the image below:
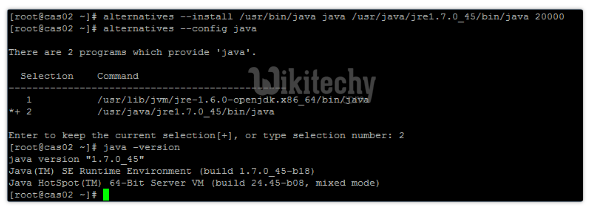
Utilize the following command to double check the correct version of Oracle Java SE Runtime Environment 7 is being used:
[pastacode lang=”apacheconf” manual=”java%20-version” message=”” highlight=”” provider=”manual”/]Step 2: Add the DataStax Community Repository
For a refresher on editing files with vim see: Overview of the Vim Text Editor
[pastacode lang=”apacheconf” manual=”vim%20%2Fetc%2Fyum.repos.d%2Fdatastax.repo” message=”” highlight=”” provider=”manual”/]Add the following information to the file you’ve created, using i to insert:
[pastacode lang=”apacheconf” manual=”%5Bdatastax%5D%20name%20%3D%20DataStax%20Repo%20for%20Apache%20Cassandra%0Abaseurl%20%3D%20http%3A%2F%2Frpm.datastax.com%2Fcommunity%0Aenabled%20%3D%201%0Agpgcheck%20%3D%200″ message=”” highlight=”” provider=”manual”/]Then exit and save the file with the command :wq (see the example below):

Step 3: Install Apache Cassandra 2
At this point, installing Cassandra is as simple as running just one command:
[pastacode lang=”apacheconf” manual=”yum%20install%20dsc20″ message=”” highlight=”” provider=”manual”/]Step 4: configure the Apache cassandra 2 environment
Just 2 additional simple environment tweaks that enable cassandra to run correctly:
[pastacode lang=”apacheconf” manual=”export%20JAVA_HOME%3D%2Fusr%2Fjava%2Fjre1.7.0_45%2F%0Aexport%20PATH%3D%24PATH%3A%2Fusr%2Fjava%2Fjre1.7.0_45%2Fbin%2F” message=”” highlight=”” provider=”manual”/]Note:
Your commands are slightly completely different if you downloaded a distinct version of Oracle Java SE Runtime surroundings seven. merely replace jre1.7.0_45 with the particular version you’ve put in.
Step 5: Get Cassandra Running
Start-Up Cassandra
[pastacode lang=”apacheconf” manual=”service%20cassandra%20start” message=”” highlight=”” provider=”manual”/]Check Cassandra Service Status
[pastacode lang=”apacheconf” manual=”service%20cassandra%20status” message=”” highlight=”” provider=”manual”/]Enter the Cassandra Command Line
[pastacode lang=”apacheconf” manual=”cqlsh” message=”” highlight=”” provider=”manual”/]The cqlsh interface should look similar to the image below:

Check Cassandra Node Status
[pastacode lang=”apacheconf” manual=”nodetool%20status” message=”” highlight=”” provider=”manual”/]Shutdown Cassandra
[pastacode lang=”apacheconf” manual=”service%20cassandra%20stop” message=”” highlight=”” provider=”manual”/]

