Now it is available for download the latest version of unofficial TWRP for Asus ZenFone 3. You can download the recovery from here and flash it through fastboot. Now, we explain the simple method to Root and Install TWRP Recovery on Asus ZenFone 3. This guide is divided into three parts first part show you how to unlock bootloader of Asus ZenFone 3, second how to install TWRP on Asus ZenFone 3, and the last one how to Root Asus ZenFone 3. Follow this guide to Unlock Bootloader, Install TWRP and Root Asus ZenFone 3.
Table Of Content
If you are an Asus ZenFone 3 user, then you can simply unlock bootloader, root and Install TWRP Recovery on Asus ZenFone 3. And if you already install a custom recovery on Asus ZenFone 3 then you can flash the latest version of the TWRP recovery to get more impressive benefits. So here is the step by step guide to Unlock Bootloader, Install TWRP and Root Asus ZenFone 3. Read the below note carefully before you Install TWRP on Asus ZenFone 3. Also, check the benefits of rooting from below.
Some benefits of Rooting –
- You can install custom ROM and custom kernel on your device for faster and better performance.
- Block Ads in apps with the help of ad blocker.
- Automatically, it will Increase the performance and battery life by killing background process.
- To restore all of your apps and data, You need to use Titanium Backup.
- You can uninstall bloatware (Pre-installed Apps)
Note:-
- Rooting will invalid your phone warranty, and you won’t get it back.
- Follow these steps carefully otherwise you may crash your device. We are not liable for any harm of your device.
- It will wipe all your personal data including data of internal storage, so we recommend you first to take a full backup of your phone and then proceed.
- Make sure that your device has at least 50-60% charged to avoid the unexcepted shutdown in-between the process.
Files required to Unlock Bootloader, Root and Install Custom Recovery on Asus ZenFone 3
- Download ADB and fastboot driver for windows or ADB and Fastboot for Mac and install it on your PC. This will also install your device driver.
- All-in-one Master zip for Asus Zenfone 3 (unlock App+driver+adb+fastboot+twrp+SuperSU.zip) – Download
How to Unlock Bootloader, Install TWRP and Root Asus ZenFone 3
How to Unlock Bootloader of Asus ZenFone 3
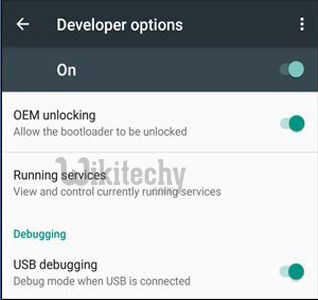
1) First, enable USB debugging and OEM Unlock from setting>developer option>. To enable Developer Options, go to About phone and tap the Build Number 7 times.
2) First, download Master zip from above and Unzip the file
3) Now boot your Asus Zenfone 3 into bootloader mode by turn the phone off and then press and hold Volume Up + Power buttons.
4) Now double click on the below files according to your model number to unlock Asus Zenfone 3 bootloader.
0.unlock_ze520kl.bat (for ZE520KL)

0.unlock_ze552kl.bat (for ZE552KL)
5) If the above bat file not work, then follow below commands to unlock it manually
fastboot flash all unlock_ze520kl.raw (for ZE520KL)
OR
fastboot flash all unlock_ze552kl.raw (for ZE552KL)

fastboot reboot bootloader

fastboot oem unlock-go
[ad type=”banner”]
How to Install TWRP on Asus ZenFone 3 :
- First enable USB debugging and OEM Unlock from setting>developer option>. To enable Developer Options, go to About phone and tap the Build Number 7 times.
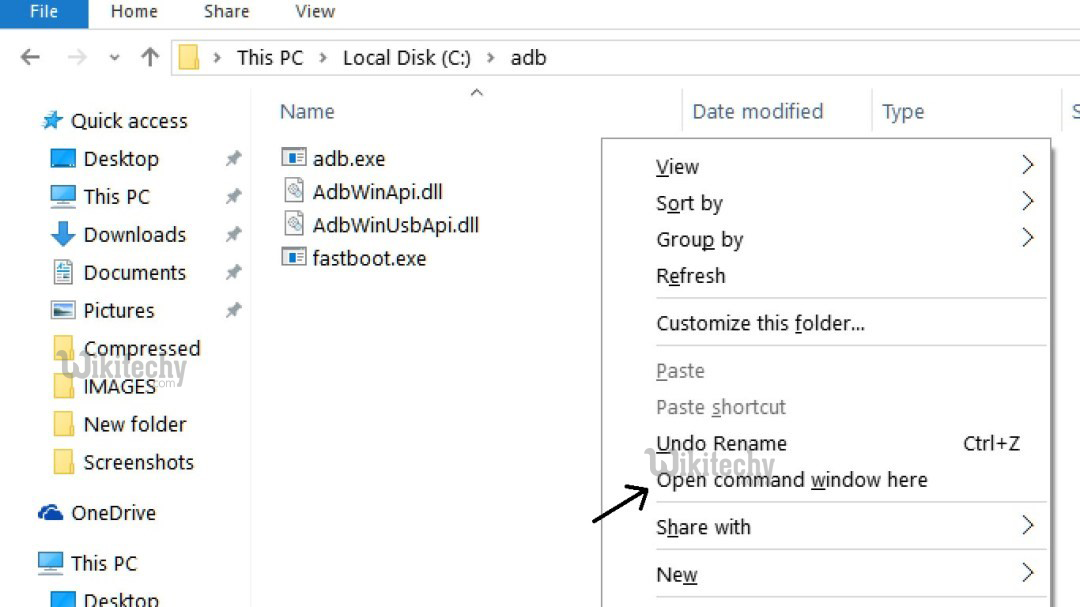
- Now go to installation directory open ADB folder and open the command window thereby pressing and hold the ‘shift’ key and right-clicked anywhere in that folder.
- Now connect your phone to PC and reboot the device into fastboot mode by typing.
adb reboot bootloader
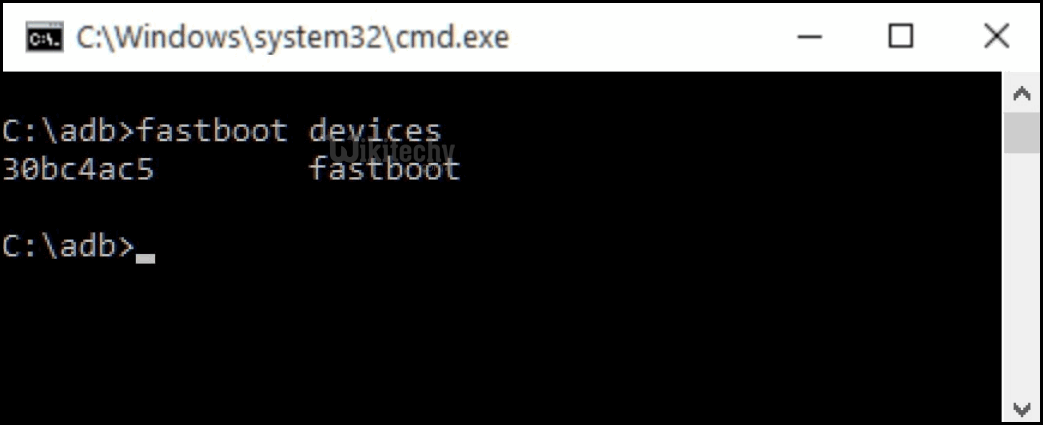
- You are in Fastboot mode now to check your connection by entering below command in command prompt. It will return your device serial number means your device properly connected. Check your driver if the above command is not responding.
fastboot devices
- Type the below command correctly in command prompt and then press enter. It starts flashing recovery on your phone.
fastboot flash recovery recovery.img
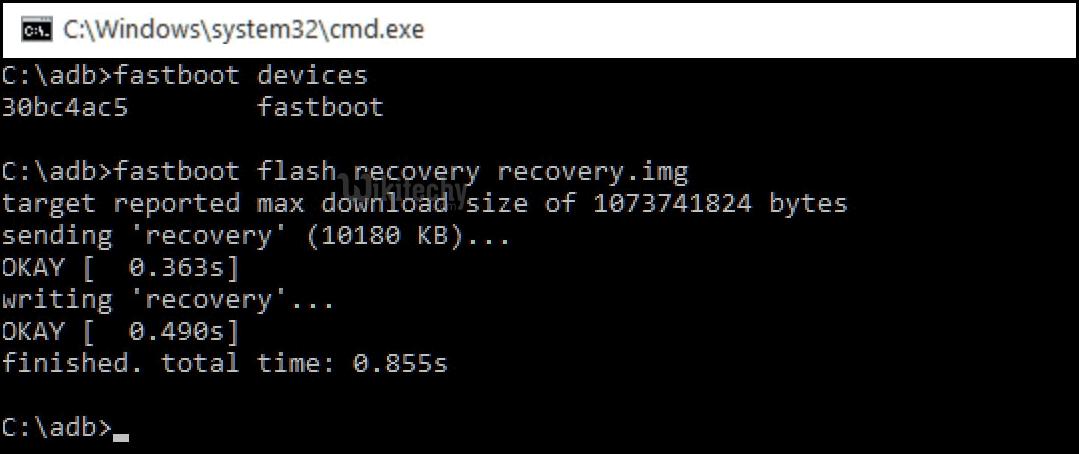
6) With above command, you installed the custom recovery on Asus ZenFone 3.
Root Asus ZenFone 3 :
- To Root Asus ZenFone 3, first, download the SuperSu zip file from above.
- Now save the SuperSu zip file to your phone.
- Boot your device into Recovery mode (TWRP) by pressing ‘Volume Up + Power‘ button.
- In TWRP recovery navigate to Install Zip and select ‘SuperSu.zip’ to Root Asus ZenFone 3.
- Swipe to install SuperSu and reboot your device.
- Or you can use the following command to push .supersu file into /data

wow
Great..I loved it
nice article