- We deliberate here to Root Galaxy S7 and Install TWRP Recovery on Galaxy S7 (G930F variant).
- Galaxy S7 and S7 Edge was recently launched by Samsung at MWC16. Galaxy S7 sports a 1-inch display. The phone powered by a powerful Octa Core Snapdragon 820 or Exynos 8890 and Adreno 530 GPU with 4GB RAM and 32/64 GB internal memory.
- Galaxy s7 has a 12MP rear-facing sensor with an aperture of f/1.7 and 5 MP Front facing camera. The phone runs on Android 6.0 and has IP67 (dustproof and water resistant), 3D touch technology and Always-on display.
- The phone is new one, So the developers still find a way to install TWRP 3.0.0 Recovery on Galaxy S7 (SM-G930F Exynos variant) and Root Galaxy S7.
- TWRP recovery got updated with material designed to TWRP 3.0.0. So,now we get the latest TWRP 3.0.0 on Galaxy S7. XDA Developer jcadduono recently posted the official builds of TWRP 3.0.0 for Galaxy S7 G930F.
- By this guide, we will help you to Root Galaxy S7 and Install TWRP Recovery on Galaxy S7. But before we explain to root Galaxy S7 and install custom recovery on S7, you can check why you should root your device.
Some benefits of Rooting :
- For faster and better performance you want to install custom ROM and custom kernel on your device.
- Block Ads in apps with the help of ad blocker.
- Increase performance and battery life by killing background process automatically.
- After Installation of TWRP Recovery and Root Galaxy S7 Edge, you can install Xposed Framework to customize your device.
- For restore all your apps and data use Titanium Backup.
Note:
Table Of Content
- Installing Custom Recovery on Galaxy S7 Edge will trip the Knox warranty bit on your phone.
- It will void your phone warranty, and you won’t claim it back.
- This method is only for the International SM-G935F/FD/X, and Canadian SM-G935W8 Exynos Edge models only don’t try it on any other model.
- Follow the steps correctly otherwise you may brick your device. We are not responsible for any damage of your phone.
- It will erase all your personal data including data of internal storage, so we advise you first to take a complete backup of your phone and then proceed.
- Ensure that your phone has at least 50-60% charged to prevent the accidental shutdown in-between the process.
Files required to Install TWRP Recovery and Root Galaxy S7 :
- Download Latest Odin Tool on your PC.
- Download and install Samsung Galaxy S7 and S7 Edge USB Drivers.
- Download Official TWRP Recovery for Galaxy S7 Edge.
- Download dm-verity and force encryption disabler. This will install a kernel that has dm-verity disabled in the fstab.
- Download SuperSu to root Galaxy S7 Edge and copy it to your phone sd card.
Steps to Root Galaxy S7 and Install TWRP Recovery (SM-G930F) :
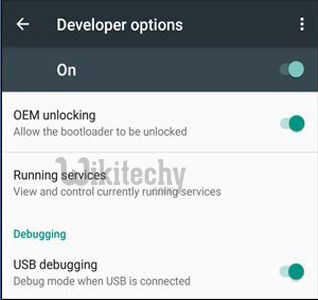
- First enable USB debugging from setting>developer option>. To enable Developer Options, go to About phone and tap the Build Number 7 times.
- Now download the SuperSU and dm-verity and force encryption disabler files from above and copy it on your device storage.
- Now Download the Odin tool from above and extract the zip file.
- Run the 10.7.exe file on your PC.
- Connect your Galaxy S7 to your PC with the data cable and reboot into the Download/Odin mode.
- To enter into download mode turn off your phone and press and hold the ‘Home + Volume Down + Power’ buttons together until you see the download mode screen.
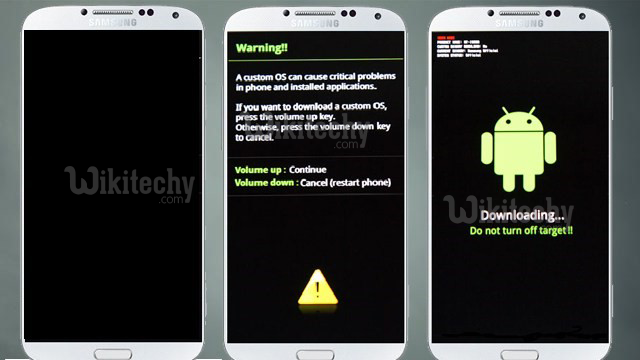
- Once you enter into Download mode, you see an ID: COM port turned blue and Added message in Odin message box means your device has recognized by Odin.

- If ID: COM doesn’t show means your driver is not correctly installed or try it with different USB cable.
- Now locate and add the twrp-3.0.0-1-hero2lte.tar.md5 file (you downloaded from above) to the AP/PDA tab in Odin.

- Make sure that only these two options are tick “Auto Reboot” and “Reset Time“
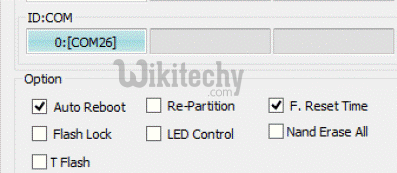
- Now click ‘Start‘ button and it will start flashing the file. Wait until you see ‘Pass‘ in Green Color on Odin screen. This step will install TWRP 3.0.0 recovery on Galaxy S7.

- Now boot your device into the recovery mode by pressing and holding ‘Home + Volume Up + Power‘ buttons for few seconds.
- You are in TWRP recovery of Galaxy S7. Now take Nandroid Backup and do a Factory Reset.
- In TWRP recovery navigate to Install Zip and select dm-verity and force encryption disabler.
- Now swipe to Flash the above file and reboot your device.
- Now reboot your device into recovery mode again.
- Now in TWRP recovery navigate to Install Zip and select the zip file to root Galaxy S7.
- Swipe to install SuperSu and reboot your device.
- So this is the complete guide to Root Galaxy S7 and Install TWRP Recovery on Galaxy S7 (SM-G93F) in easy steps.
nice
Interesting
learnt to root s7