Now we are goind to discuss about How to Root your Samsung Galaxy J7 [SM-J700P]. Virgin and Boost Galaxy J7 are now can be rooted by CF Auto Root, which is the most reliable rooting method from Chainfire. CF Auto Root will be root your Samsung Galaxy J7 within minutes. Recently Marshmallow update for Samsung Galaxy J7 spread out for several version of Galaxy J7. So finally, CF Auto Root is available for Boost and Virgin Galaxy J7. This article will guide you to easily Root Boost/Virgin Samsung Galaxy J7 SM-J700P With CF Auto Root On Marshmallow.
Table Of Content
Now we are going to discuss a method to Root Galaxy J7 with CF Auto Root. Before that we explain you how to Root Samsung Galaxy J7, and why you should root your device.
Some benefits of Rooting –
- To attain fast and better performance in your Samsung Galaxy J7, you can install custom ROM and custom kernel.
- Block Ads in apps with the help of ad blocker.
- Background process killing will increase performance and battery life.
- After you Root your Samsung Galaxy J7, you can install Xposed Framework to customize your device.
- You can use Titanium Backup to restore all of your apps and data.
- You can uninstall bloatware (Pre-installed Apps)
Note:-
- Don’t try this on other variants, because this method only works on Samsung Galaxy J7 SM-J700P.
- Rooting your Samsung Galaxy J7 SM-J700P will void your phone warranty, and you won’t claim it back.
- Follow the steps carefully otherwise you may crash your device. We are not liable for any damage to your device.
- It will wipe all your personal data including data of internal storage, so we advise you first to take a complete backup of your phoneand then proceed.
- Make sure that your phone has at least 50-60% charged to avoid the unexpected shutdown in-between the process.
Files required to Root Boost/Virgin Samsung Galaxy J7
- DownloadLatest Odin Tool on your PC.
- Download and installSamsung Galaxy USB Drivers.
- DownloadCF Auto Root for Samsung Galaxy J7
Steps to Root Samsung Galaxy J7 SM-J700P –
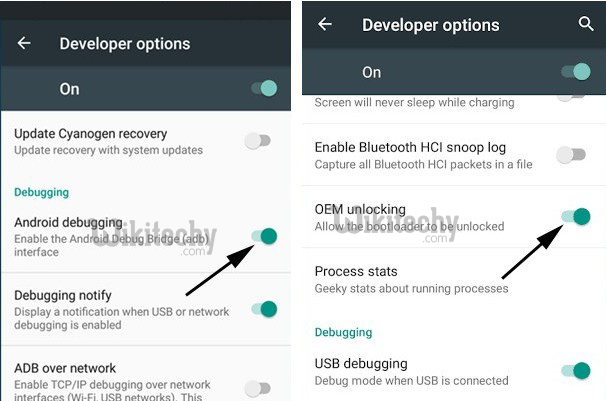
- First, enable ‘USB debugging’ and ‘OEM Unlock’ option from setting>developer option>. To enable Developer Options, go to About phone and tap the Build Number 7 times.
2) Now Download the CF Auto Root file for your device and extract it.
3) Now Download the Odin tool from above and extract the zip file.
4) Run the Odin_v3.10.7.exe file on your PC.
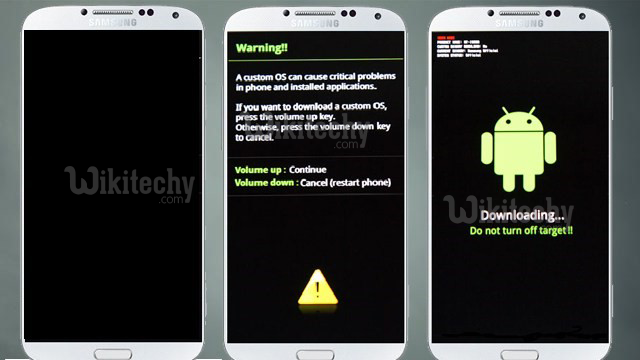
5) Connect your phone to your PC with the data cable and reboot into the Download/Odin mode.
6) To enter into download mode turn off your phone and press and hold the ‘Home + Volume Down + Power’ buttons together until you see the download mode screen.
7) Once you enter into Download mode, you see an ID: COM port turned blue and Added message in Odin message box means your device has recognized by Odin.
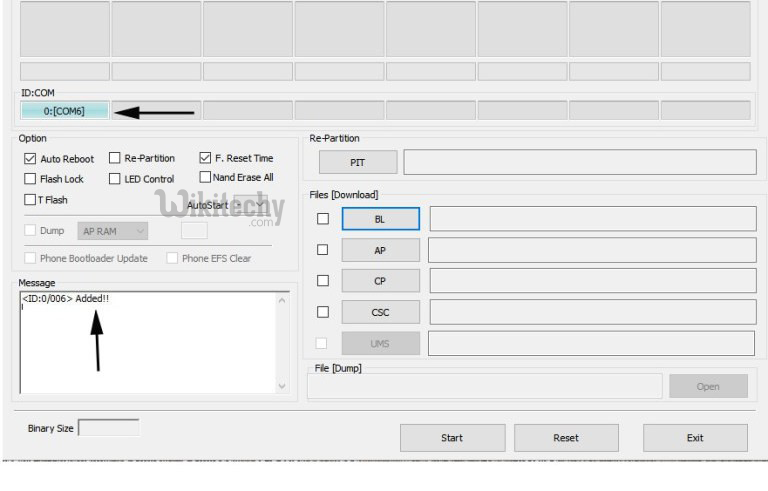 8) If ID: COM doesn’t show means your driver is not correctly installed or try it with different USB cable.
9) Now locate and add the CF_Auto_root_xxx .tar to the AP/PDAtab in Odin.

10) Make sure that only these two options are tick “Auto Reboot” and “F.Reset Time“
[ad type=”banner”]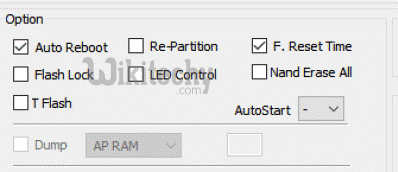
11) Now click ‘Start‘ button and it will start flashing the file. Wait until you see ‘Pass‘ in Green Color on Odin screen. The above step will reboot your device and Root Samsung Galaxy J7 With CF Auto Root.

So this is the complete guide to Root Samsung Galaxy J7 With CF Auto Root easily.

good work the article is very interesting
Super