android tutorial - Hello World Espresso Example | Developer android - android app development - android studio - android app developement
Hello World Espresso Example
- This is a tutorial to create a hello world example: Used for this example: Android Studio 2.3;
- To Start use Android Studio to create a new Project with an empty activity. Then we add some simple functionality to the App that we can test: We add a button which when clicks displays "Hello World" in a textview.
- The activity code looks like this:
package com.example.testing.helloworld;

import android.os.Bundle;
import android.support.v7.app.AppCompatActivity;
import android.view.View;
import android.widget.TextView;

public class MainActivity extends AppCompatActivity {

    @Override
    protected void onCreate(Bundle savedInstanceState) {
        super.onCreate(savedInstanceState);
        setContentView(R.layout.activity_main);

        final TextView textView = (TextView) findViewById(R.id.textView);

        findViewById(R.id.button).setOnClickListener(new View.OnClickListener() {
            @Override
            public void onClick(View v) {
                textView.setText("Hello World!");
            }
        });
    }
}
click below button to copy code from our android learning website - android tutorial - team
And the
activity_mainclick below button to copy code from our android learning website - android tutorial - team
layout for this activity looks like this:
<?xml version="1.0" encoding="utf-8"?>
<LinearLayout xmlns:android="http://schemas.android.com/apk/res/android"
    android:layout_width="match_parent"
    android:layout_height="match_parent"
    android:orientation="vertical">

    <TextView
        android:id="@+id/textView"
        android:layout_width="wrap_content"
        android:layout_height="wrap_content"
        android:text="" />

    <Button
        android:id="@+id/button"
        android:layout_width="wrap_content"
        android:layout_height="wrap_content"
        android:text="Say Hello" />
</LinearLayout>
click below button to copy code from our android learning website - android tutorial - team
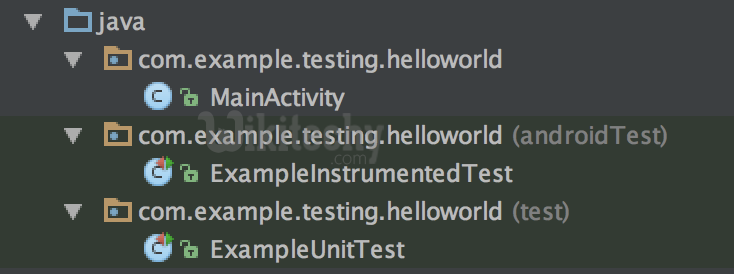
Now we want to test the behaviour of this new created app by using espresso. Generally the code for your app itself is within the main package, Unit Tests are inside test and the espresso instrumentation tests are inside the androidTest package. If you create a new empty activity project with Android Studio, it should already have created those packages and classes and it should look like this:
Learn - tutorial - learn android - android tutorial - android testing - mobile app developement - android code - android programming - android download - android examples - examples - programs
To start with espresso we have to make sure that the espresso-core dependency is included in the build.gradle file (note that it is not annotated with the compile keyword but instead with androidTestCompile). The dependencies in the build.gradle file created by Android studio should look like this:
dependencies {
    compile fileTree(dir: 'libs', include: ['*.jar'])
    androidTestCompile('com.android.support.test.espresso:espresso-core:2.2.2', {
        exclude group: 'com.android.support', module: 'support-annotations'
    })
    compile 'com.android.support:appcompat-v7:25.2.0'
    compile 'com.android.support.constraint:constraint-layout:1.0.2'
    testCompile 'junit:junit:4.12'
}
click below button to copy code from our android learning website - android tutorial - team
Now that all is set up we can start with the actual test: Open the ExampleInstrumentationTest file and you see that there is already one generated useAppContext test inside. We will change this test class and create a test to check our app behaviour:
@RunWith(AndroidJUnit4.class)
public class ExampleInstrumentedTest {

    @Rule
    public ActivityTestRule<MainActivity> mActivityRule = new ActivityTestRule<>(
        MainActivity.class, false, true);

    @Test
    public void checkHelloWorld() throws Exception {
        onView(withId(R.id.textView)).check(matches(withText("")));
        onView(withId(R.id.button)).perform(click());
        onView(withId(R.id.textView)).check(matches(withText("Hello World!")));
    }
}
click below button to copy code from our android learning website - android tutorial - team
Start the test by running the ExampleInstrumentedTest class. This test then does three things:
- It checks if the textview contains an empty string ("")
- It clicks the button in our layout
- It again checks the text of the textview if it contains "Hello World!"
The ActivityTestRule at the top defines which activity is tested and launches it at the beginning of the test. (You can also turn of the automatic launch of an activity and instead launch it inside each test manually) The test rules are quite simple:
- onView(withId(R.id.textView)) looks up a view inside the current screen by the ID of the view inside our activity_main layout file.
- .check(matches(withText(""))); then performs a test case on that view.
- .perform(click()) performs an action on a view: This actions could be clicks, long clicks or swipes or some more.