Android tutorial - Listview in android | Android ListView example - android app development - android studio - android development tutorial
Learn android - android tutorial - Listview in android - android examples - android programs
Android ListView:
- Android ListView is a view which groups several items and display them in vertical scrollable list.
- The list items are automatically inserted to the list using an Adapter that pulls content from a source such as an array or database.
- In Android, ListView let you arranges components in a vertical scrollable list. In this tutorial, we will show you 2 ListView examples :
- Normal way to display components in ListView.
- Custom array adapter to customize the item display in ListView.
- P.S This project is developed in Eclipse 3.7, and tested with Android 2.3.3.
1. Normal ListView example: 1. Normal ListView example:
- In this example, we show you how to display a list of fruit name via ListView, it should be easy and self-explanatory.
1.1 Android Layout file
- File : res/layout/list_fruit.xml
<?xml version="1.0" encoding="utf-8"?>
<TextView xmlns:android="http://schemas.android.com/apk/res/android"
    android:layout_width="fill_parent"
    android:layout_height="fill_parent"
    android:padding="10dp"
    android:textSize="20sp" >
</TextView>
click below button to copy the code from android tutorial team
1.2 ListView
package com.wikitechy.android;

import android.app.ListActivity;
import android.os.Bundle;
import android.view.View;
import android.widget.AdapterView;
import android.widget.ArrayAdapter;
import android.widget.ListView;
import android.widget.TextView;
import android.widget.Toast;
import android.widget.AdapterView.OnItemClickListener;

public class ListFruitActivity extends ListActivity {

	static final String[] FRUITS = new String[] { "Apple", "Avocado", "Banana",
			"Blueberry", "Coconut", "Durian", "Guava", "Kiwifruit",
			"Jackfruit", "Mango", "Olive", "Pear", "Sugar-apple" };

	@Override
	public void onCreate(Bundle savedInstanceState) {
		super.onCreate(savedInstanceState);

		// no more this
		// setContentView(R.layout.list_fruit);

		setListAdapter(new ArrayAdapter<String>(this, R.layout.list_fruit,FRUITS));

		ListView listView = getListView();
		listView.setTextFilterEnabled(true);

		listView.setOnItemClickListener(new OnItemClickListener() {
			public void onItemClick(AdapterView<?> parent, View view,
					int position, long id) {
			    // When clicked, show a toast with the TextView text
			    Toast.makeText(getApplicationContext(),
				((TextView) view).getText(), Toast.LENGTH_SHORT).show();
			}
		});

	}

}
click below button to copy the code from android tutorial team
1.3 Demo - android emulator - android tutorial

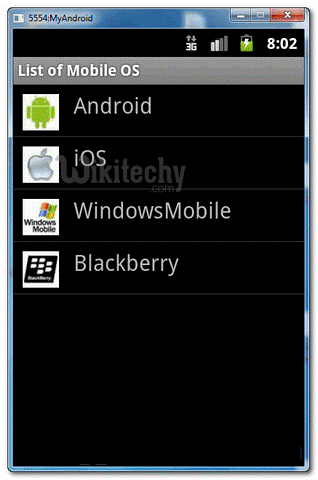
2. Custom ArrayAdapter example:
- In this example, we show you how to create 4 items in the ListView, and use a custom “ArrayAdapter” to display different images base on the “item name” in the list.
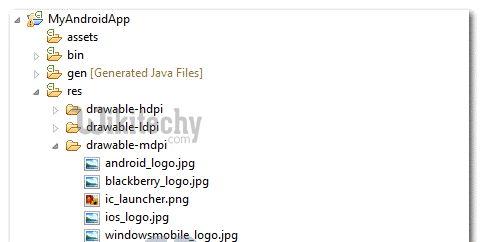
2.1 Images
- Get 4 images for Demo - android emulator - android tutorialnstration.
2.2 Android Layout file
- File : res/layout/list_mobile.xml
<?xml version="1.0" encoding="utf-8"?>
<LinearLayout xmlns:android="http://schemas.android.com/apk/res/android"
    android:layout_width="wrap_content"
    android:layout_height="wrap_content"
    android:padding="5dp" >

    <ImageView
        android:id="@+id/logo"
        android:layout_width="50px"
        android:layout_height="50px"
        android:layout_marginLeft="5px"
        android:layout_marginRight="20px"
        android:layout_marginTop="5px"
        android:src="@drawable/windowsmobile_logo" >
    </ImageView>

    <TextView
        android:id="@+id/label"
        android:layout_width="wrap_content"
        android:layout_height="wrap_content"
        android:text="@+id/label"
        android:textSize="30px" >
    </TextView>

</LinearLayout>
click below button to copy the code from android tutorial team
2.3 Custom ArrayAdapter
- Create a class extends ArrayAdapter and customize the item display in the getView() method.
package com.wikitechy.android.adaptor;

import com.wikitechy.android.R;

import android.content.Context;
import android.view.LayoutInflater;
import android.view.View;
import android.view.ViewGroup;
import android.widget.ArrayAdapter;
import android.widget.ImageView;
import android.widget.TextView;

public class MobileArrayAdapter extends ArrayAdapter<String> {
	private final Context context;
	private final String[] values;

	public MobileArrayAdapter(Context context, String[] values) {
		super(context, R.layout.list_mobile, values);
		this.context = context;
		this.values = values;
	}

	@Override
	public View getView(int position, View convertView, ViewGroup parent) {
		LayoutInflater inflater = (LayoutInflater) context
			.getSystemService(Context.LAYOUT_INFLATER_SERVICE);

		View rowView = inflater.inflate(R.layout.list_mobile, parent, false);
		TextView textView = (TextView) rowView.findViewById(R.id.label);
		ImageView imageView = (ImageView) rowView.findViewById(R.id.logo);
		textView.setText(values[position]);

		// Change icon based on name
		String s = values[position];

		System.out.println(s);

		if (s.equals("WindowsMobile")) {
			imageView.setImageResource(R.drawable.windowsmobile_logo);
		} else if (s.equals("iOS")) {
			imageView.setImageResource(R.drawable.ios_logo);
		} else if (s.equals("Blackberry")) {
			imageView.setImageResource(R.drawable.blackberry_logo);
		} else {
			imageView.setImageResource(R.drawable.android_logo);
		}

		return rowView;
	}
}
click below button to copy the code from android tutorial team
2.4 ListView
- ListView, but use above custom adapter to display the list.
package com.wikitechy.android;

import com.wikitechy.android.adaptor.MobileArrayAdapter;
import android.app.ListActivity;
import android.os.Bundle;
import android.widget.ListView;
import android.widget.Toast;
import android.view.View;

public class ListMobileActivity extends ListActivity {

	static final String[] MOBILE_OS =
               new String[] { "Android", "iOS", "WindowsMobile", "Blackberry"};

	@Override
	public void onCreate(Bundle savedInstanceState) {
		super.onCreate(savedInstanceState);

		setListAdapter(new MobileArrayAdapter(this, MOBILE_OS));

	}

	@Override
	protected void onListItemClick(ListView l, View v, int position, long id) {

		//get selected items
		String selectedValue = (String) getListAdapter().getItem(position);
		Toast.makeText(this, selectedValue, Toast.LENGTH_SHORT).show();

	}

}
click below button to copy the code from android tutorial team
2.5 Demo - android emulator - android tutorial