pig tutorial - apache pig tutorial - Apache Pig – Download and Installation - pig latin - apache pig - pig hadoop
How to download and install in Apache Pig ?
Method 1:
Download Apache Pig
- We need to download the latest version of Apache Pig from the following website − https://pig.apache.org/
Step 1:
- First, open the homepage of Apache Pig website. Under the category News, then click on the link release page which is shown in the screenshot which is given below:
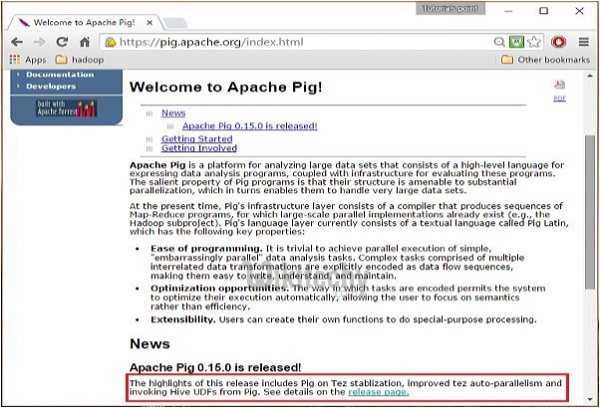
Learn apache pig - apache pig tutorial - apache pig installation home page - apache pig examples - apache pig programs
Step 2:
- On clicking the link release page we will be redirected to the Apache Pig Releases page.
- On the page Apache Pig Releases, under the Download category, we will have two links, known as, Pig 0.8 and later and Pig 0.7 and before.
- We need to click on the link Pig 0.8 and later, and then we will be redirected to the page which is having a set of mirrors.
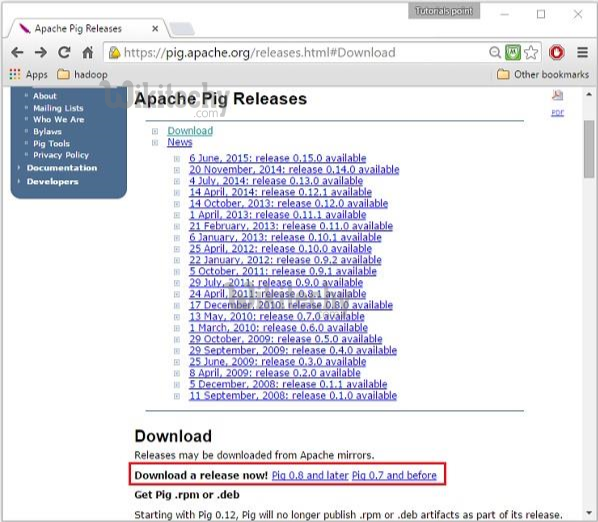
Learn apache pig - apache pig tutorial - apache pig releases - apache pig examples - apache pig programs
Step 3:
- On clicking that site, choose and click on the mirror which is given as http://www.us.Apache.org/dist/pig which is given below:
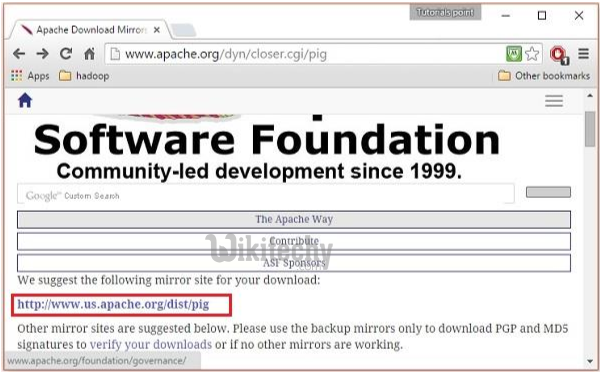
Learn apache pig - apache pig tutorial - apache pig mirror site - apache pig examples - apache pig programs
Step 4:
- The mirrors that we click on will take us to the Pig Releases page. This page contains various versions of Apache Pig. We need to click the latest version which is given among them.
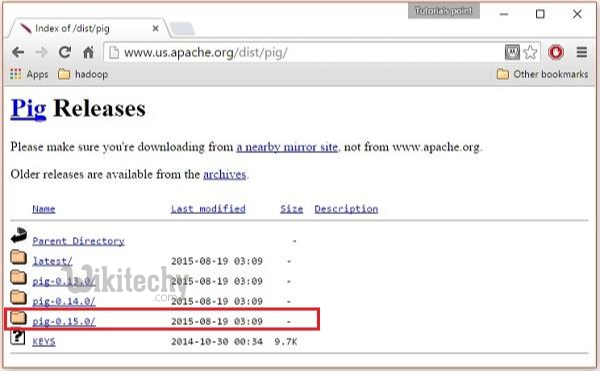
Learn apache pig - apache pig tutorial - pig releases - apache pig examples - apache pig programs
Step 5:
- Ø Within the folder which is given, we will have the source and binary files of Apache Pig in various kinds of distributions.
- Ø We need to download the tar files of the source and binary files of Apache Pig 0.15, version pig0.15.0-src.tar.gz and pig-0.15.0.tar.gz.
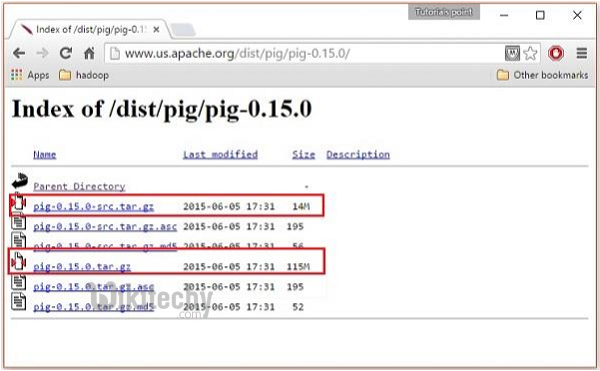
Learn apache pig - apache pig tutorial - apache pig version - apache pig examples - apache pig programs
- Hence the download for Apache Pig has been downloaded successfully and hence we can find the file in our download folder.
Method 2:
Install Apache Pig
- After downloading the Apache Pig software, we need to install it in the Linux environment.
Step 1:
- First, we need to create a directory and named it Pig in the directory where the installation directories of Hadoop, Java, and other softwares are installed.
$ mkdir Pig
Step 2:
- We need to extract the downloaded tar files as given below.
$ cd Downloads/
$ tar zxvf pig-0.15.0-src.tar.gz
$ tar zxvf pig-0.15.0.tar.gz
Step 3:
- We need to move the content of pig-0.15.0-src.tar.gz file to the Pig directory which was created earlier as given below.
$ mv pig-0.15.0-src.tar.gz/* /home/Hadoop/Pig/
- Hence we have Installed Apache Pig Successfully
Method 3:
Configure Apache Pig
- After installing Apache Pig, we need to configure Apache Pig. To configure Apache Pig, we need to edit two files which are used for the configuration of Apache Pig and they are bashrc and pig.properties.
.bashrc file
- In the .bashrc file, we need to set the following variables −
- We need to set PIG_HOME folder to the Apache Pig’s installation folder,
- We need to change PATH environment variable to the bin folder, and
- PIG_CLASSPATH environment variable to the configuration folder of the Hadoop installation.
export PIG_HOME = /home/Hadoop/Pig
export PATH  = $PATH:/home/Hadoop/pig/bin
export PIG_CLASSPATH = $HADOOP_HOME/conf
pig.properties file
- In the configuration folder of Pig, we have the file which is called pig.properties. In the file, pig.properties file, we can set various parameters which are given below.
pig -h properties
Properties:
Logging: verbose = true|false; default is false. This property is the same as -v
switch brief=true|false; default is false. This property is the same
as -b switch debug=OFF|ERROR|WARN|INFO|DEBUG; default is INFO.
This property is the same as -d switch aggregate.warning = true|false; default is true.
If true, prints count of warnings of each type rather than logging each warning.
Performance tuning: pig.cachedbag.memusage=<mem fraction>; default is 0.2 (20% of all memory).
Note that this memory is shared across all large bags used by the application.
pig.skewedjoin.reduce.memusagea=<mem fraction>; default is 0.3 (30% of all memory).
Specifies the fraction of heap available for the reducer to perform the join.
 pig.exec.nocombiner = true|false; default is false.
Only disable combiner as a temporary workaround for problems.
opt.multiquery = true|false; multiquery is on by default.
Only disable multiquery as a temporary workaround for problems.
 opt.fetch=true|false; fetch is on by default.
Scripts containing Filter, Foreach, Limit, Stream, and Union can be dumped without MR jobs.
pig.tmpfilecompression = true|false; compression is off by default.
Determines whether output of intermediate jobs is compressed.
pig.tmpfilecompression.codec = lzo|gzip; default is gzip.
Used in conjunction with pig.tmpfilecompression. Defines compression type.
pig.noSplitCombination = true|false. Split combination is on by default.
Determines if multiple small files are combined into a single map.  pig.exec.mapPartAgg = true|false. Default is false.
Determines if partial aggregation is done within map phase, before records are sent to combiner.
pig.exec.mapPartAgg.minReduction=<min aggregation factor>. Default is 10.
If the in-map partial aggregation does not reduce the output num records by this factor, it gets disabled.
Miscellaneous: exectype = mapreduce|tez|local; default is mapreduce. This property is the same as -x switch
 pig.additional.jars.uris=<comma seperated list of jars>. Used in place of register command.
 udf.import.list=<comma seperated list of imports>. Used to avoid package names in UDF.
stop.on.failure = true|false; default is false. Set to true to terminate on the first error.
 pig.datetime.default.tz=<UTC time offset>. e.g. +08:00. Default is the default timezone of the host.
Determines the timezone used to handle datetime datatype and UDFs.
Additionally, any Hadoop property can be specified.
Method 4:
Verifying the Installation
- After we have done the configuration of Apache pig, we need to verify the installation
- We can verify the installation of Apache Pig by typing the version command
- If we have successfully installed and verify the installation is successful, we will get the version of Apache Pig and compiled message which is shown below:
$ pig –version
Apache Pig version 0.15.0 (r1682971)
compiled Jun 01 2015, 11:44:35
download pig for ubuntupig installation in ubuntuinstall pig on windowspig invalid optioninstall pig on macthe program 'pig' is currently not installedinstall pig on windows 10how to install pig in centospig 0.11.1 downloadpig.jar downloaddownload pig for windowsapache hive versionpig version checkcannot locate pig-core-h2.jar. do 'ant -dhadoopversion=23 jar', and try againpig 0.15.0 jar downloadpig jar for udf download